Do you have a question about the RHINO Grind NG2000 and is the answer not in the manual?
Inquire about current revisions and other documentation or assistance with Trade Fixtures products.
Proprietary information may not be reproduced without permission.
Recycle responsibly to promote sustainable reuse of material resources.
Instructions for customers using the grinder to dispense nut butter for purchase.
Explanation of warning symbols used to prevent injury and material damage.
Guidelines for grounding, extension cords, and GFCI usage.
Information on warranty service and risks of third-party modifications.
General advice on reading safety messages and maintaining the unit.
Safety requirements for trained and certified electrical personnel servicing the equipment.
Instructions for upright shipping, carrying, storing, and handling to prevent damage.
Steps for interrupting power during emergencies and resuming normal operation.
Instructions for securing the anti-tip device to wooden, metal, or granite surfaces.
Details on model numbers, voltage, current draw, and recommended circuit.
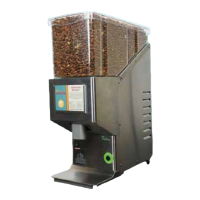
Diagram showing the physical measurements and key features of the grinder.
Explanation of safety switches that prevent operation when the hopper or merchandiser is removed.
Step-by-step guide for detaching and reattaching the hopper and front merchandiser for cleaning.
Description of the label holder on the front of the grinder and its dimensions.
Information on ordering nutritional labels from Trade Labels.
Instructions for unpacking, inspecting for damage, and installing the unit.
Procedure for filling the hopper with nut meat.
List of recommended nuts, precautions, and notes on processing difficulties.
Chart detailing nut types, grindability (whole, halves, pieces), and notes.
Recommendations on dry roasting, oil content, and limitations for certain nuts and seeds.
Explanation of cleaning procedures based on FDA and health department regulations.
Information on NSF certification for sanitation and food safety.
Information on UL certification for electrical and flammability safety.
Instructions for daily cleaning of the grinder's exterior cabinet and accessible parts.
Guidance on cleaning internal food contact components, recommended before refilling the hopper.
Essential safety steps before disassembling or cleaning the unit.
Step-by-step instructions for removing the hopper, merchandiser, and grinding components.
Instructions for removing the grinding wheel, housing, and retaining ring.
Procedure for removing the grinding plate, noting the alignment notch.
Detailed steps for cleaning the grinding housing, duckbill valve, and other parts with soapy water and sanitizer.
Steps for reassembling the unit after cleaning, including hopper installation and power connection.
Troubleshooting error indications on the start/stop button and push button issues.
Procedure for interrupting power during emergencies and resuming normal operation.
Solutions for dry residue clogging the duckbill valve, preventing product flow.
Addressing thin nut butter paste that may syphon product out of the cover.
Solutions for product bridging in the hopper, causing the grinder to run dry.
Steps to loosen and remove a tight grinding cover for cleaning and reassembly.
Instructions for accessing and identifying the toggle switches for timer configuration.
Table showing switch settings for various predetermined run times and functions.
Instructions for changing the grind texture from Fine (Smooth) to Coarse.
Detailed steps for removing parts, adjusting screws, and rotating the plate for coarse grind.
Details the one-year warranty period, coverage, and exclusions for parts.
States warranty is exclusive, limitations on modifications, and buyer's remedy.