26
- Any external circuits connected to the outputs of the control board, must be carried out to
make sure the double or reinforced insulation is used compared to parts with hazardous
voltage.
- All the inputs are run by a programmed integrated circuit which carries out an auto-test at
every start-up operation.
MAINTENANCE CHECK
N.B.: During this check the safety functions Edges, Photocells, Stop button and Impact
detection are NOT active.
1 - Set DIP 1 to ON => LED DL1 starts to flash.
2 - Press and hold the PROG button (the command is hold-to-run, open-stop-close-stop-
open-etc ...) => The gate starts at high speed and then slow down until the limit switch
is reached.
3 - At the end, put DIP 1 back to the OFF position. The DL1 LED turn off signaling the exit
from the check.
If the motor does not work during this check, check the connections and its capacitor.
If the motor is working properly, check the safety devices.
TROUBLE SHOOTING
After having carried out all connections, by carefully following the layout and having positioned
the gate in intermediate position, check the correct ignition of red LEDS DL6, DL7, DL8 and
DL9.
In case of no ignition of the LEDS, always with gate in intermediate position, check the
following and replace any faulty components.
DL6 OFF Stop button malfunction (if Stop is not connected, perform
the jump between COM A+ and STOP).
DL7 or DL8 OFF Faulty photocells (In case the edge is not connected, carry
out jumper between COM A+ and PHOTO 1/PHOTO 2)
DL9 OFF Faulty safety edge (In case the edge is not connected, carry
out jumper between COM A+ and EDGE)
LED DL13 (BLUE) ON Some functions are enabled via smartphone, so via
smartphone check the card functions as the dips/trimmers status may not be true.
On the board there are resettable fuses which intervene in the event of a short circuit,
interrupting the output assigned to them.
In the event of troubleshooting, it is advisable to disconnect all the removable
connectors and insert them one at a time in order to more easily identify the cause
of the fault.
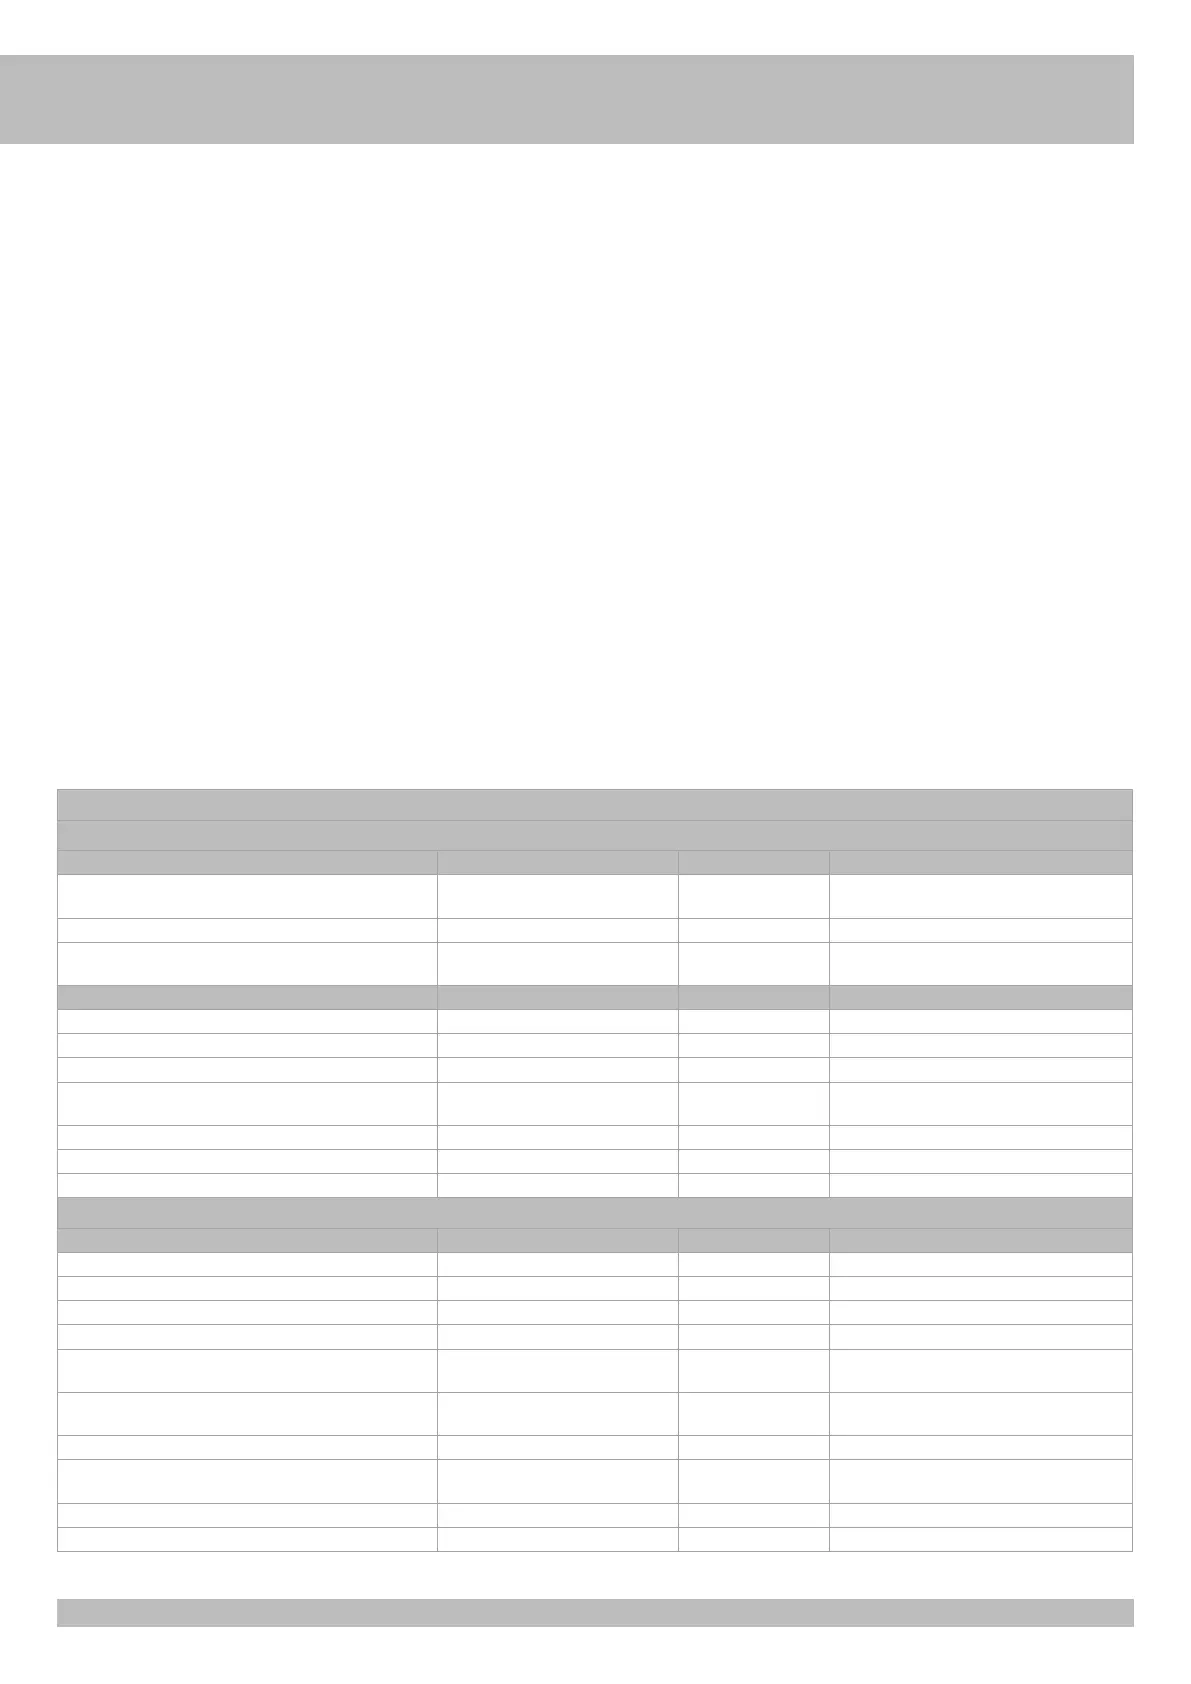
TABLE SUMMARISING VISUAL AND SOUND ALARMS
SIGNALS DURING PROGRAMMING SEQUENCE
EVENT BUZZER STATUS FLASHER STATUS DL1 LED STATUS
Dip 1 ON (hold-to-run mode)
Or failure of a safety device
Off Off Flashes on-off 250 ms
Dip 2 ON (stroke programming) Off Off Flashes on-off 500 ms
Programming sequence stopped due to intervention of a safety
device
10 seconds tone with 2 seconds pause Off On steady
EVENT BUZZER STATUS FLASHER STATUS DL12 LED STATUS
No transmitter code entered Off Off Flashes intermittently red/green
Dip 1 > 2 - transmitter code programming for full opening Off Off Flashes red for 10 seconds
Dip 1>2> 3 - transmitter code programming for R-AUX relay Off Off Flashes orange for 10 seconds
Correct transmitter codes programming for opening and R-AUX
relay
1 Tone Off Turns green once
Remote control code not present in memory Off Off Turns red once
Memory saturated by remote control codes (1000 codes saved) Off Off Runs 6 green flashes
Radio code deletion for opening and R-AUX relay 2 Tones Off Runs 2 green flashes
WARNING SIGNALS DURING OPERATION
EVENT BUZZER STATUS FLASHER STATUS LED STATUS AND SIGNAL OUTPUT
Stop button pressed Off Off Led DL6 turns off
Photocell intervention 1 Tone Off Led DL7-8 turns off
Edge intervention 2 Tones Off Led DL9 turns off
Failure of a safety device or safety device engaged for too long Off Off Led DL1 flashes on-off 250 ms
Alarm from edge 2 Tones every 5 seconds for 1 minute
(It is renewed by giving a command)
Enabled for 1 minute No led combined
Failed photocells auto-test alarm 4 Tones every 5 seconds for 1 minute
(It is renewed by giving a command)
Off No led combined
Functional block activated by smartphone Off Off Led DL12 is steady on green.
Achievement of set cycles 6 Tones every 5 seconds
(It is renewed by giving a command)
Off No leds matched
Energy saving activated by smartphone Off Off Blue led flashes once every 5 seconds
Alarm - no limit switches reached or unlocked barrier 5 Tones Enabled for 1 minute No leds matched
G
B
 Loading...