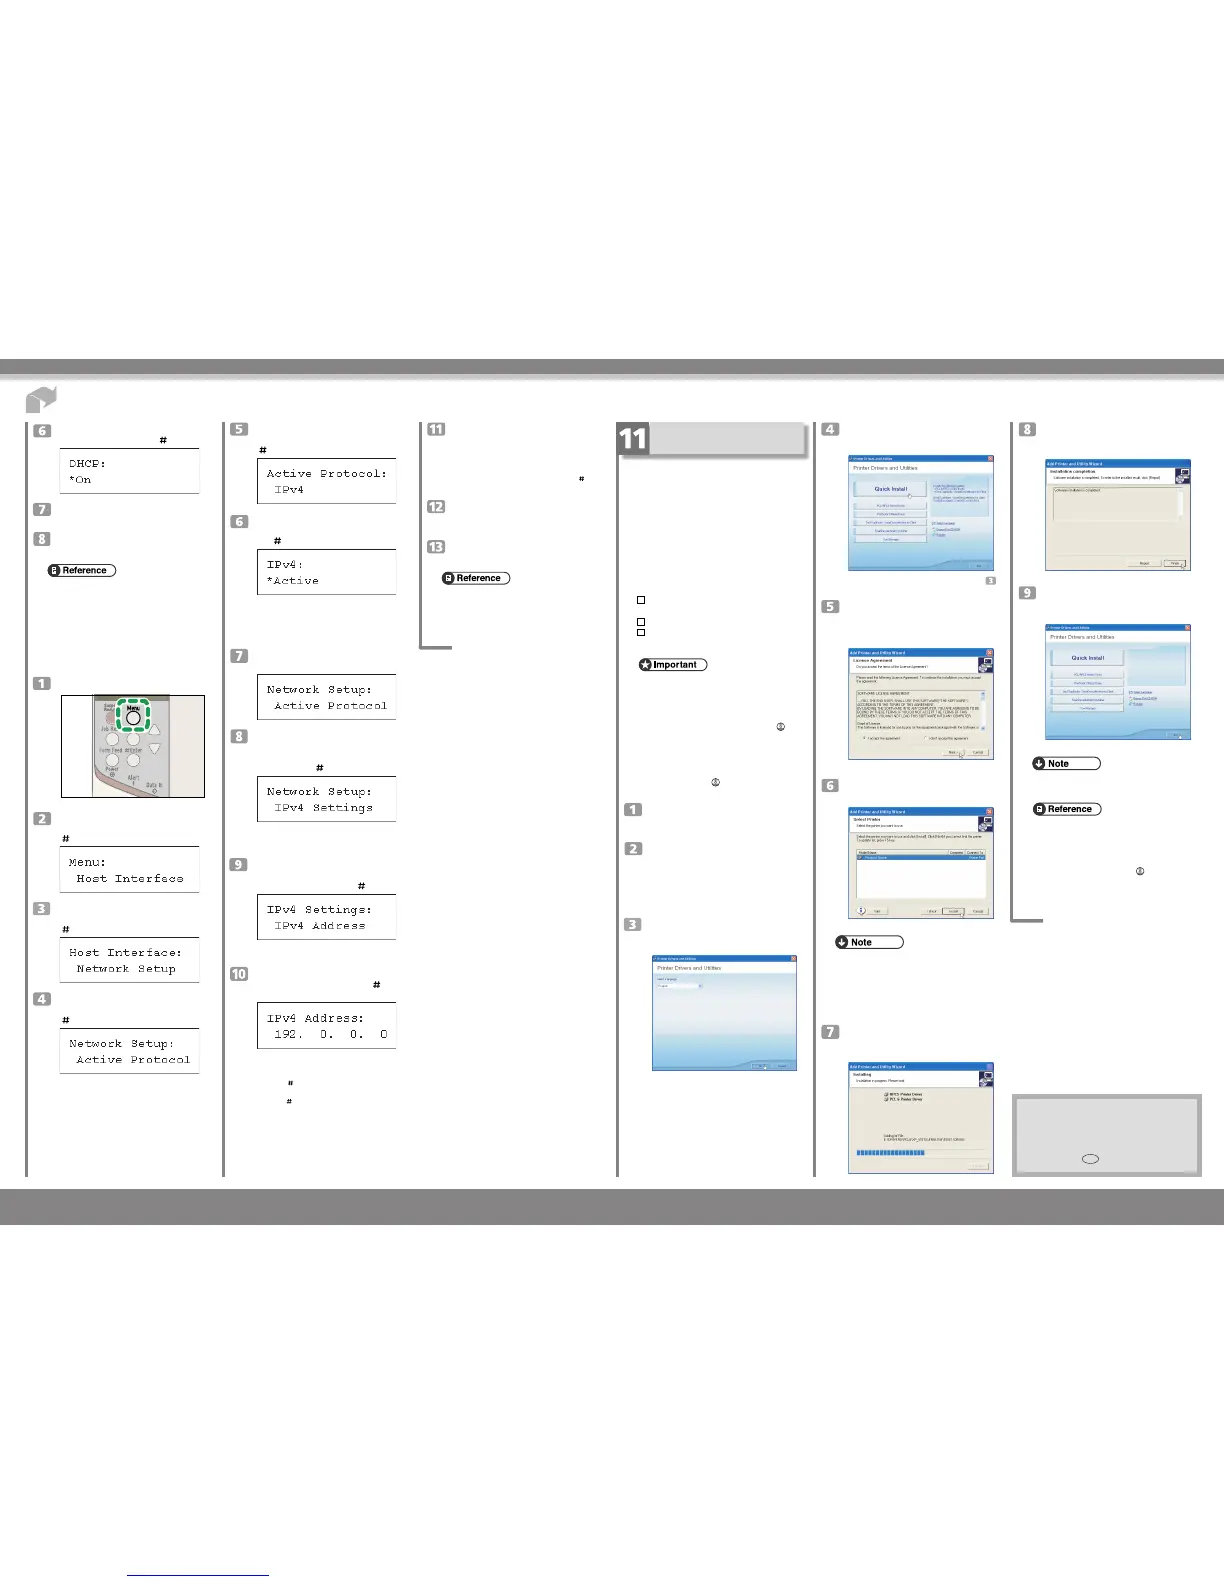
Press the
{{
{{
{▼
}}
}}
} or
{{
{{
{▲
}}
}}
} key to display
[Host Interface], and then press the
{{
{{
{
Enter
}}
}}
} key.
Press the
{{
{{
{▼
}}
}}
} or
{{
{{
{▲
}}
}}
} key to display
[Network setup], and then press the
{{
{{
{
Enter
}}
}}
} key.
Press the
{{
{{
{▼
}}
}}
} or
{{
{{
{▲
}}
}}
} key to display
[Active Protocol], and then press the
{{
{{
{
Enter
}}
}}
} key.
Press the
{{
{{
{▼
}}
}}
} or
{{
{{
{▲
}}
}}
} key to select the
network protocol, and then press the
{{
{{
{
Enter
}}
}}
} key.
Press the
{{
{{
{▼
}}
}}
} or
{{
{{
{▲
}}
}}
} key to set
[Active] or [Not Active], and then press
the
{{
{{
{
Enter
}}
}}
} key.
Set other protocols you need to set in the same way.
• Select [Not Active] for unused protocols.
• Enable IPv4 to use the Pure IPv4 environment of
NetWare 5/5.1, NetWare 6/6.5.
Press the
{{
{{
{
Escape
}}
}}
} key until the screen
returns to the [Network Setup] menu.
If your network uses IPv4, assign the
IPv4 address to the printer. Press the
{{
{{
{▼
}}
}}
}
or
{{
{{
{▲
}}
}}
} key to display [IPv4 Settings], and
then press the
{{
{{
{
Enter
}}
}}
} key.
To get the IP address for the printer, contact your
network administrator.
To specify the IPv4 Address, press the
{{
{{
{▼
}}
}}
} or
{{
{{
{▲
}}
}}
} key to display [IPv4 Ad-
dress], and then press the
{{
{{
{
Enter
}}
}}
} key.
If you use IPv4, also assign subnet mask and gate-
way address.
Press the
{{
{{
{▼
}}
}}
} or
{{
{{
{▲
}}
}}
} key to enter the
address, and then press the
{{
{{
{
Enter
}}
}}
}
key.
Press the {▼} or {▲} key to enter the left most en-
try field of the address. After entering the left field,
press the {
Enter
} key, and then you can enter the
next field. After completing to enter in the all fields,
press the {
Enter
} key.
Do not set “11.22.33.44” as the IPv4 address.
Click
[Quick Install]
.
The software license agreement appears in the [Li-
cense Agreement] dialog box.
This is an example when English is selected in step
.
After reading through all of the contents,
click
[I accept the agreement]
to agree with
the License Agreement, and then click
[Next >]
.
Select the printer model you want to
install in the “Select Printer” dialog box.
• For a network connection via TCP/IP, select the printer
whose IP address is displayed in [Connect to]. In
this case, SmartDeviceMonitor for Client will also
be installed.
• For parallel connection, select the printer whose
printer port is displayed in [Connect to].
Click
[Install]
.
The following display appears while installing the
printer driver.
Copyright © 2008
Printed in France
GB GB M001-8640
If you use IPv4, use this method of as-
signing IPv4 address to assign subnet
mask and gateway address.
Press the {▼} or {▲} key to select [Subnet mask]
or [Gateway Address], and then press the {
Enter
}
key.
Press the
{{
{{
{
Menu
}}
}}
} key to return to the ini-
tial screen.
Print a configuration page to confirm the
settings made.
• For details about printing the configuration page, see
“Printing the Test Page”.
Installing the Printer Driver
You can install the printer drivers and software easily
from the CD-ROM labeled “Printer Drivers and Utili-
ties”.
Click [Quick Install] in the window of the CD-ROM
to install PCL and RPCS printer drivers. To install the
PostScript 3 printer driver, click the [PostScript 3 Printer
Driver] button. For more information about the
PostScript 3 printer driver, see Software Guide on the
CD-ROM labeled “Manuals”.
When the TCP/IP protocol is used, SmartDevice Moni-
tor for Client will be installed as well.
When using with TCP/IP protocol, confirm the follow-
ings:
The printer is connected to the network with
Category 5 interface cable.
The TCP/IP protocol is enabled.
The IP address is set for the printer and the com-
puter.
• To install printer driver under Windows 2000/XP Pro-
fessional/Vista, or Windows Server 2003/2003 R2/
2008, you must have an account that has Manage
Printers permission. Log on as an Administrator.
• For details about installing the printer drivers, see
“Preparing for Printing”, Software Guide (
).
• When using this printer under parallel connection,
only the printer drivers are installed and not
SmartDeviceMonitor for Client.
• Quick Install is not available when using this printer
under USB connection. If you connect using USB,
see Software Guide (
).
Quit all applications currently running.
Insert the CD-ROM into the CD-ROM
drive.
The installer starts.
Auto Run may not work with the certain operating
system settings. If this happens, launch
“Setup.exe” on the CD-ROM root directory.
Select an interface language, and then click
[OK]
.
The default interface language is English.
Click
[Finish]
.
A message about restarting the computer may ap-
pear. Restart the computer to complete installation.
Click
[Exit]
in the first dialog box of the
installer, and then take out the CD-
ROM.
• To stop installation of the selected software, click
[Cancel] before installation is completed.
• Quick Install is not available for parallel connec-
tion unless bidirectional communication between
the printer and computer is enabled. For details
about bidirectional communication between the
printer and computer, see “Printing with Parallel
Connection”, Software Guide (
).
 Loading...


