2837
1
GB
KIT CONTENTS
BURNER TRANSFORMATION
➤
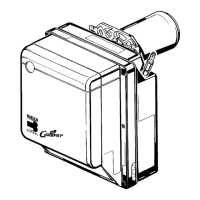
Turn the power off to the burner and remove
the cover.
➤
Remove the control box from the burner by
loosening the screw (
A
. fig. 1) and pull it in the
direction of the arrow, after disconnecting all
the components, the 7-pin plug and the earth
lead.
➤
Loosen the two screws (2, fig. 2), unscrew the
nut (3), slide out the photoelectric cell (4) and
then pull out the nozzle-holder assembly (1).
➤
Pull the cables (5) out from the electrodes,
loosen the screw (3 fig. 3) and pull the diffuser
disc-holder assembly out from the nozzle-hold-
er assembly.
➤
Choose the nozzle (7) suitable for the boiler’s
required output (consult table on page 4) and
fasten it on the nozzle-holder assembly sup-
plied in the kit.
➤
Fit the diffuser disc-holder assembly (1) as illus-
trated in Fig. 3
.
Quantity
Description
1
1
1
1
1
Control box 553SE
Nozzle-holder assembly
Specification label
Technical instructions
Screw M4x8
Fig. 2
S7745
Fig. 1
S7186
A
D5022
4.5 – 0.5 mm
0
2.5 ± 0.2 mm
3 + 0.5 mm
0
123
5
4
MEASURES MUST BE
RESPECTED
WARNING
Place the diffuser disc-holder assem-
bly (1) on the nozzle holder (2) and
fix it in place with the new screw (3).
For prospective adjustments of the
electrodes assembly (4), loosen
screw (5).
Fig. 3
 Loading...