Do you have a question about the Risco WICOMM RW232M and is the answer not in the manual?
Details on enhancing the security system with additional detectors and accessories.
Guide to using the RISCO Express Wizard for system installation.
Lists components and devices available for the Smart Hub, included or sold separately.
Using the RISCO Express Wizard for professional installation and system setup.
Entering Kit Number and 4-digit Code on the Smart Hub.
Connecting the Smart Hub via cellular or internet.
Inserting and securing the SIM card in the Smart Hub.
Plugging in the power adapter and verifying LED indicators.
Entering user registration details like name, email, and password.
Naming the system and dividing it into 'Areas'.
Identifying and configuring system detectors and accessories.
Assigning new User Codes and Master User Code.
Selecting Local Network or Mobile Connection for the system.
Confirmation of successful registration and readiness for use.
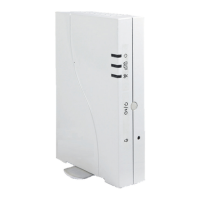
Details of the Smart Hub's front panel components and buttons.
Description of rear panel ports: Ethernet, Power Adaptor, SIM Card slot.
Explains the meaning of different colors and states of Power, Status, and Communication LEDs.
Illustrates optimal placement and spacing for the Smart Hub.
Explains signal loss caused by building materials and placement advice.
Guidance on upright placement and stable positioning of the Smart Hub.
Recommendations for mounting detectors on wood/metal frames.
Placement advice and avoiding interference for PIR detectors.
Procedure for activating the battery by removing the isolation strip.
Instructions for mounting the detector using adhesive tape.
Steps for detaching and mounting the transmitter and magnet with screws.
Procedure for activating PIR detector batteries using isolation strips.
Instructions for mounting the PIR detector using adhesive tape.
Steps for releasing screws and removing the PIR detector cover.
Using knockout holes for corner or surface mounting the bracket.
Sliding and screwing the PIR detector onto the mounting bracket.
Method for allocating additional accessories to the system.
Specific transmission procedures for allocating PIR, Door/Window, Keyfobs, etc.
Logging into the iRISCO website using email, password, and PIN code.
Configuring the system's time zone and time format via the website.
Adding or editing user codes and assigning authority levels.
Defining user roles like User, Set Only, Cleaner, and Duress.
Editing detector names (zone labels) via the Detectors menu.
Lists devices for system operation: Keyfob, Smartphone App, Keypad, Web App.
Procedure for arming the entire system when vacating premises.
Procedure for arming only parts of the system for partial security.
Dividing property into Areas and setting them individually.
How to disarm the system, including full and area unsetting.
Enabling Service Mode via LCD keypad or Web UI for battery replacement.
Steps for replacing batteries using the web interface.
Procedure to replace batteries in the door/window detector.
Procedure to replace batteries in the PIR detector.
Declaration of equipment compliance with EU Directive 2014/53/EU.
Industry Canada compliance statement and operating conditions.
FCC rules compliance for Class B digital devices, including interference guidelines.