1952B OPERATION
Fill the canister with the desired amount of spray material. Reposition the sprayer on
canister top and snap clamp so it fits tightly. Check the switch to make sure it is “off”
before plugging into a 110/120 volt AC outlet. Once operating, the discharge rate of
the sprayer may be adjusted by turning the discharge control.
Spray Adjustment: The 1952B has an adjustment range of 1.5 to 5.3 gallons/hr. Spray
direction is variable through all degrees between 35 upward to 35 downward.
Wettable Powders: The 1952B sprays wettable powders at a maximum discharge
rate of 5.3 gallons/hr. Preliminary testing is recommended to insure that desired
rate is obtainable. Shake or agitate solution periodically to keep powders in suspen-
sion.
Spray Patterns: The 1952B atomizes 95% of its output of less than 50 microns.
Average particle size is 20 microns.
After Use: To store the 1952B or change spray materials, detach the sprayer from the
canister and turn it “on” to flush out any spray material. The sprayer should be emptied
of any unused spray solution and the canister should be washed after which the unit
should be reassembled. After use with wettable powders, detach the canister,
immerse the supply tube in clear water and flush until no residue can be seen in
the supply tube. Wash the canister thoroughly.
1026B OPERATION
Fill the canister with the desired amount of spray material. Reposition the sprayer on
the canister top and snap clamp it fits tightly. Check the spray selector valve on the
tube that extends from the motor housing to the tank cover plate and set it according
to the desired spray pattern. “Heavy” setting is achieved with valve lever turned full
left (counterclockwise.) This covers the valve opening and pressurizes the canister.
Heavy setting produces a dense wetting spray ideal for application of residual or
surface type spraying. “Fine” setting is achieved by turning valve lever full right (clock-
wise.) This opens the valve and allows air not utilized in spray discharge to escape.
Fine setting produces ultra fine particles ideal for flying insect control. Check the
switch to make sure it is “off” before plugging into a 110/120 Volt AC outlet for 1026B.
1026XB, 1026BG, 1026BR and 1026BP are wired for 220 volt. Once operating, the
discharge rate may be adjusted by turning the discharge control at end of hose.
Spray Adjustment: The “fine” (unpressurized) setting has an adjustment rate of 1.5
to 3.5 gallons/hr. On “heavy” pressurized setting, the adjustment rate is 6 to 14
gallons/hr. Spray direction is variable through manipulation of the discharge hose.
Wettable Powders: Preliminary testing is recommended to insure that desired rate is
obtainable. Shake or agitate solution periodically to keep powders in suspension.
After Use: When the unit is turned “off” after spraying, siphoning action may continue
for a moment, resulting in a solid stream of spray material. To prevent this, tip the
nozzle up straight as you switch “off” the motor thus flushing spray solution remaining
in the discharge line back into canister. To store the 1952B or change spray materials,
detach the sprayer from the canister and turn it “on” to flush out any spray material. The
sprayer should be emptied of any unused spray solution and the canister should be
washed after which the unit should be reassembled. After use with wettable powders,
detach the canister, immerse the supply tube in clear water and flush until no residue
can be seen in the supply tube. Wash the canister thoroughly.
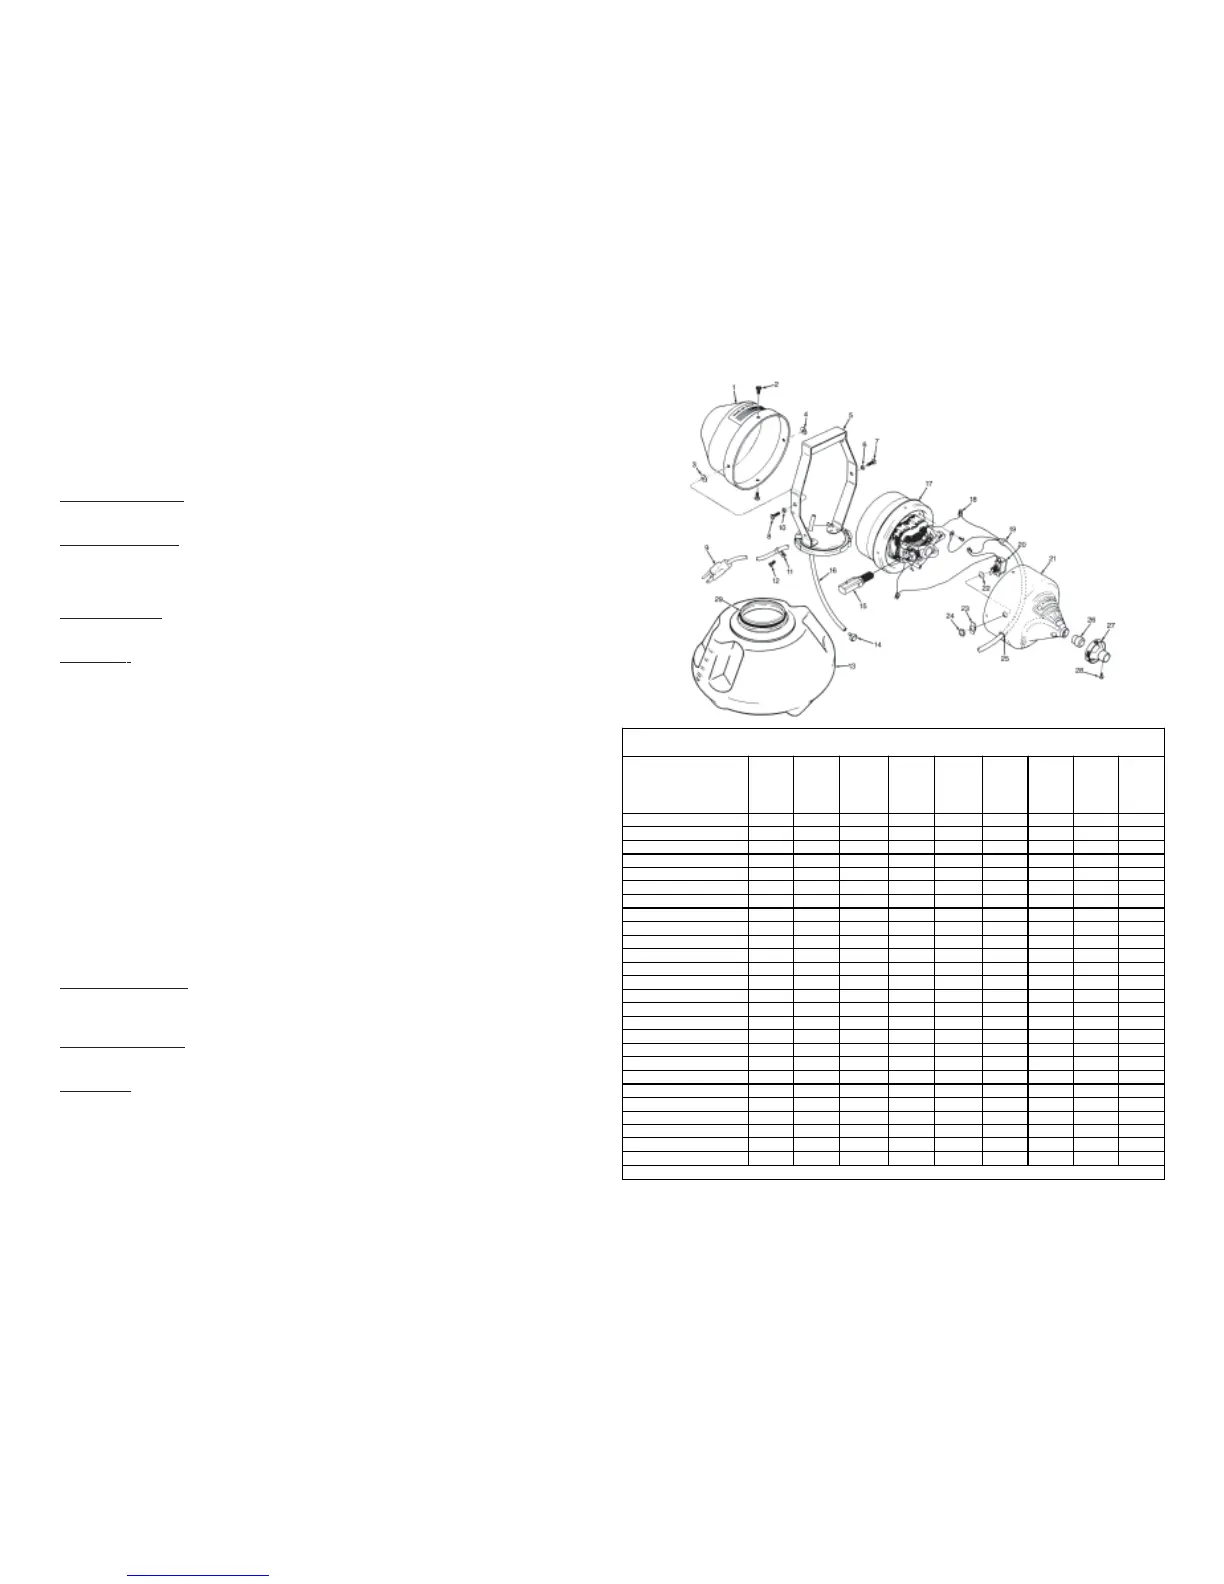
Parts List for Model 1952B
Figure Number
Description
Outlet
Kit
946-705
Switch
Kit
944-825
Motor Kit
944-850
Cord kit
(120V)
944-820
Mototr
Euro Kit
CE
944-786
Cord kit
(Euro)
948-306
Motor
Euro Kit
944-785
Frame
Kit
944-600
Misc
Parts
1. Intake Housing *
2. Screw # 10 - 9/16 * *
3 & 4. Spring Washer * *
5. Frame *
6 & 10 Shoulder bushing * *
7 & 8 Screw # 10 - 3/4 * *
9. Cord 22 inch 3 m
11. Cord Clamp * * *
12. Clamp Screw # 8 * * *
13. Canister 952-552
14. Intake Strainer *
15. Brush ** 953-500
16. Supply Tube *
17. Motor 120V 220V 220V
18. Wire Connectors * * * * *
19. Cord Stop * * *
20. Switch *
21. Outlet Housing *
22. Lock Nut *
23. Switch On/Off plate *
24. Switch Plate Nut *
25. Grommet ** * * *
26. Nozzle (Brass) *
27. Adjustment Hub *
28. Hub Screw # 4 - 1/4 *
29. Gasket 805-202
** Denotes 2 each are required
 Loading...