HOWTO: Water System Winterizing
140
© 2014 by Roadtrek, Inc.
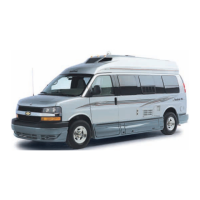
Water heater bypass valves in the
unwinterized, normal position
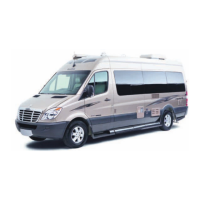
Water heater bypass valves in the bypass
position
• The water heater bypass valves are in the cabinet under the sink, on the left wall. Set the valves to the by-pass position
(see photo). The “middle valve” (the one on the horizontal water line connecting the two vertical lines) should be turned in
line with the tubing. All handles should have been pointing vertically in the normal, summer use position. Turn each handle
90 degrees to a horizontal position to achieve the bypass position.
•• Check to be sure that the fresh water drain on the exterior tank and the black and and gray tank valves are all closed.
Move the single lever galley faucet all the way to the cold side, and leave it open.
•• Add 1 1/2 gallons of non-toxic RV approved antifreeze to the interior tank, and 1/2 gallon to the exterior tank through the
gravity fill. Use a funnel and wash any spillage off the paint. Put the tank selector switch in the exterior tank position
(handle horizontal, pointed toward driver's side of vehicle).
•• Turn the water pump on and allow to prime. Close cold galley sink faucet once you see pink antifreeze coming out. Switch
the plastic covered tank selector handle to the interior tank position.
•• Move the single lever galley faucet to the hot side, and run until you see pink antifreeze come out. Open both hot and cold
faucets in the bathroom sink. Open the toilet valve. Open the hot and cold faucets on the outside shower. Leave the
outside shower valves open, or open them if you were in winter mode. Observe the antifreeze flow through all fixtures,
then close each fixture. Ensure antifreeze flows into all P-traps (galley sink, washroom sink, and shower). You may also
consider adding antifreeze from the extra gallon in the container jug to the shower floor-pan trap.