ROBERTS RADIO LIMITED
PO Box 130
Mexborough
South Yorkshire
S64 8YT
Website: http://www.robertsradio.com
© 2015, 2016 Roberts Radio Limited
Issue 1a
6
7
5
Guarantee
This product is guaranteed for twelve months from the date of purchase by the
original owner against failure due to faulty workmanship or component breakdown,
subject to the procedure stated below. Should any component or part fail during
this guarantee period it will be repaired or replaced free of charge.
The guarantee does not cover:
1. Damage resulting from incorrect use.
2. Consequential damage.
3. Product with removed or defaced serial numbers.
Procedure:
Any claim under this guarantee should be made through the dealer from whom
the product was purchased. It is likely that your Roberts dealer will be able to
attend to any defect quickly and effi ciently, but should it be necessary the dealer
will return the product to the company’s service department for attention. In the
event that it is not possible to return the product to the Roberts dealer from whom
it was purchased, please contact Roberts Radio using the contact details on the
www.robertsradio.com website.
For product repairs falling outside the guarantee period, please refer to the
“customer care” tab on the www.robertsradio.com website.
These statements do not affect the statutory rights of a consumer.
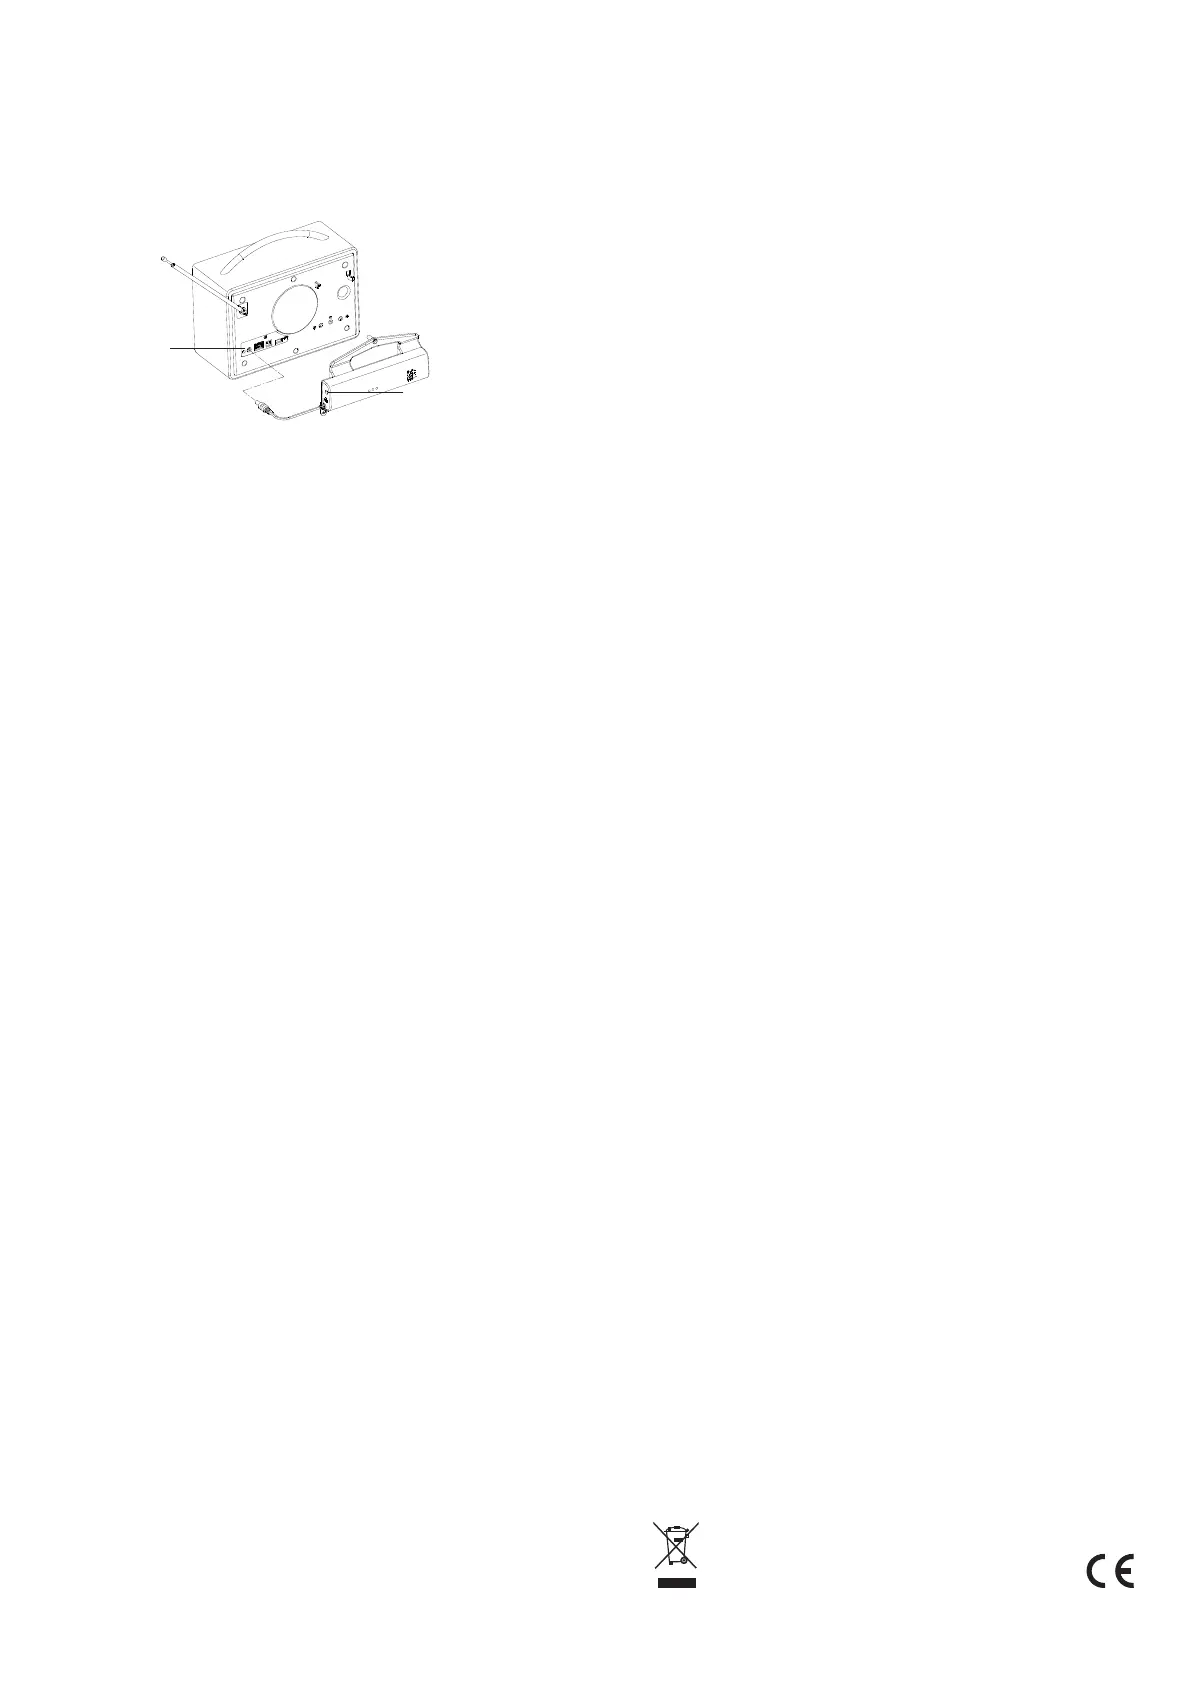
Preparing the battery pack for use
1. Insert the short lead from the battery pack into the DC-input socket of your
radio (see illustration above).
2. With the On/Off switch on the side of the battery pack still in the Off
position, connect the mains adaptor for your radio to the DC-Input socket
on the battery pack.
3. Connect the mains adaptor to the mains supply and switch on at the mains
socket.
4. The red Charging indicator should light.
5. When charging is completed, the green Full indicator will light.
6. The time taken to charge the battery pack will vary depending on the
amount of charge present before charging but it may take up to 8 hours.
7. You may use your radio while the battery pack is charging but the battery
pack should be charged fully before using it to power your radio away from
the mains for the fi rst time.
Using your radio with the battery pack
1. Slide the On/Off switch on the battery pack to the On position. Your radio
can now be used whether it is connected to the mains adaptor or not.
2. When the radio is powered from the battery pack without the mains adaptor
present, then none of the indicators in the pack will be lit unless the battery
is almost exhausted. The orange Low Battery indicator will light when
there is about 30% charge remaining in the battery.
3. When there is no charge left in the battery the pack will stop powering the
radio in order to protect the battery and it will switch off abruptly. The battery
pack will then not show any indicator until it is reconnected to the mains
adaptor.
4. To obtain the best life from the battery pack we recommend that you
reconnect it to the mains adaptor to recharge the battery after use, even if
it was only used away from the mains for a short while.
5. With the mains adaptor plugged into the battery pack and the battery pack
plugged into the radio, the radio can be powered whether the battery is
switched on or not.
6. The battery will be charged by the mains adaptor whether the battery pack
On/Off switch is in the On or Off position.
7. The battery will be charged by the mains adaptor whether the radio is in use
or not.
8. The On/Off switch only determines whether the battery can power the radio
when the mains adaptor is not connected.
Battery pack removal
• Tools required – Philips-style cross-head screw drivers, numbers 1 and 2.
1. Locate the pack of three screws which were removed from the radio
during the installation of the battery pack.
2. Ensure that the On/Off switch on the battery pack is in the OFF position.
3. Unplug your radio at the mains.
4. Disconnect your battery pack from the mains adaptor.
5. Unplug the battery pack from the DC-input socket on the radio.
6. Remove any audio cables, Ethernet cable or USB memory device.
7. Carefully unclip the aerial and position it to one side.
8. Identify the screws to be removed. (Please see illustration on page 3).
Remove the three screws identifi ed ONLY. Do NOT remove any other
screws. Set these screws to one side.
Battery pack removal continued
Top centre, remove screw using Philips number 2
Left of DC-input socket, remove screw using Philips number 1
Above Line-out socket, remove screw using Philips number 1
9. The battery pack may now be lifted away from the back of the radio and
set to one side.
Note: When inserting the screws (steps 10 to 12), start by giving the screw a
partial turn anti-clockwise so that it settles in the hole. This will help the screw
to engage with the thread formed by the screw that was just removed.
10. Take one small (original) screw and place it in the hole to the left of the
DC-input socket. Tighten down the screw so that it is snuggly seated. Do
not over tighten.
11. Take the other small (original) screw and place it in the hole above the
Line-out socket. Take care not to drop the screw into the speaker port
above the headphone socket. Tighten down the screw so that it is snuggly
seated. Do not over tighten.
12. Take the long (original) screw and insert it in the hole above the rear loud
speaker. Tighten down the screw so that it is snuggly seated. Do not over
tighten.
13 Take the three screws which you removed from your radio, place them in
the plastic bag, and keep them with these instructions in case you wish to
reinstall the battery pack in the future.
14. If the battery pack is removed from your radio for later use, ensure that
the On/Off switch on the battery pack is fi rst set to Off. Store the battery
pack in a cool, dry place and out of the reach of children. The battery pack
should be given a top-up charge every 2-3 months to prevent premature
aging of the cells in the pack.
15. We recommend that the battery pack is charged for 2-3 hours before
storage using your radio’s mains adaptor.
Battery pack installation continued
13. Carefully tighten each screw in turn. Do not apply excessive force or the
screw fi xings may be damaged. Simply ensure that the battery is not
loose so that it does not vibrate when the radio is in use.
14. Take the three screws which you previously removed from your radio,
place them in the plastic bag, and keep them with these instructions in
case you wish to remove the battery pack in the future.
Disposal of your battery pack
• When the battery pack reaches the end of its life it will be unable to power
the radio for any useful amount of time.
• The battery pack should be disposed of at a domestic waste recycling
centre.
• Do not dispose of the battery pack in household refuse or by incineration.
Battery pack
DC-input socket
Radio
DC-input socket
 Loading...