EasyManua.ls Logo

Roberts Blutune 300 - User Manual

Roberts Blutune 300
10 pages
Print Icon
To Next Page IconTo Next Page
Loading...
STEP 4 - Navigating your sound system
STEP 5 - Operating your sound system
Other information
Circuit features
ROBERTS RADIO LIMITED
www.robertsradio.com
© 2021 Roberts Radio Limited
Issue 1a
2021-06-15
DAB / DAB+ / FM RDS / Bluetooth / CD / USB
wireless charging sound system
Please read this guide and the safety/warranty leaet before use
Blutune 300
Specications
Power requirements
Mains 100 - 240V
50/60Hz
Remote control batteries 2 x AAA size
USB output 5V / 1A
Headphone socket 3.5mm stereo, Aux In socket 3.5mm stereo
Aerial System - DAB / FM Telescopic aerial
Bluetooth standards A2DP, AVRCP
Bluetooth codecs supported SBC and AAC
Bluetooth EDR EIRP POWER (MAX.) 2.19dBm
Frequency coverage FM 87.5 - 108MHz, DAB 174.928 - 239.200MHz
Bluetooth 5.0 frequencies 2.402 - 2.480GHz
Product markings
This symbol indicates AC voltage.
This symbol indicates Class II equipment.
DAB - Listen to DAB radio
FM radio - Listen to FM radio
Bluetooth - Stream music using your smart device
CD - Play music from CD
USB - Play music from a USB memory device
Auxiliary input - Connect to other devices
Remote control battery replacement
Wireless charging
Please read the safety leaet provided before using batteries.
1 Remove the battery cover on the rear of your remote
control by applying pressure to the catch in the
direction shown by the arrow and then lifting off the
cover.
2 Insert 2 x AAA size batteries into the spaces in the
compartment. Take care to ensure all batteries are
inserted with the correct polarity as shown inside the
battery compartment. Replace the battery cover.
3 If the sound system is not to be used for any extended period of time it
is recommended that the batteries are removed from the remote control.
Caution: Replace batteries only with the same or equivalent type. Danger
of explosion if the batteries are incorrectly replaced.
DAB menu USB Mode
FM menu
When in DAB mode, press the Menu
button. The DAB menu items include
Recall Preset, Save Preset, Station
List, Scan, Manual Tune, Prune Invalid,
DRC, Station order, Slideshow (choose
full screen or small image) and System
Settings. **
When in FM mode, press the Menu
button. The FM menu items include Recall
Preset, Save Preset, Scan Setting, Audio
Setting and System Settings. **
System settings
You can access your sound system’s
‘System settings’ from the current menu.
The system settings include Sleep, Alarm,
Equaliser, Time/Date, Backlight, Inactive
Standby, Language, Factory Reset,
Software Update, Software Version and
Loudness. **
In this guide the symbol ** indicates that further details are provided in the on-line user guide available from www.robertsradio.com
1 Switch on your sound system.
2 Press and release the Mode button to access
each of the operating modes in turn.
3 Alternatively, press Mode and rotate the
Tuning control clockwise or anti-clockwise
to highlight the desired menu item. Press the
control to select that item.
4 Press Menu to access the full menu for the
current operating mode.
Select music mode
The name plate is located on the rear of the sound system.
The company reserves the right to amend the specication without notice.
Designed & Engineered in the UK
Made in China
DAB
USB
CD
There are 20 memory presets, 10 for DAB and 10
for FM.** Presets are remembered in the event of
a power failure.
To store a preset
1 Tune to the required radio station.
2 Apply a long press on the Preset/Play/Pause
button (on the unit) or Select button (remote
control). ‘Save to Preset’ will be displayed.
3 Use the Tuning control or the Menu Up or
Down buttons (remote control) to scroll to an
unused preset or a preset you wish to change.
4 Press the Tuning/Select control or the Select
button (remote control) to save the preset.
To recall a preset
1 Choose DAB or FM mode.
2 Press and release the Preset/Play/Pause
button (on the unit) or Select button (remote
control). ‘Preset Recall’ will be displayed.
3 Use the Tuning control or the Menu Up or
Down buttons (remote control) to scroll to a
desired preset. Press Tuning or the Select
button (remote control) to select the preset.
Preset radio stations
System reset
Recall Preset
Save Preset
Station List
Scan
Manual Tune
Prune Invalid
DRC
DAB 16.34
>
>
>
>
>
>
>
Off
Recall Preset
Save Preset
Scan Setting
Audio Setting
System Settings
FM 16.34
Strong St
Stereo Al
>
>
>
>
>
Sleep
Alarm
Equaliser
Time/Date
Backlight
Inactive Standby
Language
System Settings 16.34
>
>
>
>
>
>
>
Normal
Off
English
If you wish to completely reset your sound system to its initial state perform
a factory reset. Press Menu. Choose ‘System Settings’, ‘Factory Reset’
then ‘YES’. All user entered settings will be erased.
Select
Sound system buttons Remote control buttons
A short press will switch your sound system On or to Standby.
A short press will cancel an active alarm.
**
A long press will access the sleep timer when the unit is playing. **
A short press will access each operating mode in turn.
Repeatedly press to change the alarm status when the unit is in standby.
A long press will access the alarm settings when the unit is in standby. **
Alternatively, alarms can be accessed using the system settings menu. **
A short press will access the current menu system when the unit is playing.
Press the Menu / Back button to go back to a higher level menu or if an error is made.
Rotate the control clockwise or anti-clockwise to scroll menu items.
Press Menu Up / Next / Down or Previous buttons on the remote control to scroll menu items.
A short press on Tuning/Select or the Select button (remote control) will select highlighted menu items.
A short press on Tuning/Select or the Select button (remote control) will pause the alarm for the snooze period.
A short press will display information relating to the music being played.
A long press will change dimmer settings when the unit is playing.
A short press will change dimmer settings when the unit is in standby.
The Blutune 300 has been tested with a range of USB memory devices up to
32GB. However there are many different memory devices available and not
all the USB devices can be guaranteed to work in the Blutune 300. Memory
must use the FAT or FAT 32 ling system in order to operate in the Blutune 300.
Important: Your sound system is designed to work with USB ash memory
devices. It is not intended to be connected to hard disk drives or any other
type of USB device. Audio formats supported on USB memory devices are
MP3 and WMA. The USB socket is located on
the back of the unit. **
Carefully insert a USB memory
device into the USB socket. The
USB socket can also be used to
charge your smartphone, tablet
or similar devices.
To select the USB mode, press the Mode button until 'USB' is selected.
Note: Playback control in USB mode is similar to CD-MP3/WMA mode (see
overleaf). Files are played back in the order that they are written to the USB
memory device by your computer except when the shufe mode is used. Press
the Info button to cycle through the various display options.
In order to minimise the risk of damage to your sound system, or USB memory
device, please place the unit so that the device cannot be easily knocked while
it is inserted in the socket. Remove the USB memory device before carrying
the unit or if not using the USB feature for a prolonged period.
Note: The USB memory device should not be removed during playback as
damage or corruption of les may occur.
CLASS 1
LASER PRODUCT
AC In
100-240V ~
W63 zH06 / zH05
Aux In
5V 1A
Designed & Engineered in the UK,
Made in China
Roberts Radio Ltd, Stoney Lane, Whiston, Prescot, L35 2XW, UK
Glen Dimplex Europe Ltd, Airport Road, Cloghran, Co. Dublin, K67 VE08, Ireland
READ
SAFETY
GUIDE
FM: 87.5 - 108 MHz
DAB/DAB+(Band III) :
Channel block 5A - 13F
Wireless Charging : 15W Max
Bluetooth/CD/USB/DAB/DAB+/FM Digital Sound System
Blutune 300
Equaliser
The sound on your sound system can be adjusted to suit your personal taste for the
material that you are listening to. The radio has six equaliser proles. **
1 Press Menu. Choose ‘System Settings’, ‘Equaliser then choose from normal,
classic, jazz, pop, rock or speech. Alternatively, press the Equaliser button on
the remote control and use the Menu Up or Down buttons to select an option.
2 You may set the treble, mid and bass levels using the ‘My EQ Setup’ option.
3 To use your ‘My EQ’ prole choose ‘Equaliser then ‘My EQ’.
In order to minimise its energy consumption when not in use, your sound
system will go into standby if it detects that it is no longer being used.** By
default this period is set to 8 hours but you may change it if you wish. Press
Menu, choose ‘System settings’ then ‘Inactive Standby’ and then choose
from 2, 4, 5, 6, 8 hours or Off. Your sound system will go into standby after
the selected time has expired.
Note: If the unit is in the Bluetooth or auxiliary input stop mode position
for more than 15 minutes it will automatically switch to standby. To
use the radio again, simply press the On / Standby button.
1: (Empty)
2: Heart
3: BBC Radio 1
4: (Empty)
5: BBC Radio 2
6: (Empty)
7: (Empty)
Save to Preset 16.34
Preset 2 saved
2
1 To enable wireless charging ensure your sound
system is plugged into the mains using the
supplied mains lead.
2 Place your wireless charging enabled device
over the charging icon. Your device must have
wireless charging to use this function.
3 Your device will start charging, the charging indicator
will show on the
screen. Charging will be faster when your unit is in standby. If the charging
indicator ashes it will have detected a non wireless charging device.
Indicator
: Flashes - poor connection, Off - no connection
Solid - connected.
Charging time will depend on your device. Standby - 15W, On - 5W.
WPT 110-155KHz WPT H-FIELD STRENGTH 30.24 dBμA/3m
Question and Answer IconNeed help?

Do you have a question about the Roberts Blutune 300 and is the answer not in the manual?

Summary

What is in the Box?

Controls

Control Panel Overview

Identifies and explains the function of each button and port on the sound system unit.

STEP 1 - Plug in & Play Radio

Connecting to Mains Power

Guides on connecting the sound system to the mains supply and initial power-up.

Switching On and Basic Operation

Instructions for powering the system on/off and initial system scan.

Selecting DAB Radio Stations

How to tune and select stations from the DAB band, including info display.

Scanning for DAB Stations

Procedure to rescan for available DAB radio stations.

Tuning FM Radio Stations

Steps for searching and tuning FM radio stations using manual or scan methods.

STEP 2 - Connect Bluetooth

Pairing Bluetooth Devices

Instructions for enabling Bluetooth and connecting smart devices for audio streaming.

STEP 3 - Playing CD

Inserting and Ejecting CDs

Guide on how to insert, load, and eject audio CDs into the player.

Playing CD and MP3;WMA Discs

How to play standard CDs and discs with MP3/WMA files.

Navigating Tracks and Folders

Instructions for selecting tracks, fast-forwarding, and navigating folders on MP3/WMA discs.

CD Repeat and Shuffle Modes

Details on using repeat and shuffle functions for CD playback.

STEP 4 - Navigating Your Sound System

Understanding System Buttons

Explains the functions of buttons on the sound system unit and remote control.

STEP 5 - Operating Your Sound System

Selecting Music Modes

How to switch between different audio sources like DAB, FM, Bluetooth, CD, and USB.

DAB and FM Menus

DAB Menu Options

Details available settings and functions within the DAB mode menu.

FM Menu Options

Details available settings and functions within the FM mode menu.

System Settings Menu

Configuring System Settings

Describes access and options within the main system settings menu.

USB Mode Operation

Using USB Memory Devices

Instructions for connecting, selecting, and playing music from USB devices.

Other Information

Preset Radio Stations

How to store and recall favorite radio presets for DAB and FM.

Equaliser Settings

Adjusting audio sound profiles and custom EQ levels for personalized listening.

Remote Control and Wireless Charging

Replacing Remote Control Batteries

Guide on how to open the remote and replace batteries.

Wireless Charging Functionality

Instructions for using the wireless charging feature for compatible devices.

System Reset and Specifications

Performing a Factory Reset

Steps to restore the sound system to its original factory settings.

Technical Specifications

Lists power requirements, frequency coverage, and other technical details.

Product Markings and Compliance

Explains product markings related to voltage, safety classification, and company information.

Overview

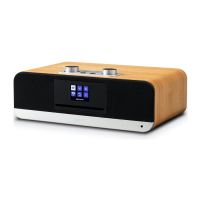
The Roberts Blutune 300 is a versatile wireless charging sound system designed for a comprehensive audio experience. It integrates multiple listening options, including DAB/DAB+ and FM RDS digital radio, Bluetooth audio streaming, CD playback, and USB connectivity. The system is housed in an acoustically tuned wooden cabinet, enhancing its sound quality.

Function Description:

The core function of the Blutune 300 is to provide high-quality audio playback from various sources. It features a DAB/DAB+ and FM RDS digital sound system, allowing users to access a wide range of radio stations with clear reception. The DAB band is generally recommended for better quality and less interference. For FM radio, the system includes search tuning capabilities, stopping automatically when a station of sufficient strength is found. RDS data, if present, displays station names and other information.

Bluetooth audio streaming is a key feature, enabling users to wirelessly connect smartphones, tablets, or laptops to play music. The system is discoverable as 'BLUTUNE 300' and provides indicators for connection status. Playback controls like Play/Pause, Next, and Previous tracks can often be managed directly from the sound system or its remote when connected via Bluetooth, though compatibility may vary with different player applications or devices. The system also allows for connecting multiple devices and managing pairings.

The Blutune 300 includes a CD player that supports CD-DA format audio CD-R/CD-RW discs, as well as MP3 and WMA files. It's designed for full-size 12cm CDs, with warnings against using mini or transparent/partly transparent discs to prevent jamming. CD playback controls include Play/Pause, Stop/Eject, and track selection. Users can also navigate folders on MP3/WMA discs and utilize repeat or shuffle options.

USB connectivity serves a dual purpose: playback of MP3 and WMA files from USB flash memory devices (up to 32GB, formatted in FAT or FAT32) and charging of smartphones, tablets, or similar devices. The USB socket is located on the back of the unit. Playback from USB is similar to CD-MP3/WMA mode, with files played in the order they were written, unless shuffle mode is active.

A notable feature is the wireless charging capability, allowing users to charge compatible devices by placing them on the designated charging location on the unit. The charging indicator on the screen provides feedback on the charging status, indicating poor connection, no connection, or a solid connection. Charging is faster when the unit is in standby mode.

The system also incorporates practical features like 20 radio station presets (10 DAB, 10 FM), clock and dual alarms with radio or buzzer sounds, sleep and snooze timers, and adjustable display brightness. An auxiliary input socket allows for connecting other audio devices, and a headphone socket provides private listening.

Usage Features:

Operating the Blutune 300 is designed to be intuitive, with both on-unit controls and a multi-function remote control.

  • Power and Standby: The On/Standby button switches the system on or to standby. The system remembers the last used mode. A long press on this button accesses the sleep timer.
  • Mode Selection: The Mode button cycles through operating modes (DAB, FM, Bluetooth, CD, USB, Auxiliary input). Alternatively, the Tuning control can be used to highlight and select modes from a menu.
  • Tuning and Selection: The Tuning control is central to navigation. It's used to step through DAB stations, scan FM frequencies, scroll through menu items, and select highlighted options. For alarms, it can pause the alarm for snooze.
  • Information Display: The Info button cycles through various display options, providing details like scrolling text, program type, frequency, signal strength, bit rate, and date. A long press on this button changes dimmer settings.
  • Menu Navigation: The Menu button accesses the current menu system. It allows users to delve into specific settings for each mode (DAB menu, FM menu) and general 'System settings'. The Menu/Back button on the unit or the Menu Up/Next/Down/Previous buttons on the remote facilitate scrolling through menu items.
  • Presets: Radio stations can be stored and recalled using 20 memory presets. A long press on the Preset/Play/Pause button (unit) or Select button (remote) initiates the 'Save to Preset' function, while a short press recalls presets.
  • Equaliser: The sound can be customized using six equalizer profiles (normal, classic, jazz, pop, rock, speech) or by setting custom treble, mid, and bass levels via the 'My EQ Setup' option in 'System Settings'.
  • Alarms and Timers: Alarms can be set and managed through the 'System settings' menu. The On/Standby button can cancel an active alarm, and the Tuning/Select button can snooze it. Sleep timers are accessed via a long press on the On/Standby button.
  • Bluetooth Pairing: A long press on the Bluetooth Pair button (unit) or Select button (remote) makes the system discoverable for new device connections. The Menu can also be used to disconnect or clear all pairings.
  • CD Handling: CDs are inserted into the CD slot. The CD Stop/Eject button is used to stop playback and eject the disc.
  • Wireless Charging: Simply place a compatible device on the wireless charging location. The screen indicates charging status.

Maintenance Features:

The manual provides guidance on maintaining the device and ensuring its longevity.

  • Battery Replacement: For the remote control, 2 x AAA batteries are required. Instructions detail how to open the battery compartment, insert batteries with correct polarity, and replace the cover. It's advised to remove batteries if the remote won't be used for an extended period to prevent damage.
  • USB Device Handling: To prevent damage to the sound system or USB device, it's recommended to place the unit where the device won't be easily knocked while inserted. USB devices should be removed before carrying the unit or if the USB feature won't be used for a prolonged period. Crucially, USB devices should not be removed during playback to avoid file corruption.
  • Inactive Standby: To minimize energy consumption, the system automatically enters standby if inactive for a set period (default 8 hours). This period can be adjusted or turned off in 'System settings' under 'Inactive Standby'.
  • System Reset: If needed, the sound system can be reset to its initial factory state. This is done by navigating to 'System Settings', then 'Factory Reset', and confirming with 'YES'. This action will erase all user-entered settings.
  • Software Updates: The 'System settings' menu includes options for 'Software Update' and 'Software Version', suggesting that the device's firmware can be updated, though specific instructions are not detailed in this quick start guide.
  • General Care: The initial setup advises placing the sound system on a flat surface and fully extending the telescopic aerial for optimal reception. The safety leaflet, which should be read before use, likely contains further general care instructions.

Roberts Blutune 300 Specifications

General IconGeneral
Projection-
Antenna typeExternal
Product colorBlack, Silver
Volume controlRotary
Number of alarms2
Country of originChina
Remotely operatedYes
Radio typePortable
FM band range87.5 - 108 MHz
DAB band range174.928-239.200 MHz
Supported radio bandsDAB, DAB+, FM
Preset stations quantity20
RMS rated power- W
Battery typeAAA
Speaker typeFull range
Bluetooth version5.0
Headphone outputs1
Cables includedAC
Package typeGift box
Package depth225 mm
Package width440 mm
Package height335 mm
Package weight5965 g
Customs product code (TARIC)8527911900
Weight and Dimensions IconWeight and Dimensions
Depth265 mm
Width360 mm
Height138 mm
Weight4565 g