EasyManua.ls Logo

ROCAM CR1018 - User Manual

ROCAM CR1018
2 pages
Print Icon
To Next Page IconTo Next Page
Loading...
1. Press button once, display starts
flashing.
2. Press button to set the hour.
press button to set the minute.
3. Press button or button to save time or
wait for another 10 seconds to confirm automatically.
To change 12H/24H time format
Hold press button to change 12H/24H time format.
- 02 -- 01 -
Chapter 1 LOCATION OF CONTROLS
Chapter 2 POWER RESOURCES
1. Pull out of the insulator at battery compartment to activate
CR2032 coin cell backup battery.
NOTE: Backup battery(included) doesn't support time display but can back up time &
alarm setting.
2. Connect the adapter line to DC jack , then plug into a 100~240V
AC wall power outlet.
Chapter 3 TIME SETTING
SNOOZE
HOUR
MIN
DIMMER
HOUR
MINUTE
SNOOZE
ALARM 1
ALARM 2
ALARM
OFF
VOLUME
DST
TIM E
12H/24H
1
2
3
4
5
6
7
8
9
10
AM
PM
DST
11
12
13
14
15
16
17
18
19
1. Dimmer Button
4. Time Button(12/24H)
7. Alarm 2 Button
10. Red Indicator Light
13. DST Indicator
16. Speaker
19. Back up Battery
2. Hour Button
5. Snooze Button
8. Volume Button(DST)
11. AM Indicator
14. Alarm 1 Indicator
17. DC Input Jack
3. Minute Button
6. Alarm 1 Button
9. Alarm OFF Button
12. PM Indicator
15. Alarm 2 Indicator
18. USB Output Jack
TIME
12H/24H
TIME
12H/24H
TIME
12H/24H
Version 2.0
CR1018
Mirror Alarm Clock with USB Charger
CREATE YOUR PERFECT SLEEP ENVIRONMENT
ROCAM
R
Contact our experts
support@yelaw.net
Mad e in Chi na
Http://www.yelaw.net
Question and Answer IconNeed help?

Do you have a question about the ROCAM CR1018 and is the answer not in the manual?

Overview

This document describes the FROCAM CR1018 Mirror Alarm Clock with USB Charger, a device designed to enhance your sleep environment.

Function Description

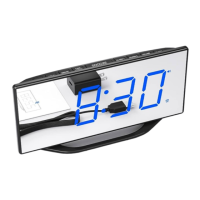
The CR1018 is primarily a digital alarm clock with a mirror finish display. It features dual alarm settings, adjustable display brightness, and a USB charging port for external devices. It also includes a backup battery to maintain time and alarm settings during power outages.

Important Technical Specifications

  • Power Input: 100~240V AC wall power outlet.
  • Backup Battery: CR2032 coin cell (included). This battery backs up time and alarm settings but does not power the display.
  • USB Output: 2 USB Output Jacks (18), with a maximum charging current of 1 Ampere.
  • Display: LED display with a mirror finish.
  • Alarm Volume: 7 adjustable levels.
  • Display Brightness: 8 adjustable levels, including a complete OFF state.
  • Time Format: 12H/24H selectable.

Usage Features

Time Setting

  1. Initiate Time Setting: Press the TIME 12H/24H button once. The display will show "12:00" and start flashing.
  2. Set Hour: Press the HOUR button to adjust the hour.
  3. Set Minute: Press the MIN button to adjust the minute.
  4. Save Time: Press the TIME 12H/24H button or SNOOZE button to save the set time. Alternatively, waiting for 10 seconds will automatically confirm the setting.
  5. Change Time Format: Hold down the TIME 12H/24H button to switch between 12-hour and 24-hour formats.

Alarm Setting

The device supports two independent alarms (Alarm 1 and Alarm 2), with the setting process being identical for both.

  1. Initiate Alarm Setting: Press the ALARM 1 button (or ALARM 2 button for the second alarm). The corresponding alarm indicator (1 or 2) will light up, and the display will show "6:30" (default) and start flickering.
  2. Set Hour: Press the HOUR button to adjust the alarm hour.
  3. Set Minute: Press the MIN button to adjust the alarm minute.
  4. Save Alarm: Press the ALARM 1 button (or ALARM 2 button) or SNOOZE button to save the alarm time. Waiting for 10 seconds will also automatically confirm the setting.

Alarm Ring Volume Adjustment

To adjust the alarm ring volume, repeatedly press the VOLUME DST button. There are 7 levels, cycling through 04 (default), 05, 06, 07, 06, 05, 04, 03, 02, 01, and 02.

Turning Off Alarm

  • Temporary Snooze: When the alarm sounds, press the SNOOZE button to temporarily turn off the alarm for 9 minutes. The alarm will ring again after 9 minutes.
  • Turn Off for 24 Hours: When the alarm sounds, press the ALARM OFF button to turn off the alarm for 24 hours. The alarm indicator (1 or 2) will remain on, indicating the alarm is still activated and will ring again after 24 hours.

Cancelling Alarm Permanently

  • Cancel All Alarms: Hold down the ALARM OFF button to permanently turn off both Alarm 1 and Alarm 2. The corresponding indicators (1 and 2) will turn off.
  • Cancel Specific Alarm: Hold down the ALARM 1 button to permanently turn off Alarm 1, or hold down the ALARM 2 button to permanently turn off Alarm 2. The respective indicator will turn off.
  • Cancel Alarms When Sounding: If Alarm 1 is sounding, hold down ALARM OFF or ALARM 1 to permanently turn it off. If Alarm 2 is sounding, hold down ALARM OFF or ALARM 2 to permanently turn it off.

Display Brightness Adjustment (Dimmer)

Repeatedly press the DIMMER button to adjust the display brightness. There are 8 levels, cycling through 04 (default), 05, 06, 07, 06, 05, 04, 03, 02, 01, OFF, 01, and 02.

  • When the "OFF" level is selected, the display will be completely turned off, and the Red Indicator Light will turn on.
  • Pressing any button while the display is off will restore it to the 04 default brightness level, and the Red Indicator Light will turn off.
  • Holding down the DIMMER button will directly turn off the display.

Daylight Saving Time (DST) Function

  • Activate DST: Hold down the VOLUME DST button to switch on the DST function. The DST indicator will turn on.
  • Deactivate DST: Hold down the VOLUME DST button again to turn off the DST function. The DST indicator will turn off.

USB Charging

The device features two USB output jacks (18) that allow you to charge your phone or tablet simultaneously. Simply plug your charging cable into the USB port. The maximum charging current is 1 Ampere.

Red Indicator Light

  • Alarm Notification: The Red Indicator Light (10) will flash when an alarm goes off.
  • Display Off Indication: The Red Indicator Light will stay on when the display brightness is set to "OFF".

Maintenance Features

  • Backup Battery: The CR2032 coin cell backup battery ensures that time and alarm settings are retained even if the main power is interrupted. This prevents the need to reconfigure settings after a power outage.
  • Insulator: Remember to pull out the insulator from the battery compartment to activate the backup battery upon initial setup.

ROCAM CR1018 Specifications

General IconGeneral
BrandROCAM
ModelCR1018
CategoryBattery Charger
LanguageEnglish