Do you have a question about the Rockler Dust RIGHT and is the answer not in the manual?
Emphasizes the critical need to read and follow all instructions and safety warnings before use.
Lists specific sections that must be understood before operating the product, covering safety, electrical, mounting, operation, and maintenance.
Encompasses general shop safety practices such as keeping children away, avoiding explosive environments, and proper attire.
Warns about wood dust exposure from woodworking, a known carcinogen, recommending dust masks.
Provides essential safety instructions for electrical appliances, emphasizing reading and understanding before use.
Covers crucial electrical safety guidelines, including proper grounding, avoiding wet surfaces, and handling cords.
Details safe operating practices, prohibiting the use with liquids, flammables, or burning materials, and specifying prohibited materials.
Continues safety guidelines for use, including child supervision, using recommended attachments, and the safety key function.
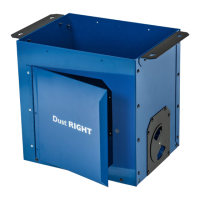
Provides critical warnings and instructions regarding the installation and assembly of the dust collector, emphasizing secure mounting.
Outlines essential maintenance procedures, including unplugging before servicing and inspecting/emptying bags.
A critical warning about the risks of improper electrical grounding, advising consultation with a qualified electrician if unsure.
Explains the importance of grounding for electrical safety and the process for connecting the appliance to a grounded outlet.
Warns against installing the unit outdoors or near gas-fueled appliances due to carbon monoxide risk from exhaust.
Specifies the mandatory use of lag screws into wall studs for secure mounting, prohibiting drywall anchors.
Reaffirms the requirement for secure mounting using lag screws into wall studs, prohibiting drywall anchors.
Provides a specific measurement for the top set of lag screws to ensure a tight connection to the drum.
Details the step-by-step process for marking and drilling pilot holes for mounting on studs spaced 16" on center.
Guides the user through determining the mounting location, emphasizing marking stud locations and ensuring cleats are secured to studs.
Instructs on positioning and leveling the upper cleat, marking drilling locations, and ensuring marks are centered on studs.
Details how to mark pilot hole locations for mounting screws on the upper cleat, ensuring correct spacing and alignment.
Explains how to drive lag screws to secure the cleat, leaving screws about 1" from the surface for vibration dampeners.
Describes the installation of vibration dampeners, noting their side-specific nature and proper orientation.
Warns that the motor assembly is heavy and requires assistance from another adult for safe lifting and positioning.
Details attaching the mounting brackets to the main housing using flange bolts.
Explains applying foam tape to the cone's opening and securing the hose clamp.
Describes applying foam tape around the inlet port and securing the Inlet Y-Adapter with a screw.
Guides the user on attaching the handle to the canister filter for dislodging dust.
Instructs on lifting and positioning the canister filter onto the main housing, securing it with bolts and nuts.
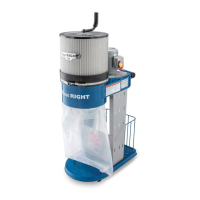
Explains how to install the plastic bag onto the canister filter and secure it with a bag clamp.
Guides the assembly of the inner frame for the drum plastic bag using screws and nuts.
Instructs on placing the drum plastic bag and the assembled inner frame into the drum.
Details placing the drum lid and attaching the hose to the drum lid flange with a hose clamp.
Explains attaching the quick lever to the cone using screws and aligning plates.
Describes the proper positioning of the quick lever and how to adjust it for correct operation.
Instructs on securing the quick lever posts with locknuts and testing its movement.
Details connecting dust hoses to the inlet Y-adapter and using caps or blast gates as needed.
Lists critical warnings for operating the dust collector, including avoiding flammables, ensuring proper setup, and using safety gear.
Identifies the components of the dust collector's power panel, including the main power switch, safety key, and remote reset.
Explains the two-step process for turning on the dust collector, either at the machine or via the remote control.
Provides instructions for clearing and resetting the remote control if it malfunctions, including battery replacement.
Details the steps to take if the dust collector's overload protection is tripped, including shutting off, cooling, and resetting.
Advises regular inspection of filter and drum plastic bags for damage and avoiding use with compromised bags or hoses.
Provides guidance on proper storage of the machine when not in use, including unplugging and protecting the cord.
Lists product identification, compliance statements, and manufacturer contact information.
| Brand | Rockler |
|---|---|
| Model | Dust RIGHT |
| Category | Dust Collector |
| Language | English |