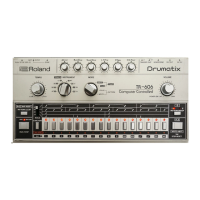
Write a few different Rhythm Patterns into Track Memory, and then press the $
PATTERN GROUP button (N) (which activates the D.S. function) then press the
TAP button (M) which will log that pattern into memory. Once the $ button has been
pressed, the bar has been designated the $ Bar, and will be the bar the Track will set at
when the TAP button (M) is pressed during TRACK PLAY.
Continue programming a few more Rhythm Patterns into memory and then press the
CLEAR/RESET button (F) (which activates the D.C. function) and then press the
TAP button (M). By pressing the CLEAR/RESET button (F) before pressing the TAP
button, the bar you have just played has been designated the D.C. Bar.
NOTE: Press the CLEAR/RESET (D.C.) button or Pattern Group ($) button before
pressing the TAP button. Otherwise, the bar will be advanced to the next bar.
To play the Track, press the CLEAR/RESET button (F), and start the Rhythm. When
you press the TAP button (M), the Track will jump to the $ Bar after finishing the bar
that is playing. At the end of the Track, the bar you set as the D.C. Bar will play once,
and then the Track will reset and play all over again from the first bar. To change a
bar's designation as $ or D.C. simply recompose the Track and designate another bar
as $ or D.C., the original D.S. or D.C. Bar's designation will automatically be erased.
Bar Selection Within the Track
A truly outstanding feature of the TR-606 is the facility to access any bar within a
Track for editing, changing a $/D.C. designation, or just to listen to a specific passage.
This is accomplished by reading the LED display of the Bar Number, which up till
now we have seen, but not described.
As mentioned earlier, for songs that are longer than 64 bars, these Tracks can be
chained up to four Tracks (256 bars). You can select any bar within the chained
Tracks and play or compose from the bar you selected.
For example, we will call up Bar #115 in Track 3. Actually the bar #115 is located in
Track #4 because the capacity of each track is 64 measures (and in this case tracks #3
and #4 are chained). While the Rhythm is stopped, set the MODE Selector (B) to
either TRACK WRITE or TRACK PLAY. Set the TRACK SELECTOR to #3, which
is the 1st track of the chained Track. Press the FUNCTION button (J) and hold it
down. Press the SELECTOR Switch (K) corresponding to the following Bar
designation written below them: #100, then #1, and then #5. The LED indicators for
#100 and #1 illuminate, and #5 flashes. This indicates that you have set the Track at
Bar #115. Release the FUNCTION button and press the RUN/STOP button. Then you
can hear the Rhythm from bar #115.
DELETE and INSERT
Stop the Rhythm, set the MODE Selector to TRACK WRITE.
Select the Bar to be deleted or inserted in the same way as described above.
Release the FUNCTION button once, and press it again.
While holding down the FUNCTION button, press the DEL button. The selected bar
will be deleted.
In the case of insert, press the INS button. This will split the Track memory at the
selected bar and shift all the contents of the rest of the rhythm track one bar to the
right. Now you can change the rhythm in the selected bar to a new one. Press the

 Loading...