___________________________________________________________________23
CHAPTER5‐OPERATION
CAPITOLO 5 - FUNZIONAMENTO
DRIVINGSEQUENCE
SEQUENZA DI GUIDA
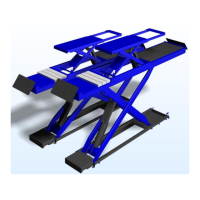
Be sure the platforms are fully closed before
getting on/off the lift. Get in the vehicle and
drive on the lift; be sure the vehicle is
centered and both rear and front wheels are
properly positioned, place the proper rubber
pads on the platform (picture 14) so that they
are in line with the lifting points specified by
the manufacturer. Press the “lifting” button,
keep it pressed until the required height is
reached. To lower the lift, press the “lowering”
button (picture 4, pos.2).
During the latest lowering phase with the button
"lowering in the dangerous area" the lift will
produce a safetyacoustic signal.
During the first hours of operation cracking
noises could occur. This is due to the natural
settlement of mechanical parts and will
disappear during the following hours of
operation.
CHECKS
Perform the following checks when operating
the car lift:
• Carefully check the car lift and its load
during
lifting/lowering operation.
• Check the warning acoustic signal operation
of the car lift during lowering phase.
• ATTENTION: When the lift is operating,
there high pressure in the hydraulic pipes
(290 bar max).
If the plat-forms do not start simultaneously, this
might be due to the following causes :
air in the A2 or B2 cylinder and/or differentiated
service
pressure in the lines. In this case, repeat the
previous procedure while pistons are at their
max. height, operating on the two lines
alternatively several times to bleed air and
balance the service pressure
Assicurarsi che le piattaforme siano totalmente
chiuse prima di salire/scendere dal sollevatore.
Salire sul veicolo e collocarsi sul sollevatore,
assicurarsi che il veicolo sia centrato e che le
ruote anteriori e posteriori siano posizionate
correttamente, collocare i gommini adatti sulla
piattaforma (illustrazione 14) in modo che siano
allineati con i punti di sollevamento specificati
dal produttore. Premere il pulsante di
„sollevamento“, tenerlo premuto finché non si
raggiunge l’altezza richiesta. Per abbassare il
sollevatore, premere il pulsante di „abbassamento“
(illustrazione 4, pos. 2). Durante l’ultima fase di
abbassamento con il pulsante „abbassamento
nell’area di pericolo“, il sollevatore emetterà un
segnale acustico di sicurezza.
Durante le prime ore di utilizzo saranno emessi
rumori di incrinatura. Ciò è dovuto al naturale
assestamento delle parti meccaniche ed essi
scompariranno durante le ore di utilizzo
seguenti.
VERIFICHE
Effettuare le seguenti verifiche durante l’utilizzo
del sollevatore per auto:
• Controllare attentamente il sollevatore per
auto e il suo carico durante le operazioni di
sollevamento/abbassamento.
• Controllare il funzionamento del segnale
acustico di sicurezza del sollevatore per auto
durante la fase di abbassamento.
• ATTENZIONE: Durante il funzionamento del
sollevatore, nei tubi idraulici è presente dell’alta
pressione (290 bar massimo).
Nel caso in cui le piattaforme non si avviino
contemporaneamente, le cause potrebbero essere le
seguenti:
Presenza di aria nel cilindro A2 o B2 e/o diverse
pressioni di servizio nelle linee. In questo caso,
ripetere la procedura precedente sulle due linee in
maniera alternata per diverse volte per rimuovere
l’aria e bilanciare la pressione di servizio.
ict.
ill. 14

 Loading...