creatively choose an aperture (i.e. f-3.0) and match
your light to your camera exposure settings, this
way all the photos from your shoot will have the
same grain structure/depth of field/etc.
Click the left knob to return to MENU, alternatively
you can return to the basic operation (BRI / COL)
by pressing both control knobs together.
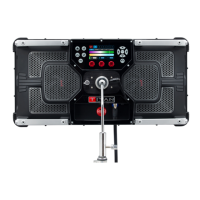
(‘CTRL’) Control Menu
This menu allows you to explore the AEOS’ control
options including DMX and Skyport settings.’
– (‘ADDR’) Primary DMX Channel Address
Use ADDR to select the starting DMX channel
address of the AEOS.
– ‘AUTO’ AutoSETUP
Only from an Anova PRO 2 – not an AEOS menu
option. For reference only
When setting AEOS as a slave from an Anova
PRO 2, the current Anova PRO 2’s configuration
(DMX ADDR/MODE/MSTR/DISP/SCRL, Skyport and
frequency) will be sent to any available slave AEOS,
NEO 2 or Anova PRO 2s that are not locked.
Be very careful using this, as it is a ‘nuclear’ option
and will erase the configuration on all of your slave
lights.
Use ‘NEXT’ to make the slaves display ’= +’ . you can
set the base channel for each slave incrementally
with just a single click on ‘+’ (i.e. 3-4, 5-6, 7-8, 9-10),
so it is really quick to set up a string of sequentially
DMX addressed slaves.
Alternatively, hit ‘=’ to make the selected light’s
address the same as the previous light’s address.
Be careful using this command, as it is also a
‘Nuclear’ option and will overwrite the DMX
address on your slave lights.
CTRL
AUTO
ADDR
25
 Loading...