•
Comb the hair.
•
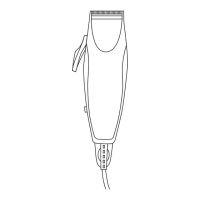
Take off the removable comb from the hair trimmer.
• Move the cutting height lever back to 'very short' position (lever released).
•
Cut the hair from the edge of the cut, moving downwards, holding the trimmer upturned and right
angles to the head. Use short strokes (figs. 10 and 11).
•
Repeat these operations for the sideburns (fig. 12).
b
) Around the ears.
• Comb thoroughly the hair around the edge of the ear; take off the removable comb.
•
Hold the trimmer on the edge, but only use a corner of the trimmer, following slowly the required
c
ontour and following the direction of the cut (fig. 13).
Tips :
•
When using the hair trimmer without a removable comb, make sure that you use controlled, light
movements.
• For the finishing strokes, ensure that the hair trimmer remains at right angles to the skin, in order
to avoid injury (fig. 14 and 15).
11. FOR A SUCCESSFUL AMERICAN-STYLE CUT
A very short cut on the sides and the nape, and very short on the top.
• Combs necessary for this cut : 3 mm, 9 mm or 18 mm (fig. 16).
• Do not forget to change combs as you progress through the hair.
1st STAGE : THE CUT
• To cut the hair on the sides and the nape, see the "Round Crew cut" chapter. At the end, use 3 mm
comb to obtain a shaven cut.
• For the top, at the locations indicated by the zone change lines (see fig. 16), use comb 9 or 18 mm, in
order to keep the length longer. Cut the hair from front to back.
2nd STAGE : CONTOURS AND FINISH
• Consult the "Contours and finish" paragraph in the " Round Crew cut" section.
12. FOR A SUCCESSFUL COMB OR FINGER CUT (square crew cut)
This cut provides a flat surface on the top of the head.
• Combs necessary for this cut : 3, 18 mm + fingers (fig. 17)
• Do not forget to change combs as you progress through the hair.
1st STAGE : THE CUT
• To obtain a successful square crew cut, preliminary drying is the most important factor (fig. 18).
• Dry the hair against the lie in order to raise the crew cut.
• Begin the cut on the sides and the nape, using the combs specified in fig. 17 (for the cut procedure,
consult the chapter entitled "Round crew cut").
• To obtain a flat top, use the normal comb or, failing that, your fingers (fig. 19 and 20).
- take off the removable comb from the hair trimmer,
- using the styling comb (or your fingers), raise a small strand of hair (the hair must be in a vertical
position in relation to the skull),
- move the comb or your fingers along the strand until you obtain the required length,
- use the hair trimmer to cut the hair sticking out of the comb or your fingers, using the latter as a support,
- the height of the last strand cut is used as a guide for the subsequent strands,
- continue in this way, strand by strand, moving gradually from the back to the top of the skull, and
then to the front.
- comb the hair regularly to remove the cut hair and check the condition of the cut,
- to obtain a perfect transitional area (A on fig. 17), between the top and side hair, slightly tilt the flat
comb and cut the excess hair (fig. 21).
2nd STAGE : CONTOURS AND FINISH
• See the paragraph entitled "Contours and finish" in the "Round Crew cut" section.
GB
NOT HC103 039236:039236 18/09/08 10:23 Page 7
 Loading...