Do you have a question about the Ruckus Wireless ICX 7150 and is the answer not in the manual?
Explains text formatting, command syntax, and notice formats used in documentation.
Information on accessing documentation, white papers, and support resources on the Brocade website.
Instructions on how to provide feedback and report errors in the document.
Details on how to contact Brocade for product support and assistance.
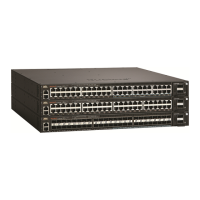
Lists the Ruckus ICX 7150 switch models and compatible rack mount kits supported by the document.
Indicates that this is a new document with no prior revisions.
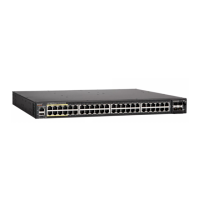
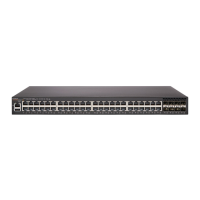
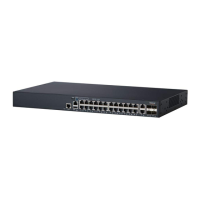
Describes the physical capabilities and components of the Ruckus ICX 7150 switch, including ports and LEDs.
Details available upgrade licenses for enabling specific features like 10-GbE speed on SFP+ ports.
Illustrates and labels the connectors and indicators on the front panel of the device.
Illustrates and labels the connectors and indicators on the rear panel of the device.
Outlines methods for managing the device, including CLI and SNMP applications.
General and specific safety guidelines to prevent hazards during installation and operation.
Specifies site, electrical, and thermal conditions necessary for proper device installation.
Provides a step-by-step overview of the installation process from planning to deployment.
Lists the items included in the device's shipping carton for verification upon arrival.
Describes various methods for installing the switch, including desktop, rack, and wall mounting.
Highlights critical safety warnings related to securing the device and rack stability during installation.
Instructions for placing the device on a stable, flat surface like a table or desk.
Details on using a magnet mount kit for securing compact devices to metal surfaces.
Steps for attaching the device to a vertical metal surface using a magnetic mount.
Guidance on magnetically mounting the device beneath a metal desk surface.
Procedures for installing the device under a desk or shelf using mounting kits.
Instructions for securing the device to a wall using screws and anchors.
Steps for mounting the device to a wall using provided wall mount brackets.
Guidelines for installing the device in a two-post rack using specific mounting kits.
Instructions for using a universal kit to mount devices in four-post EIA racks.
Steps to attach front mounting brackets to the device for rack installation.
Instructions for attaching extension brackets to the device based on rack depth.
Procedures for positioning and securing the device within the rack using brackets.
Steps to connect rear brackets to the device's extension brackets.
Instructions to secure the rear brackets to the rack posts.
Steps to attach front brackets to the rear of the device for recessed mounting.
Instructions for attaching extension brackets to the front of the device for recessed mounting.
Procedures for installing the device in the rack in a recessed configuration.
Steps to connect rear brackets to the extensions for recessed rack mounting.
Instructions to secure the rear brackets to the front rack posts for recessed mounting.
Lists necessary hardware and software for setting up the device.
Step-by-step guide to connecting and powering on the switch.
Instructions for connecting to the device via console port for initial configuration.
Steps to assign an IP address for network management and access.
Guidance on configuring the device's system date and time.
Methods to confirm the device is functioning correctly after setup.
Lists necessary tools and estimated time for installing transceivers and cables.
Safety warnings and handling guidelines for fiber-optic transceivers and cables.
Recommendations for organizing and routing network cables for efficient management.
Instructions for connecting standard Ethernet cables to the device ports.
Steps to insert a new fiber-optic transceiver into the device's SFP/SFP+ slot.
Procedures for safely removing and replacing an existing fiber-optic transceiver.
Explains the meaning of status indicators (LEDs) on the device's port side.
Explains the meaning of status indicators (LEDs) on the device's non-port side.
Guidance on checking device temperature, fan status, and power supply health.
Covers enclosure, fans, architecture, Ethernet ports, and management interfaces.
Details weight, dimensions, operating conditions, and power supply characteristics.
Lists power usage by configuration and specific data port capabilities.
Information on serial ports, memory, and various regulatory standards.
Declaration of conformity with European Union directives for electromagnetic compatibility and low voltage.
Warning regarding potential radio interference for Class A products in domestic environments.
FCC compliance statement and interference warnings for Class A computing devices in the US.
Alerts to potential hazards or damage to hardware, firmware, software, or data.
Warnings about potentially lethal or extremely hazardous conditions and situations.
| Product Series | ICX 7150 |
|---|---|
| Operating Temperature | 0°C to 50°C (32°F to 122°F) |
| Category | Switch |
| Ports | 24 or 48 |
| Uplink Ports | 1/10 GbE |
| Switching Capacity | 128 Gbps |
| Power over Ethernet (PoE) | Yes |
| Stacking | Up to 12 units |
| Management | Web GUI, CLI, SNMP |
| Layer | Layer 3 |
| Power Supply | Internal |
| Weight | 4.2 kg |
| Form Factor | 1RU |