2. Make sure that the drive levers are in
the open position, and the blade engage
knob is down.
3. Set the cutting deck to the maximum
height.
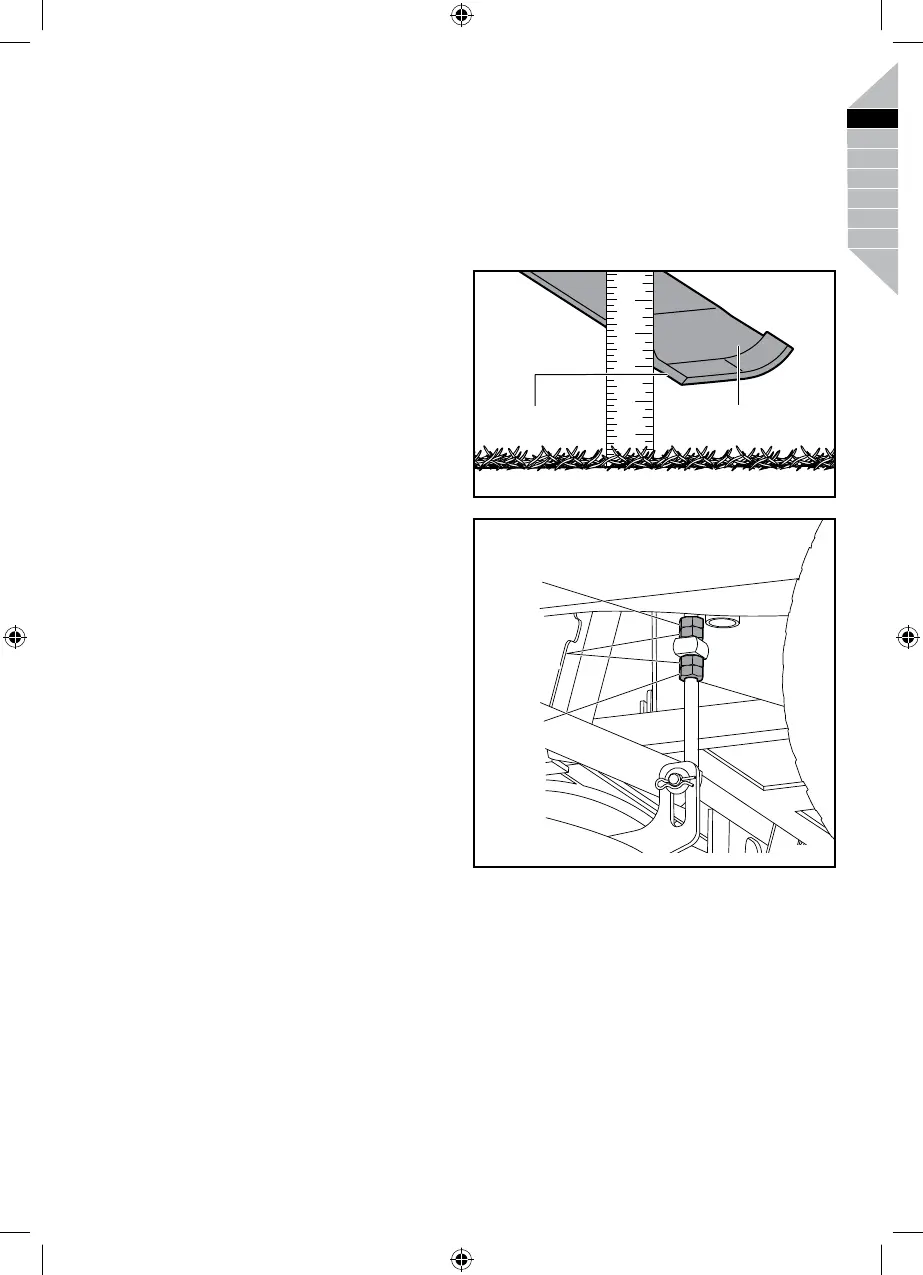
7RPDNHVLGHWRVLGHDGMXVWPHQW
1. Position the blades so that the ends point
toward the sides of the mower.
2. On the outside edge of each blade,
measure the distance from the bottom
edge of the side of the blade to the
ground. If the distance between the two
VLGHVLVJUHDWHUWKDQFPLQD
VLGHWRVLGHDGMXVWPHQWLVQHFHVVDU\
3. 2Q WKH VLGH WR EH DGMXVWHG ORRVHQ WKH
MDPQXWVDVVKRZQ
4. 7XUQ WKH DGMXVWPHQW QXWV FORFNZLVH WR
raise or counterclockwise to lower the
side of the cutting deck. Each full turn
RIWKH DGMXVWPHQWQXW FKDQJHV WKH GHFN
KHLJKWDSSUR[LPDWHO\FPLQ
NOTE: If raising the side, turn the top
DGMXVWPHQWQXWILUVW ,I ORZHULQJWXUQWKH
bottom nut first.
5. Measure the distance between the blade
DQGJURXQGDJDLQ&RQWLQXHWRDGMXVWDQG
measure until the difference between the
GLVWDQFHRQHDFKVLGHLVFPLQ
or less.
6. 3URFHHG WR IURQWWREDFN DGMXVWPHQW RU
UHWLJKWHQMDPQXWVWRVHFXUH
7RPDNHIURQWWREDFNDGMXVWPHQW
NOTE: Always level the deck side-to-side
EHIRUHPDNLQJDIURQWWREDFNDGMXVWPHQW
1. Position the blade nearest the side
discharge chute so that the ends now
point toward the front and back of the
mower.
2. Measure the distance from the tip of the
blade to the ground. For best results, the
front tip of the blade should be from 0.32
FP WR FP LQ WR LQ ORZHU
than the rear tip.
3. ,I IURQWWREDFN DGMXVWPHQW LV QHHGHG
WXUQ WKH DGMXVWPHQW QXWV FORFNZLVH WR
raise or counterclockwise to lower the
back of the cutting deck. Each full turn of
WKHDGMXVWPHQW FKDQJHV WKH GHFN KHLJKW
DSSUR[LPDWHO\FPLQ
NOTE:0DNHVXUHWRWXUQWKHDGMXVWPHQW
nuts on both sides equally to prevent
throwing the side-to-side measurement
off again.
4. Measure the distance between the blade
and ground again to verify that the front
WLSLVFPWRFPLQWRLQ
lower than the rear tip. If not, continue to
DGMXVWDQGPHDVXUHXQWLOWKH\DUH
5. :LWKRXW PRYLQJ WKH DGMXVWPHQW QXWV
UHWLJKWHQ WKH MDP QXWV WR VHFXUH WKH
DGMXVWPHQWQXWVLQSODFH
12345
Fig 25
Blade
Bottom edge
Fig 26
Jam nut
$GMXVWPHQW
nuts
Jam nut
REPLACING THE BATTERIES
See fig. 27 - 32.
NOTE: Use only RYOBI zero-turn mower
lead-acid batteries, part number 5131042607.
The mower operates on four 12-volt batteries
connected in series. If replacing one or more
of the batteries, always replace them using
batteries of the same type with equal voltage
and capacity.
33
English |
EN
FR
DE
DA
SV
FI
NO