Fold Here
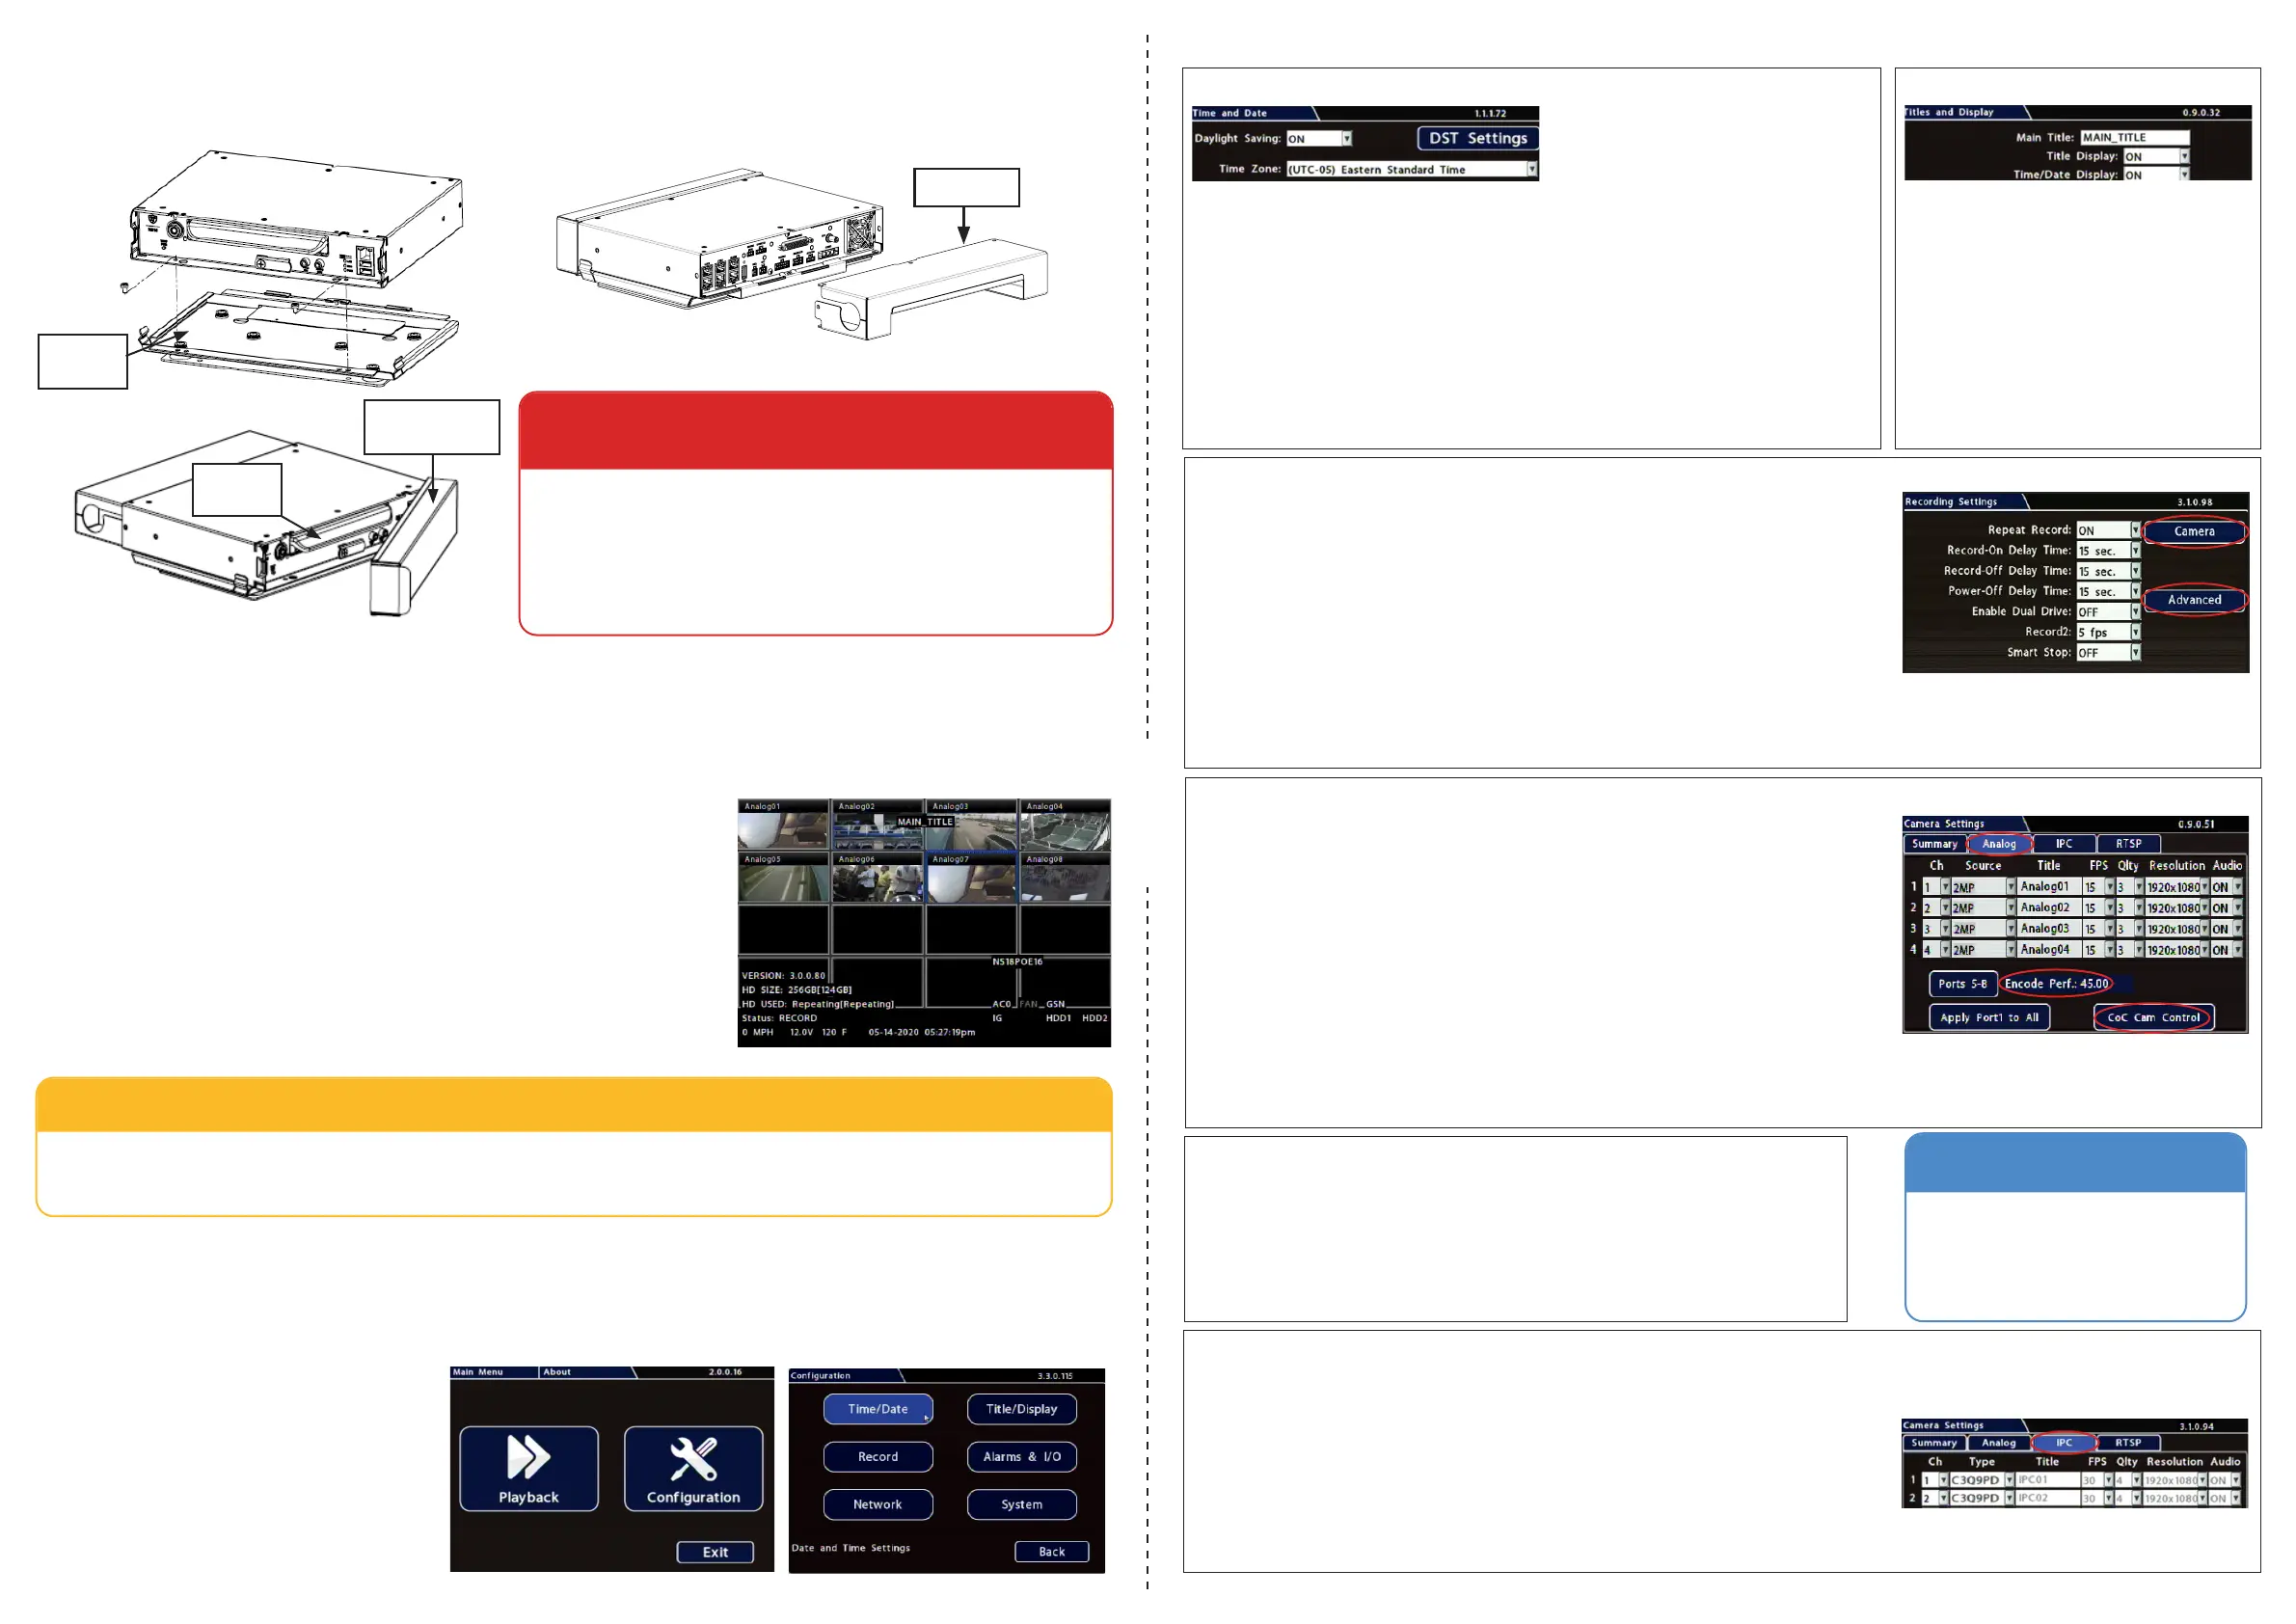
Step 4a. Analog Cameras (click the Analog tab)
Ch: Leave at default settings unless you need to customize camera display locations in Live and
Playback views.
Source: If red font is displayed, a camera is not connected to the corresponding port, or the
connected camera type does not match the current selection; choose the appropriate setting for
the connected camera type as required.
Title: For each camera, enter a title that describes the view it records, such as: Front, Step, Mid, or
Rear. Titles display here as well as on the camera view overlays.
FPS, Qlty, Resolution: Leave at default settings unless you have special requirements. Note:
enabling channels and raising FPS, Quality, and Resolution settings consumes system resources.
The Encode Perf. value indicates the amount of resources available, based on current settings.
When the Encode Perf. value is below 0, you cannot save the conguration. If this happens,
adjust FPS, Quality, or Resolution settings until the Encode Perf. value is at or above 0.
For more information, see the NH16v2Install and Cong Guide on the Safe Fleet Community.
Audio: Leave ON for interior mounted cameras. Turn OFF for exterior-mounted cameras.
Basic NVR conguration
NVR Installation
The NVR is designed for horizontal installation (i.e. on top of the mounting plate).
Do NOT install the NVR upside down or vertically.
Mounting
Plate
WARNING: Do not install the NVR in a location where the unit
is exposed to excessive heat or moisture.
Installation close to extreme heat or moisture voids the product
warranty. Route wiring and cables away from sharp edges that
might damage insulation. Avoid sharp bends in cables.
When in doubt, contact the Support team before connecting the
NVR to other equipment in the vehicle.
Powering up the System
Turn on the vehicle ignition to power up the NVR. When the PWR LED shows green and the HDD LED ashes blue, the NVR
is operating normally and recording. The red ERR LED illuminates to indicate a fault condition (for details, see the NH16v2
Installation Guide, part # 700-1300 on the Safe Fleet Community).
NVR Menu Setup
Depending on installed options, NVR menu settings must be updated for the
system to operate properly.
To access NVR menu settings:
1. Connect a portable video monitor to VIDEO OUT on the NVR front panel.
2. Plug a USB mouse into the USB mouse port on the NVR front panel.
3. Right-click anywhere on the live camera views to access NVR menus.
Return to live camera views after updating menus.
TIP: Camera views
Live camera feeds appear in a 16-up (4x4) grid. Tiles display according to assigned channel number (sequentially from top-
left to bottom-right). For more information, see Step 4.
NVR Menu Settings
This section covers only the basic menu options required to get your NVR working. For full menu details, see the
NH16v2Installation and Conguration Guide on the Safe Fleet Community.
Accessing Conguration Screens
With a portable video monitor and mouse
connected, power up the NVR. When live
camera views appear:
1. Right-click anywhere to display the NVR
Main Menu.
2. Click Conguration to access the
Conguration menu.
Step 1. Time and Date
Daylight Saving: Leave On and at default dates unless in an area that does not use daylight savings
(ex: Arizona, Saskatchewan).
Time Zone: Select the time zone.
Time Format: Choose 12 or 24 hour display.
Time: Input the correct time.
Date Format: Select the date format.
Date: Input the date.
GPS Time Sync: If GPS is installed, set this On to have system time automatically updated when
satellites are detected.
Click Back to save the menu settings and return to the Conguration menu. Click Title/Display.
Step 3. Record
Repeat Record: Leave On for the hard drive to record over the rst recordings when it is full.
Record-On Delay Time: Leave at default to let the bus voltage settle after the bus starts up, to
prevent voltage drops affecting the recorder.
Record-Off Delay Time: Set to 10-20 minutes to keep the NVR and cameras on after the ignition
turns off to record the bus post-trip check.
Enable Dual Drive: Set ON if 2 drives are installed.
Power-Off Delay Time: This starts up after Record Delay Off time ends. If Wi-Fi is used, set to 2
hours or more. If no Wi-Fi, leave at default.
Record2: Leave at 5 FPS unless instructed otherwise.
Smart Stop: When enabled, the NVR starts counting down the selected duration when the vehicle’s
ignition turns off, to reduce battery drain. For details, consult the NVR’s installation guide.
Step 2. Titles and Display
Main Title: Enter the bus number.
Title Display: Leave On to overlay Main Title
and Camera Name on video images in live and
recorded views (see “Camera Views”, below). If you
want to remove a text overlay (Titles, Time/Date,
Record Status, System Data, Metadata, Internal
Temperature Units) to reveal more of the video
image, set its Display value to Off.
Click Back to save the menu settings.
In the Conguration menu, click Record.
Step 4b. CoC Cam Control
Some cameras are equipped with IR (Infrared) LEDs that illuminate automatically in low light
conditions.
To turn off IR (e.g. for a forward-facing camera) or congure Backlight settings:
Select Camera SettingsAnalogCoC Cam Control and use the Conguration Main Menu.
For details on disabling IR, and information on other CoC options, consult your camera’s Quick
Installation Guide.
IMPORTANT
For both analog and IP cameras,
set unused camera FPS speeds and
Audio to OFF, so the NVR will not
generate video loss events.
Step 4c. IP Cameras (click the IPC tab)
Note: To enable the IPC conguration tab, at least one rear-panel POE port must have either the network switch (NS18POE16) or IP Camera selected in the
Network Port Functions screen dropdown menu. For more information, see the NH16v2Install and Cong Guide on the Safe Fleet Community.
Ch: Select an IP camera feed display location for Live and Playback views.
Type: if red font is displayed, select the appropriate camera model from the list.
Adjust Title, FPS, Qlty, Resolution, and Audio settings as required (these function the same for
analog and IP cameras).
Click Back to save settings.
8
A
B
A
B
8
7
7
6
5
4
3
E
5
6
C
D
4
1
2
3
C
2
1
F
E
D
COPYRIGHT SEON DESIGN INC., ALL RIGHTS RESERVED. THIS DOCUMENT MAY NOT BE DISCLOSED, OR REPRODUCED BY ANY MEANS WITHOUT THE WRITTEN CONSENT OF SEON DESIGN.
File Last Saved Date: January 9, 2023 1:13:28 PM
File Name: NH16V2P_CUST_NVR,Hybrid,NH16 with Mounting Hardware_1
F
THIRD ANGLE PROJECTION
SHEET:
1 of 1
B
SHEET
SIZE
PART NUMBER:
MANUFACTURING DESCRIPTION:
SEON DESIGN INC.
111 - 3B Burbidge St.
Coquitlam, BC
Canada V3K 7B2
TEL: 604.941.0880
FAX: 604.677.6050
APPROVALS
DATE
DRAWN:
ENG:
ARENA Tracking:
NO DECIMAL PLACES
1 DECIMAL PLACE
2 DECIMAL PLACE
ANGLES
UNLESS OTHERWISE NOTED
DIMENSIONS ARE IN MM
NOT SPECIFIED
REVISION
19
TOLERANCES ARE:
Cable Cover
Locking Front
Cover (reversible)
NVR Hard
Drive
Click Camera to access camera settings. Click
Advanced to congure Time Limited Recording,
Video Watermarking, and Protected Alarm
settings.
 Loading...