32
1. Preparations
Contents
1. Preparations
2. Installation
3. Installation troubleshooting
4. Manual adjustment mode
5. Optional features
• AUX-connection
• Water leakage sensor
Follow these instructions carefully and
pay particular attention to the instruc-
tions marked in the following way:
ѥ WARNING
Follow instructions marked with a
warning accurately to prevent injury
to persons and damage to property.
⚐ ATTENTION
Follow instructions marked with a
note carefully to prevent damage to
property.
ѧ HINT
Hints give you useful advices on us-
ing the appliance.
Warnings
ѥ WARNING
Read user and installation manual be-
fore using or installing the appliance.
Install and check the application ac-
cording to the instructions. Safera
is not liable for any damages or ex-
penses caused by inappropriate in-
stallation.
1.2 Package content
ѥ WARNING
Check that the Stove Guard is compat-
ible with the cooker (see section 1.1).
If the network cable is damaged, it
must be replaced by the service per-
sonnel of the manufacturer or their
representative to avoid hazards.
All electrical connections must be
carried out by a qualiied electrician.
⚐ ATTENTION
If the appliance was stored in a cold
space, it must be allowed to warm
up to room temperature before con-
necting it to electric network.
1.1 Compatibility
Safera Stove Guard is compatible with
most electrical cookers, hobs and ovens
meant for household use:
• Traditional cast-iron cookers and
hobs
• Ceramic cookers and hobs
• Induction cookers and hobs
• Cookers and hobs equipped with
a timer, afterheat indicator, child
proof lock or integrated switch-o
system
Safera Airis is compatible with cookers
no wider than 90 cm, see chapter 2. In-
stallation step 2/2.
Cleaning pad
Transparent front cover
10 x Color labels
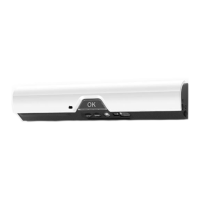
Sensor unit Ⓐ with
mounting bracket Ⓑ
User and installa-
tion manuals
2x Batteries for sen-
sor unit (AA/LR6)
Optional mounting
screws (2x)
ѥ WARNING
Please contact your vendor if you no-
tice anything unusual about the ap-
pliance.
Check the product and the contents of the package before installation:
Adjustment button ❶
OK-button ❸
Adjustment button ❷
Low battery
light
❺
Indicator light ❹
❻ Sensors
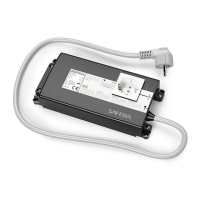
Power control unit
Ⓒ (various models
available)
 Loading...