hole for the recommended pin position
and screw tight.
4. Place the lever (1) and disk spring (1.2)
on the sensor shaft.
Place the lever (1) in mid-position and
hold it in place. Screw on the nut (1.1).
5. Place the follower clamp (3) on the actu
-
ator stem, align and fasten it, making
sure that the fastening screw rests in the
groove of the actuator stem.
6. Place the mounting plate (21) together
with the sensor onto the actuator yoke so
that the follower pin (2) rests on the top
of the follower clamp (3). It must rest on
it with spring force.
Screw tight the mounting plate (21) onto
the actuator yoke using both fixing
screws.
7. Mount cover (11) on the other side.
Make sure that the vent plug points
downwards when the control valve is in
-
stalled to allow any condensed water
that collects to drain off.
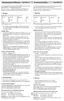
2.7.2 Mounting the position
sensor with attachment
according to IEC 60534-6
For the required mounting parts as well as
the accessories, refer to the order numbers
listed in Tables 7 and 8 on page 45.
1. Place the lever (1) on the sensor in
mid-position and hold it in place.
Unthread the nut (1.1) and remove the
lever together with the disk spring (1.2)
from the sensor shaft.
2. Screw the position sensor (20) onto the
bracket (21).
The standard attached lever M with the fol-
lower pin (2) at position 35 is designed for
42 EB 8384-4 EN
Attachment to the control valve – Mounting parts and accessories

 Loading...