SRK
SERIES
ASSEMBLY
..
'
....
--
· .
..
-
..
- . .
.. -
:-.;,,
•,,-·=
--
~,_]
~·
..._,--
I
,.-
I
..
-
..
-
\
--
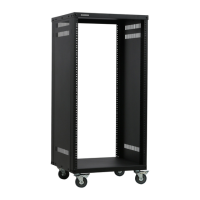
SRK
Assembly Instructions
1.TOP
PLATE
2.SIDE
PLATE
3.FRONT
PILLAR
4.BACK
PILLAR
5.BASE
PLATE
6.WHEEL
7
.CROSS-SCREW
8.BACK
PLATE
(1
PCS
}
(2PCS
)
(2PCS
)
(2PCS
)
(1
PCS
}
(4PCS
)
(36PCS
)
(1
PCS
)
1 First, determine
if
you are setting up the rack for
US
or
European threads.
Each
of
the pil-
lars
has
the
US
thread on one side and the European thread on
the
other. The
US
threads
are indicated
by
the
knockout hole.
So
,
if
you want
to
configure the rack for
US
threads be
sure that all
the
knockout holes
are
facing outward.
If
you want to configure
the
rack for
European threads be sure that all
the
knockout holes are facing inward.
2 With the base plate
(#5)
flat on
the
ground, using the small black screws, screw (3 screws)
one
of
the side plates (
#2)
in
so
that the inner ridge
is
sitting flat on
the
base
plate.
3 On either side
of
the
side plate screw
(2
screws per pillar) in
the
2 pillars (
#3
& #4)
with
th
e
inner ridge sitting flat on
the
base
plate, for American thread
the
side
with
the
knockout
should be facing out.
4 On
the
SRK16
and
SRK21
the 2 pillars will be screwed i
nto
the side plate.
5 Repeat for the other side
of
the
rack.
6
Place
the
top
plate
(#1
) over
the
sides
of
the rack,
so
that the 4 pillars and side plate
fit
inside the
top
plate and fasten the
18
screws.
7 Screw the Samson back plate (
#8
) in
with
either the American 10/
32
si
lver screws, or the
Euro
M6
black chrome screws.
 Loading...