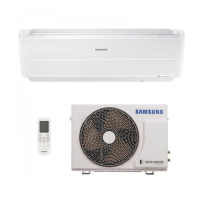
Do you have a question about the Samsung AR09JSFDHWKN and is the answer not in the manual?
Cools the room quickly and then adjusts fan speed and airflow automatically.
Provides strong and powerful cooling or heating air.
Spreads cool/warm air indirectly for comfortable environment.
Minimizes energy consumption when used by one person.
Allows for easy and frequent filter cleaning without removing grilles.
Adjusts temperature, fan speed, and airflow for a good night's sleep.
Self-examines the unit after installation for proper setup.
Simplifies hanging the unit and connecting pipes/wires.
Defines symbols and critical warnings for safe operation and installation.
Covers warnings related to wiring, grounding, and qualified personnel for installation.
Includes precautions on installation locations, grounding, and power wiring.
Details safety measures during operation, flood, smoke, or gas leak situations.
Warns against inserting fingers, striking, or disassembling the unit.
Advises on placing objects, operating with wet hands, and using chemicals.
Highlights safety steps for cleaning and cautions against specific cleaning agents.
Provides a warning about chemicals known to cause cancer and reproductive toxicity.
Specifies indoor/outdoor temperature and humidity ranges for efficient operation.
Details internal protections and smart install function for unit upkeep.
Illustrates and labels the primary components of the indoor unit.
Identifies indicators and icons on the remote controller's LCD screen.
Explains the function of each button on the remote control.
Details the indicators and symbols displayed on the remote control.
Guides on battery replacement, low battery warnings, and proper storage.
Automatically sets temperature and fan speed based on room conditions.
Cools the room, allowing temperature and fan speed adjustments.
Dehumidifies the air for a refreshing feel in humid climates.
Circulates air in the room to refresh stale air.
Warms the room, with considerations for low outdoor temperatures.
Controls the up and down movement of the air flow blades.
Controls the left and right movement of the air flow blades.
Configures the air conditioner to turn on automatically at a set time.
Specifies options like mode and temperature for the On timer.
Configures the air conditioner to turn off automatically at a set time.
Explains how to set both On and Off timers for sequential operation.
Details the three stages: Fall asleep, Sound sleep, and Wake up.
Allows temperature adjustments and airflow control during sleep mode.
Describes how temperature and fan speed adapt during sleep stages.
Allows temperature adjustment and airflow control in single user mode.
Allows temperature adjustment and auto fan speed in quiet mode.
Instructions for cleaning the indoor unit with a damp cloth.
Guidance on cleaning the outdoor unit's heat exchanger to maintain performance.
Step-by-step guide on how to remove the air filter from the unit.
Method for cleaning washable foam air filters using vacuum or washing.
Chart detailing recommended checks for indoor and outdoor units.
Solutions for when the unit fails to power on or operate.
Troubleshooting steps for incorrect temperature settings or control.
Resolutions for when the unit does not produce desired cool or warm air.
Solutions for issues related to air direction and fan speed control.
Troubleshooting fan speed control when it's not working as expected.
Solutions for a non-responsive or malfunctioning remote controller.
Resolutions for problems with setting or operating the timer functions.
Guidance on interpreting blinking indicators and error messages.
Addresses issues like unusual noise, room odors, and water leaks.
Guidelines for selecting an appropriate location for the indoor unit.
Ensures compliance with safety standards for electrical connections.
Criteria for choosing a suitable location for the outdoor unit.
Identifies places that could cause unit malfunction or damage.
Specifies clearance dimensions for installing one outdoor unit.
Details clearance requirements when installing more than one outdoor unit.
Lists the accessories included with the indoor unit case.
Lists the accessories included with the outdoor unit case.
Details optional accessories for connecting the unit.
Lists general tools and specific tools required for installation and testing.
Instructions for mounting the installation plate on a wall.
Steps for attaching the installation plate to a window frame.
Procedure for fixing the installation plate to a gypsum board.
Steps to remove screws before disassembling the cover panel.
Detailed process for removing the indoor unit's cover panel.
Instructions for reassembling the indoor unit's cover panel after installation.
Details wire types, AWG, and cross-sectional area requirements.
Guides on connecting the main power, communication, and grounding wires.
Procedure for extending the power wiring safely and correctly.
Ensures proper connection of wires to terminal blocks on indoor/outdoor units.
Instructions for cutting, flaring, and extending refrigerant pipes.
Steps for correctly routing and connecting the indoor unit's drain hose.
Procedure for altering the direction of the drain hose connection.
Process to remove air from refrigerant lines using a vacuum pump.
Guidance on adding refrigerant based on pipe length.
Method for charging refrigerant using a liquid pipe connection.
Procedure for testing for leaks using nitrogen pressure before operation.
Method for checking leaks after opening valves using a leak detector.
Steps to collect refrigerant before disconnecting lines for repair or disposal.
Guidance on securely installing the outdoor unit on a stable base or wall.
Details progress indicators and outcomes for successful/failed installation.
Lists error codes and corresponding troubleshooting measures for installers.
Steps to safely remove refrigerant before disconnecting the unit.
| Refrigerant | R410A |
|---|---|
| Power Supply | 220-240 V, 50 Hz |
| Type | Split |
| Cooling Capacity | 9, 000 BTU/h |
| Energy Efficiency Ratio (EER) | 3.21 |
| Indoor Noise Level | 21 dB |
| Operating Temperature (Cooling) | 18°C to 32°C |


