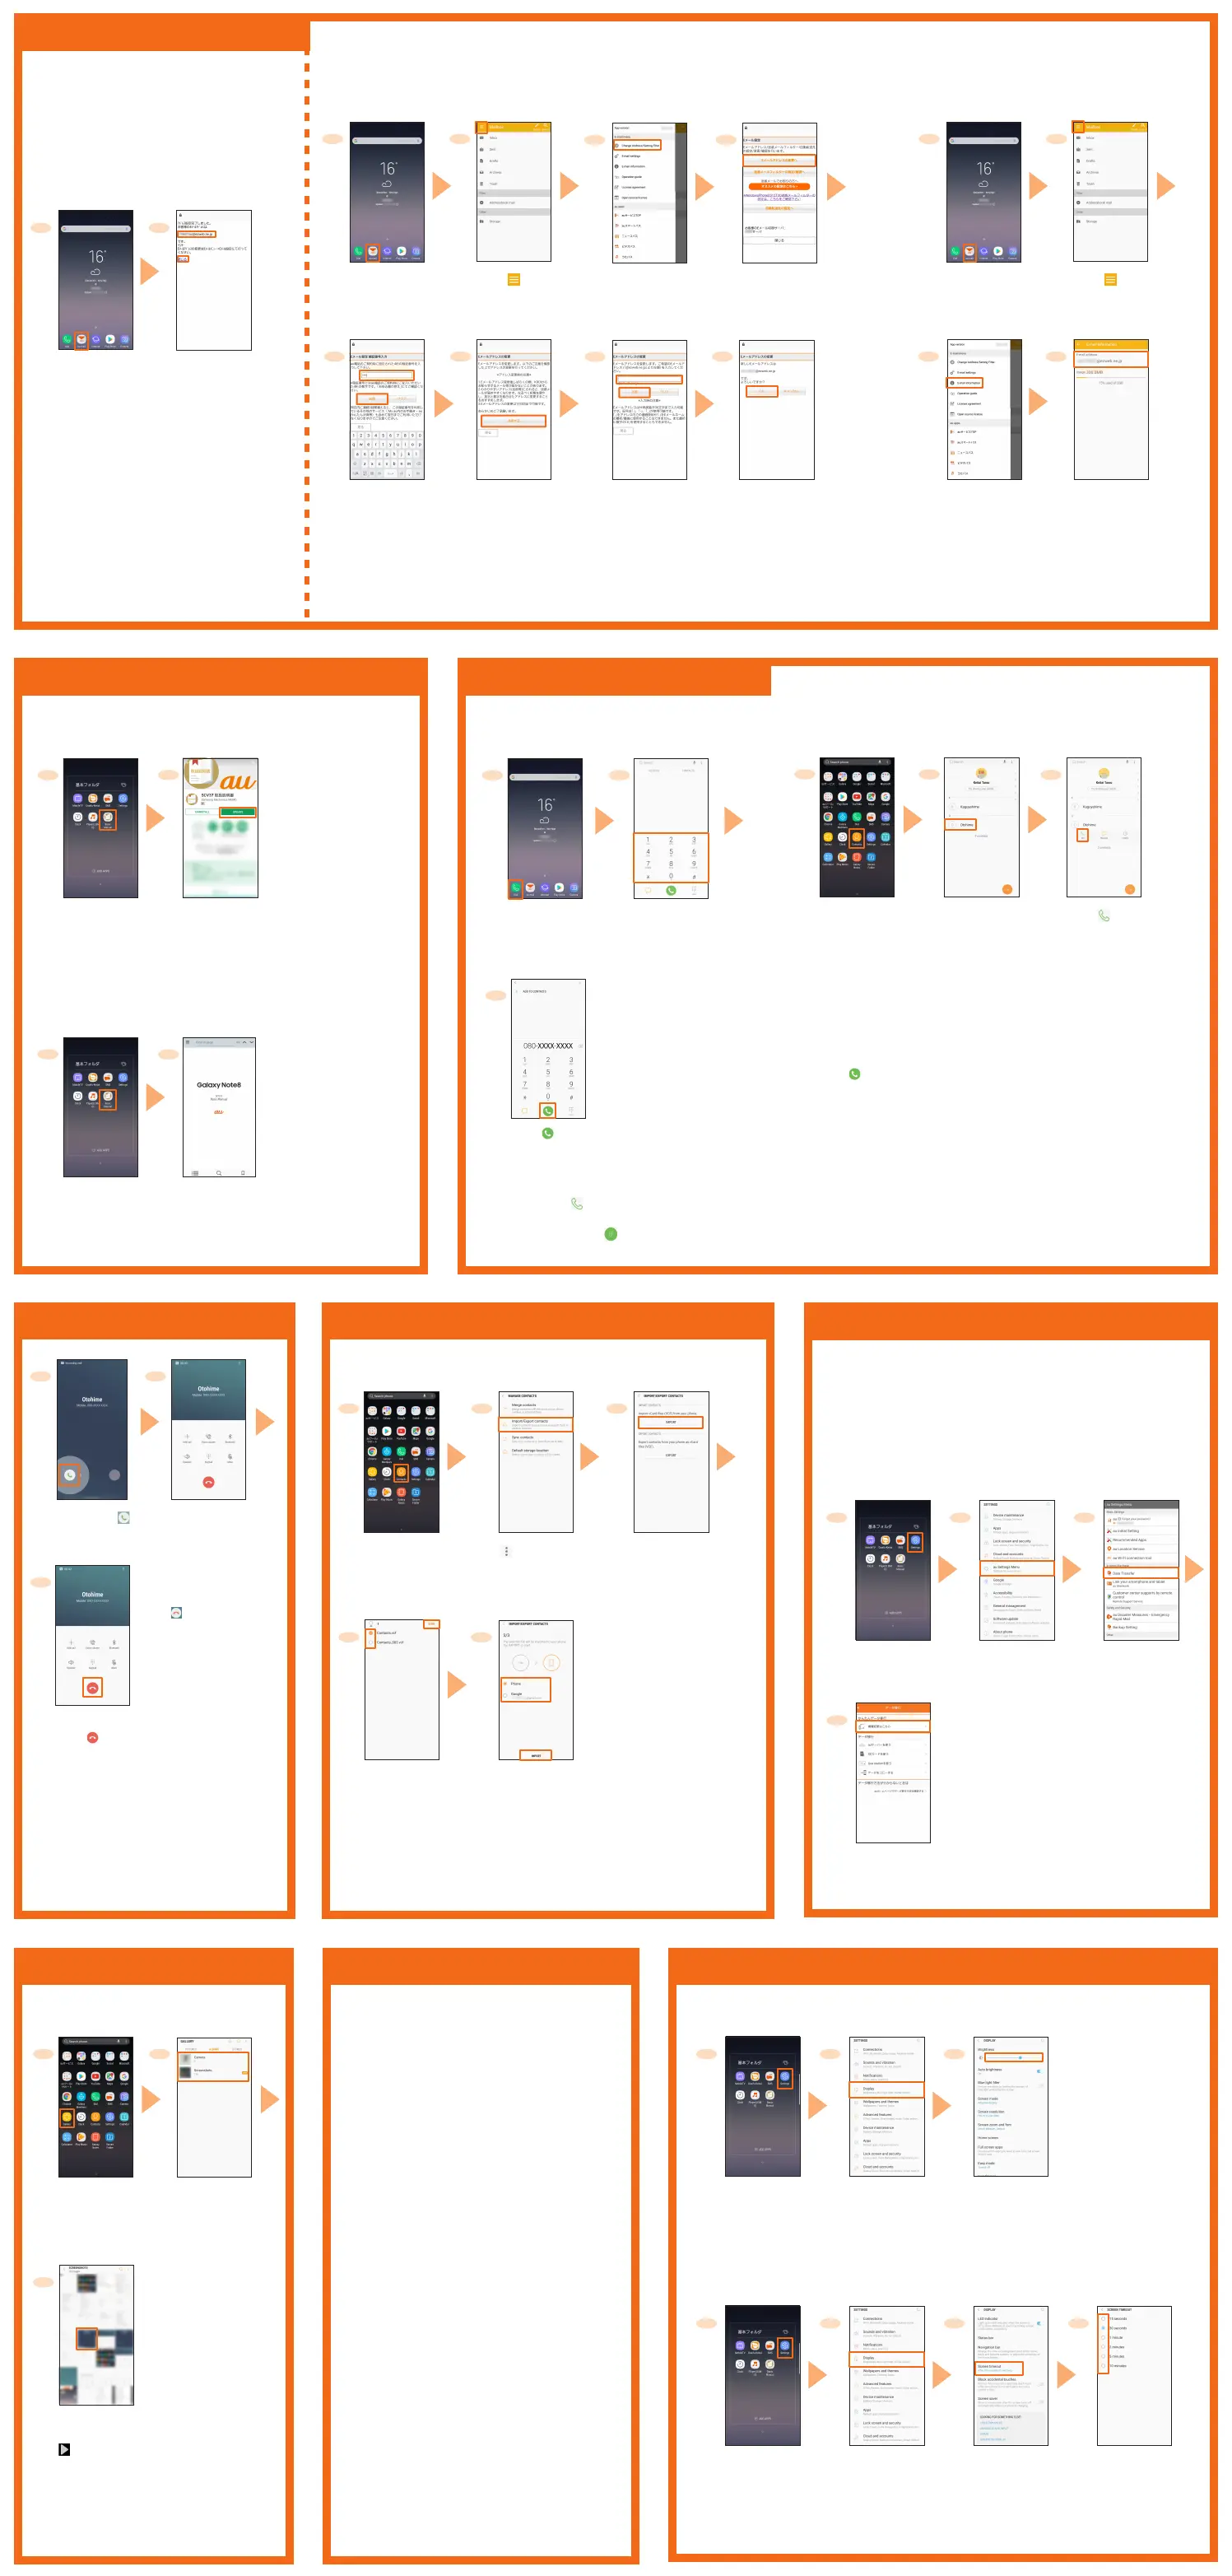
au-mail settings
Basic Manual application
Making a call
Viewing/playing data
電話を受ける
Importing/Exporting contacts
How to transfer data from the au Settings Menu
Setting screen brightness and screen timeout
How to back up data to a PC
Receiving a call
[Phone]/Synchronized
account → [IMPORT]
* Contacts data is imported.
On the home
screen, flick up
or flick down →
[Contacts]
Enter a phone
number
[
]
View/play images or videos saved in the phone
memory or a microSD memory card.
Although E-mail address is automatically decided by performing Initial settings, the E-mail
address can be changed.
■ Changing your E-mail address
■ Initial Setup
To use au-mail, subscription to LTE NET is required.
If you did not subscribe it when you purchased the
product, contact an au shop or Customer Service
Center.
● For model change from au phone, you can
continue to use the E-mail address that is used
on the former model by making initial settings.
● Before performing this procedure, turn o the Wi-Fi
®
function.
■ Downloading "Basic Manual application"
■ Using "Basic Manual application"
■ Checking E-mail address
■ Calling by direct input ■ Calling from the contacts
Calling overseas (au International Call Service)
You can make international calls without any special procedure from
the product.
To call overseas, on the keypad screen, enter an access code,
country code, area code*, and the phone number of the other party,
then tap " ".
* If the area code starts with "0", dial it without including the "0". (There are
some exceptions such as Italy).
● To dial using call log, in step 2, tap the
"RECENTS" tab to select a log you want to
call, then tap " ".
● To return to the keypad screen from the
"RECENTS" tab, tap " ".
You can transfer contacts data in the previously used au Nano IC Card 04 or
microSD memory card.
● To export contacts, in step 3, [EXPORT] → [Internal storage]/[SD card]/
[SIM card].
● You can export up to 50 contacts to the au Nano IC Card 04.
● If "License agreement" screen appears, confirm the
content and tap [AGREE].
On the home
screen, [au-mail]
Initial settings are
complete, E-mail
address appears
→ [閉じる (Close)]
On the home
screen, [au-mail]
On the home
screen, [au-mail]
[ ] [ ]
[Change Address/
Setting Filter]
[Eメールアドレスの変更
へ (To Change E-mail
address)]
Enter the
security code
→ [送信 (Send)]
Enter E-mail
address → [送信
(Send)]
[OK] → [閉じる
(Close)]
[E-mail information]
E-mail address
appears
Tap a contact
to call
[ ]
On the home
screen, flick up
or flick down →
[Contacts]
[ ] → [Manage
contacts] →
[Import/Export
contacts]
[IMPORT] →
[Internal storage]/
[SD card]/[SIM
card]
On the home screen,
flick up or flick down
→ [Gallery]
Select an album
* When a screen
other than album
list is displayed,
go to step 3.
Select data to view
* To play video, tap
[
].
On the home
screen, [Dial]
You can restore/store data from your previous au phone to this product
using a microSD memory card or au servers.
● If you restore data using au server, store the data using your previous
au phone to the au server in advance. You need to set up an au ID to
use the au server.
(If your previous au phone does not have the au Settings Menu, use the
au Cloud app.)
● If you restore data using microSD memory card, save the data using
your previous au phone to a microSD memory card.
(If your previous au phone does not have the au Settings Menu, use the
au backup app.)
■ Setting screen brightness
■ Setting screen timeout
Smart Switch is an app for transferring data.
There are two versions of Smart Switch: Smart Switch
for PC and Smart Switch for mobile.
By using Smart Switch for PC, you can back up data to
and restore data from a PC.
You can download "Smart Switch" from Smart Switch
homepage. For details of downloading and the way to
use, refer to Smart Switch homepage.
http://www.galaxymobile.jp/apps/smart-switch/(in
Japanese only)
You can only forward content that you own or have the
rights to.
Samsung Electronics Co., Ltd. takes no responsibility
for any infringements on the Copyright Law.
■ How to back up data to a PC
using Smart Switch
Select contacts data to
import → [DONE]
* If there is only one
contact data saved, go
to step 5.
● To reject a call, in
step 1, drag/slide
" " out of circle.
When a call rejected,
the caller hears the
guidance.
● To answer with an
answering message,
slide "SEND
MESSAGE" up →
[Answering message]
in step 1.
● When you receive a call while using the
product, a pop-up screen will appear. To
answer the call, tap [ANSWER].
● Tap [DECLINE] on the pop-up screen to
reject a call.
● On the pop-up screen, tap [SEND MESSAGE]
→ [Answering message] to answer the call
with an answering message.
Your call will begin
To end the call,
[
]
Drag/slide " "
out of the circle
On the home screen,
[基本フォルダ (Basic
folder)] → [Settings]
[機種変更はこちら(Model
changing is here)] and perform
data transfer according to the
screen guidance.
Tap the time until
screen turns o
[Data Transfer]
[au Settings Menu]
If you want to store your pictures,
address book (contacts), etc.
automatically to the au server using
"データお預かり(Data Storage)" app, you
can set up by following procedure.
● On the home screen, [基本フォルダ
(Basic folder)] → [Settings] → [au
Settings Menu] → [Backup Setting]
Precautions screen
of changing E-mail
address appears →
[承諾する (Accept)]
On the home
screen, [基本フォル
ダ (Basic folder)]
→ [Basic Manual]
On the home
screen, [基本フォル
ダ (Basic folder)]
→ [Basic Manual]
[UPDATE] → [ACCEPT]
The Basic Manual
cover is displayed.
On the home
screen, [基本フォル
ダ (Basic folder)] →
[Settings]
On the home
screen, [基本フォル
ダ (Basic folder)] →
[Settings]
Drag the "Brightness"
slider to the right
and left to adjust the
brightness
[Screen timeout]
[Display]
[Display]
 Loading...