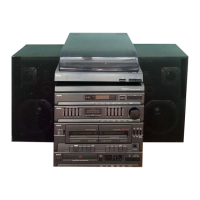
Bass expander system
Press the BASSXPANDER button to enhance the bass sound. “BASY
appears on the display.
The initial setting of t$his function is ON.
Selecting the sourud mode
Press the SOUND PRESET button to select the sound mode matching the
music to be listened b.
POP: Pops, etc.
ROCK: Rock music, etc.
CLASSIC: Class&} music, etc.
JAZZ: Jazz, etc.
Spectrum analyzer
Indicates the input Ievai and peak value of each sound range.
Demonstration mode
If the DISPLAY buttom is pressed, the display enters the demonstration
mode. The following display modes will sequentially appear.
- AMP — CD— TUNER— TAPE— VI DEO/PHONO 1
To cancel this mode, press the DISPLAY button again.
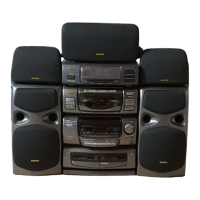
WHAT TO DO IF ...
[
If the operation of the unit or display is not normal or when all the memory
contents are to be cleared, disconnect the mains lead from the AC outlet,
then press the RESET button (rear of the unit) for 30 seconds or more.
%
RESET
Use compact discs bearing the symbol shown below. In addition to
conventional 12cm CDs, this system can be used to play 8 cm CDs without
an adarXer.
~T-@
DIGITAL AUDID
Note:
Do not touch the disc tray while it is moving.
- Never place anything except a compact disc on the disc tray. Foreign
objects can damage the unit.
Do not apply excessive force to the disc tray.
- Discs must be pfaced on the disc tray one at a time.
If discs are loaded, you can turn the unit on and begin play immediately
bv messina the ➤/11PtAY/PAUSE, DISC 1, DISC 2 or DISC 3 button.
1.
2.
3.
4.
5.
Select “CD” function by pressing the FUNCTION button. “CD” appears
on the display, then ‘CD” is replaced by”dlSC”. ”1” disc number blinks.
Press one of the disc select buttons (DISC 1, DISC 2 or DISC 3), then
press the 0PENA2LOSE button.
If the changer mechanism has detected “no disc” for the disc
select button pressed, the tray slides out automatically.
The selected disc tray slides out. “OPEN” appears and the selected
disc number blinks on the display.
Place the disc with the label facing upon the disc tray.
‘a ‘*
For 12 cm CD For 8 cm CD
Press the OPEN/CLOSE button again to close the disc tray.
Note:
To open or close the disc tray, be sure to use the OPEN/CLOSE
button. Do not touch the disc tray by hand.
Repeat steps 2-4 to load another disc.
6.
7.
Press one of the disc select buttons (DISC 1, DISC 2 or DISC 3).
The selected disc indicator blinks.
c-MY
m
;Q
<
I-I I-I I
<
i
U.u I
“D- PLAY’ appears, and play starts from the first track of the selected
cfiss.
The track number and elapsed playing time for the current track are
d~layed. -
If the desired disc number has been selected, the WII PLAY/
PAUSE button can also be used to start play.
N-
It the disc is loaded with the label facing downward, or if a badly
scxetched disc is loaded, “NO dlSC” appears on the display.
If f4%isoccurs, load the disc correctly or replace the damaged disc.
F%ess the ■ STOP button to end disc play.
When the last track of the last disc has been played, the player stops
aw$omatically.
W%an the OPEN/CLOSE button is pressed during play, play will stop
amci the disc tray will slide out.
Ejectiing or replacing discs
1. W%xile in the CD play or stop mode, press one of the disc select buttons
tot & ejected, then press the OPEN/CLOSE button.
While the player is playing one disc, you can eject or replace
another disc without stopping play.
2. Ff@smcrveor replace the disc.
3. Rwass the OPEN/CLOSE button.
Notes on handling compact discs
U@
not expose the disc to direct sunlight, high humidity or high
tesxqx?ratures for extended periods of time.
- fMsca should be returned to their cases after use.
Da rrot apply paper or write anything on the disc surface.
- I-Wmcffe the disc by its edge. Do not touch the playing surface (glossy
S*).
F~rpnnts and dust should be carefully wiped off the playing surface
og~ disc with a soft cloth.
VV@a in a straight motion from the centre to the outside of the disc.
F&msx use chemicals such as record cleaning sprays, antistatic
sprsxys or fluids, benzene or thinner to clean compact discs.
9
 Loading...