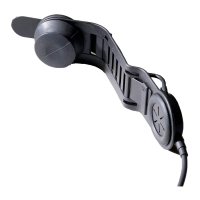
EasyManua.ls Logo

Savox HC-1 - User Manual

Savox HC-1
7 pages
Print Icon
To Next Page IconTo Next Page
Loading...
SAVOX® HC-1(2)
Helmet-com® unit with bone conduction
microphone
Product description
The SAVOX® HC-1(2) is a durable and light weight helmet-
com unit for professionals working in extreme and hazardous
conditions. The SAVOX® HC-1(2) provides instant, clear and
reliable “hands-free” communication, increasing personal
safety and work efciency, allowing full concentration on the
actual task.
Thanks to the unique arm/strap fastening system the SAVO
HC-1 easily mounts in almost any type of helmet without any
tools. The HC-2 is the dual speaker version that mount in
helmets particulary prepared for communication.
The convenient bone conduction microphone is voice sensitive
and makes a perfect combination with a breathing mask. The
SAVOHC-1(2) is the ideal communication solution for re
and rescue, special task operations – simply whenever using a
helmet. The SAVOX® HC-1(2) connects to most SAVOX® com-
control/PTT units adapting to most types of two-way radios.
The unit consists of the following parts/functions:
1. Bone conduction microphone
2. Speaker(s)
3. Detachable arm (HC-1)
4. Flexible strap (HC-1)
- Cable with quick release plug compatible with most SAVOX
with most SAVOX com-control units
Helmet specic mounting kit (HC-2)
- for MSA/Gallet helmet included
- for Dräger helmet available
Installation of the SAVOX HC-1 into the helmet:
Choose the side of the helmet on which you prefer to
have the unit.
Push the exible strap (4) behind the headband of the
helmet, or similar type of framework (g.1). (Alternatively
slide the exible strap through a proper slot to the other
side of the arm and then carefully slide the arm behind the
headband (g.2).)
When positioned in the helmet, weave the exible strap
(4) through an appropriate slot in the arm (3). Finally,
weave the exible strap (4) to the backside of the arm (3).
It is important that when the helmet is on your head,
the slots you have used keep the unit steady and that the
speaker is positioned on your ear.
Installation of the SAVOX HC-2 to the MSA/Gallet/
Drägerhelmet: (using specic mounting kit)
Speakers
Mount the speaker on the left side of the helmet using
xing clip marked L. Mount the Left side speaker so that
the cable, going to the push-to-talk unit goes backwards
and the cables for the microphone and the right side
speaker goes forwards. Assure that the speaker sink into
the spacing between the cushion and the mounting slit. In
some helmets it might be necessary to press the cushion
with the thumb aside a little (g.3).
Mount the speaker on the right side of the helmet
using xing clip marked R. Thread the Right side speaker
between the harness and the inner liner of the helmet to
the right side. Mount the right side speaker into the slit on
the right side of the helmet. Turn the speaker in such way
that the cable is going upward out of the speaker. Finally
place the cable connecting the speakers to the rear of the
helmet, lift the cushion and feed the cable underneeth the
cushion (g.4).
Microphone
Clean the inside of the helmet under the net with grease
solvent. Threadthe microphone (1) under the sweatband
and the harness of the helmet.
user guide
SAVOX HC-1(2)
helmet-com
WARRANTY
1. SAVOX grants a 16 month guarantee for its accessories which period beings
from the date of sales to the original purchaser. This includes warranty repairs
orreplacement, whichever is of lower cost, of equipment or parts.
2. The defective products or parts should be sent to the manufacturer or to
an authorised service repair center intact i.e. for any products that have been
opened in a service attempt by an unauthorized service repair shop or by the
owner/user the warranty is void. Costs of transportation are not included in the
warranty service.
3. Damages which are caused by improper use or handling, storage or transpor-
tation are excluded from the warranty.
4. SAVOX is not liable for any damages caused by failure of the SAVOX product
during operation.
5. In other respects, the warranty conditions set forth in the NL92 will apply.
LIMITED WARRANTY FOR THE UNITED STATES OF AMERICA AND CANADIAN
MARKETS ONLY.
SAVOX Communications Inc.(“SAVOX”) warrants that the SAVOX com-control
(“the Product”) will be free from defects in material or workmanship as follows:
For a time period of one (1) year from the date of purchase, SAVOX will repair
or replace the Product (repair or replacement to be at SAVOX’s sole discretion) if
it is determined to be defective.
For an additional one-year period from the date of purchase, SAVOX will pro-
vide replacement parts or replace the Product (repair or replacement to be at
SAVOX’s sole discretion), however, the customer will be responsible to pay labor
charges during the second year of the limited time warranty.
There are no warranties that extend beyond the limited warranty set forth
above.
Certain distributed products are warranted and serviced by their original
manufacturer. Please consult with your Dealer for details. During the labor war-
ranty period, to repair the Product, Purchaser may return the defected Product,
freight prepaid, or deliver it to the designated SAVOX authorized service center,
the address of which can be found at www.savox.com. SAVOX is not obligated
to provide the Purchaser with a substitute unit during the warranty period or
at any time.
CONDITIONS
1. Notification of Claims: Warranty Service: If purchaser discovers that the Prod-
uct has proven defective in material or workmanship, then written notice with
an explanation of the claim shall be given promptly by Purchaser to SAVOX but
all claims for warranty service must be made within the warranty period. If after
investigation SAVOX determines that the reported problem was not covered by
the warranty, Purchaser shall pay SAVOX for the cost of investigating the prob-
lem at its then prevailing time- and materials rate. No repair or replacement by
Purchaser of any Product or part thereof shall extend the warranty period as to
the entire Product. The specific warranty on the repaired part only shall be in
effect for a period of ninety (90) days following the repair or replacement of the
part or the remaining period of the Product warranty, whichever is greater.
2. Exclusive Remedy: Acceptance: Purchaser’s exclusive remedy and SAVOX’s
sole obligation is to supply (or pay for) all labor necessary to repair any Product
found to be defective within the applicable warranty period and to supply, at
no extra charge, new or rebuilt replacements for defective parts. If repair or re-
placement fails to remedy the defect, then and only in such event, shall SAVOX
refund to Purchaser the price for such Product. Purchaser’s failure to make a
claim as provided in Paragraph 1 above or continued use of the Product shall
constitute an unqualified acceptance of such Product and waiver by Purchaser
of all claims thereto.
3. Exceptions to Limited Warranty: SAVOX shall have no liability or obligation
to Purchaser with respect to any Product subjected to abuse, improper use,
negligence, accident, modification, failure of the end-user to follow the operat-
ing and maintenance procedures of the procedures outlined in the user’s guide,
attempted repair by nonqualified personnel, operation of the unit outside of
the
published environmental and electrical parameters, or if such Product’s original
identification (trademark, serial) markings have been defaced , altered, or
removed, SAVOX excludes from warranty coverage. Products sold AS IS and/
or WITH ALL FAULTS and excludes used Products which have not been sold by
SAVOX to the Purchaser.
4. Proof of Purchase: The authorized Seller’s dated bill of sale must be retained
as evidence of the date of purchase and to establish warranty eligibility.
Disclaimer of warranty
Except for foregoing warranties, SAVOX hereby disclaims and excludes all other
warranties, express or implied, including, but not limited to any and/or all
implied warranties of merchantability, fitness for particular purpose and/or any
warranty with regard to any claim of infringement that may be provided in sec-
tion 2-312(D) of the uniform commercial code and/or in any other comparable
state statute. SAVOX hereby disclaims any representations or warranty that the
product is compatible with any combination of non-SAVOX products purchaser
may choose to connect with the Product, including without limitation, portable
two-way handheld transceivers and interface products.
Limitation of liability
SAVOX is not liable for any Purchaser’s sole and exclusive remedy for dam-
ages for any claim of any kind whatsoever. Regardless of the legal theory
and whether arising in tort or contract, shall not be greater than the actual
purchase price of the product with respect to which such claim is made. In no
event shall SAVOX be liable to purchaser for any special, indirect, incidental, or
consequential damages of any kind including, but not limited to compensation,
reimbursement or damages on account of the loss of present of prospective
profits or for death, personal injury or to property damage or for any other
reason whatsoever. Purchaser agrees that the cost of the Product is a reason-
able measure of Purchaser’s damage in the event of a claim for damage made
by the Purchaser based upon the circumstances existing at the time of the sale
of the product in light of anticipated or actual harm.
This Product is for commercial use.
Design and manufacturing: SAVOX Communications Ltd
Vitikka 4, FIN-02630 Espoo, Finland
savox@savox.com
www.savox.com
SAVOX® is a trademark of SAVOX Communications Ltd. Doc. nr: D22361. We
reserve the rights to changes.
If a face mask with quick helmet fastenings is used, place
the microphone in the center of the inside of the helmet. If
a face mask with rubber strap fastenings is used, place the
microphone 3-4cm of the center to the left side so that the
center strap of the face mask does not get in between the
microphone and the skull.
Remove the paper from the Velcro disc. Lift up the harness
of the helmet and place the microphone on the best suitable
spot and press down to glue the Velcro (g.5).
Strain-relief
Clean the inner surface of the helmet, underneath the left side
cushion with grease solvent. Remove the paper of the anchor
part of the strain relief. Place the anchor part approximately
1cm of the edge of the helmet behind the cushion and press
down to glue. Place the cable leading to the Push-To-Talk
unit in the sinking of the cushion. Fasten the cable with the
bundle-tie to the anchor part of the strain-relief (g.6).
NOTE!
Make shure that the headband of the helmet is correctly
adjusted and that the chin strap is correctly adjusted and
allways in use .The speaker(s) and the microphone of the
SAVOX® HC-1(2) are sensitive parts. Always handle with
care.
SAVOX Communications Ltd strongly recommends to
(detach or) take the SAVOX® HC-1(2) off the helmet when
two-way radio communications is not needed.
SAVOX Communications Ltd is not responsible for any
possible damages caused to any other equipment or clothing
when using the SAVOX® HC-1(2).
Interconnection/Use
Make sure that the battery of the radio is fully charged.
Connect the radio interconnection cable of your SAVO
com-control/PTT unit to the radio.
Attach the SAVOcom-control/PTT unit to a proper spot
from where it can be easily operated.
It is preferable to wear the equipment inside clothing
where it is protected from the environment.
Connect the quick release connector plug of the SAVO
HC-1(2) to the jack of the SAVOX® com-control/PTT unit.
Switch your radio ON.
Adjust the volume of the radio to a suitable level
Press the Push-To-Talk button to verify that the two-way
communication is working
Cleaning
The unit can be cleaned with a wet sponge or brush and
diluted dish washing detergent. Clean the connectors with
some high-class Vaseline spray (SAVOX recommends PRF
BAJOL, manufactured by Taerosol, (www.taerosol.com) or
similar type of lubricant. CAUTION! Do not apply solvent or
similar caustic chemicals!
1.
1.
2.
2.
3.
4.
4.
SAVOX HC-1 SAVOX HC-2
Figure 1 Figure 2 Figure 3 Figure 4 Figure 5 Figure 6
Question and Answer IconNeed help?

Do you have a question about the Savox HC-1 and is the answer not in the manual?

Summary

SAVOX HC-1(2) Helmet-com Unit Overview

Product Description and Features

Detailed explanation of the SAVOX HC-1(2) unit's durability, communication capabilities, and ideal use cases.

Unit Components and Identification

Lists and illustrates the main parts of the SAVOX HC-1(2) and HC-2 units, including the microphone and speakers.

SAVOX HC-1(2) Installation Guide

Installing SAVOX HC-1 into Helmet

Step-by-step instructions for fitting the SAVOX HC-1 into various helmet types using its flexible strap.

Installing SAVOX HC-2 with Mounting Kit

Guide for attaching the SAVOX HC-2 to specific helmets using the provided mounting kit, including speaker placement.

Microphone Installation for HC-2

Procedures for cleaning and installing the microphone for the SAVOX HC-2 unit within the helmet.

Strain-Relief and Cable Securing

Instructions for applying strain relief and managing cables for a secure and reliable connection.

Installation Notes and Safety Tips

Key reminders for proper adjustment, handling, and care during the installation process.

SAVOX HC-1(2) Usage and Maintenance

Interconnection and Operation Guide

Steps for connecting the unit to a radio and verifying two-way communication functionality.

Cleaning and Care Instructions

Guidelines on how to properly clean the SAVOX HC-1(2) unit using recommended cleaning agents.

SAVOX HC-1(2) Warranty and Support

SAVOX General Guarantee Terms

Details the 16-month guarantee period and coverage for SAVOX accessories, including repairs or replacements.

Limited Warranty for US and Canada

Outlines the specific one-year warranty and additional year coverage for the US and Canadian markets.

Warranty Conditions and Claim Process

Explains the process for making warranty claims and the conditions that must be met for service.

Warranty Exceptions and Liability Disclaimer

Lists exceptions to the warranty, disclaims other warranties, and limits SAVOX's liability for damages.

Overview

The SAVOX HC-1(2) is a durable and lightweight helmet-com unit designed for professionals operating in extreme and hazardous conditions, providing "hands-free" communication. It enhances personal safety and work efficiency by allowing users to concentrate fully on their tasks. The unit connects to most SAVOX com-control/PTT units, adapting to various two-way radios.

Function Description:

The SAVOX HC-1(2) integrates a bone conduction microphone and speaker(s) into a helmet-mounted system. The bone conduction microphone is voice-sensitive, making it particularly effective when used with a breathing mask. This system ensures clear and reliable communication for critical operations such as fire and rescue, and special task operations where a helmet is required. The HC-1 version features a detachable arm and flexible strap for versatile mounting, while the HC-2 is a dual-speaker version designed for helmets specifically prepared for communication.

Components:

The unit consists of:

  1. Bone conduction microphone: Captures voice through bone vibrations, ideal for noisy environments or when using breathing masks.
  2. Speaker(s): Delivers audio communication. The HC-1 has one speaker, while the HC-2 has two.
  3. Detachable arm (HC-1 only): Provides structural support for the microphone and speaker.
  4. Flexible strap (HC-1 only): Used for securing the unit to the helmet.
  5. Cable with quick release plug: Compatible with most SAVOX com-control units for connection to two-way radios.
  6. Helmet-specific mounting kit (HC-2 only): Includes components for mounting in MSA/Gallet helmets, with kits for Dräger helmets also available.

Usage Features:

Installation of SAVOX HC-1 into the helmet:

  1. Side Selection: Choose the preferred side of the helmet for mounting the unit.
  2. Strap Placement: Push the flexible strap (4) behind the helmet's headband or similar framework. Alternatively, slide the strap through a slot to the other side of the arm and then carefully slide the arm behind the headband.
  3. Strap Weaving: Once positioned, weave the flexible strap (4) through an appropriate slot in the arm (3), and then to the backside of the arm (3).
  4. Positioning: Ensure that when the helmet is worn, the chosen slots keep the unit steady and the speaker is positioned over the ear.

Installation of SAVOX HC-2 to MSA/Gallet/Drägerhelmet (using specific mounting kit):

Speakers:

  1. Left Speaker: Mount the speaker on the left side using the fixing clip marked 'L'. Position it so the cable to the push-to-talk unit goes backward, and the cables for the microphone and right speaker go forward. Ensure the speaker sinks into the space between the cushion and the mounting slit. In some helmets, it may be necessary to gently press the cushion aside with a thumb.
  2. Right Speaker: Mount the speaker on the right side using the fixing clip marked 'R'. Thread the right side speaker between the helmet's harness and inner liner. Mount it into the slit on the right side of the helmet. Orient the speaker so the cable exits upward. Finally, route the cable connecting the speakers to the rear of the helmet by lifting the cushion and feeding the cable underneath.

Microphone:

  1. Preparation: Clean the inside of the helmet under the net with grease solvent.
  2. Placement: Thread the microphone (1) under the sweatband and the helmet's harness.
  3. Face Mask Considerations:
    • If using a face mask with quick helmet fastenings, place the microphone in the center of the helmet's interior.
    • If using a face mask with rubber strap fastenings, place the microphone 3-4cm to the left of the center to prevent the center strap from interfering with the microphone and skull.
  4. Securing: Remove the paper from the Velcro disc, lift the helmet's harness, place the microphone on the most suitable spot, and press down to secure the Velcro.

Strain-relief:

  1. Preparation: Clean the inner surface of the helmet, underneath the left side cushion, with grease solvent.
  2. Anchor Placement: Remove the paper from the anchor part of the strain relief. Place the anchor approximately 1cm from the edge of the helmet behind the cushion and press down to glue.
  3. Cable Routing: Place the cable leading to the Push-To-Talk unit in the sinking of the cushion.
  4. Securing Cable: Fasten the cable with a bundle-tie to the anchor part of the strain-relief.

Interconnection/Use:

  1. Battery Check: Ensure the radio's battery is fully charged.
  2. Radio Connection: Connect the radio interconnection cable of your SAVOX com-control/PTT unit to the radio.
  3. PTT Unit Placement: Attach the SAVOX com-control/PTT unit to an easily accessible spot.
  4. Protection: For optimal protection, it is preferable to wear the equipment inside clothing.
  5. Unit Connection: Connect the quick release connector plug of the SAVOX HC-1(2) to the jack of the SAVOX com-control/PTT unit.
  6. Power On: Switch your radio ON.
  7. Volume Adjustment: Adjust the radio's volume to a suitable level.
  8. Verification: Press the Push-To-Talk button to confirm two-way communication is working.

Important Notes:

  • Always ensure the helmet's headband and chin strap are correctly adjusted and in use.
  • The speaker(s) and microphone are sensitive parts; handle with care.
  • SAVOX Communications Ltd strongly recommends detaching or removing the SAVOX HC-1(2) from the helmet when two-way radio communication is not needed.
  • SAVOX Communications Ltd is not responsible for any damages to other equipment or clothing caused by using the SAVOX HC-1(2).

Maintenance Features:

Cleaning:

  • The unit can be cleaned with a wet sponge or brush and diluted dishwashing detergent.
  • Clean the connectors with a high-class Vaseline spray (SAVOX recommends PRF BAJOL, manufactured by Taerosol, www.taerosol.com, or similar lubricant).
  • CAUTION: Do not apply solvent or similar caustic chemicals.

Warranty:

  • SAVOX Warranty: SAVOX grants a 16-month guarantee for its accessories from the date of sale to the original purchaser, covering warranty repairs or replacement (whichever is lower cost) of equipment or parts.
  • Voided Warranty: The warranty is void if defective products or parts are opened for service by unauthorized personnel or the owner/user. Transportation costs are not included in warranty service.
  • Exclusions: Damages caused by improper use, handling, storage, or transportation are excluded. SAVOX is not liable for damages caused by product failure during operation. Other warranty conditions follow NL92.
  • Limited Warranty (US and Canadian Markets Only): SAVOX Communications Inc. warrants the SAVOX com-control ("the Product") to be free from defects in material or workmanship.
    • First Year: SAVOX will repair or replace the Product (at its sole discretion) if found defective.
    • Second Year: SAVOX will provide replacement parts or replace the Product (at its sole discretion), but the customer is responsible for labor charges.
  • No Extended Warranties: No warranties extend beyond the limited warranty stated.
  • Distributed Products: Warranties for distributed products are handled by their original manufacturer; consult your Dealer for details.
  • Repair Process (Warranty Period): During the labor warranty period, defective Products can be returned freight prepaid or delivered to a designated SAVOX authorized service center (address at www.savox.com). SAVOX is not obligated to provide a substitute unit during warranty.
  • Notification of Claims: Written notice with an explanation of the claim must be given promptly to SAVOX within the warranty period. If SAVOX determines the problem is not covered, the Purchaser pays SAVOX for investigation costs. Repair or replacement does not extend the overall warranty period. The specific warranty on a repaired part is 90 days or the remaining Product warranty period, whichever is greater.
  • Exclusive Remedy: Purchaser's exclusive remedy is SAVOX supplying (or paying for) labor to repair and new/rebuilt replacements for defective parts. If repair fails, SAVOX will refund the purchase price. Failure to claim or continued use constitutes acceptance and waiver of claims.
  • Exceptions to Limited Warranty: SAVOX has no liability for products subjected to abuse, improper use, negligence, accident, modification, failure to follow operating/maintenance procedures, attempted repair by non-qualified personnel, operation outside published environmental/electrical parameters, or if original identification markings are defaced/altered/removed. Products sold "AS IS" or "WITH ALL FAULTS" and used products not sold by SAVOX are excluded.
  • Proof of Purchase: A dated bill of sale from an authorized Seller is required for warranty eligibility.

Disclaimer of Warranty:

  • SAVOX disclaims all other express or implied warranties, including merchantability, fitness for a particular purpose, and non-infringement, except for the foregoing warranties.
  • SAVOX disclaims any representations or warranties that the product is compatible with non-SAVOX products, including portable two-way handheld transceivers and interface products.

Limitation of Liability:

  • SAVOX's liability for damages, regardless of legal theory (tort or contract), shall not exceed the actual purchase price of the product.
  • SAVOX is not liable for special, indirect, incidental, or consequential damages, including compensation, reimbursement, loss of profits, death, personal injury, or property damage.
  • Purchaser agrees that the product cost is a reasonable measure of damages based on circumstances at the time of sale, considering anticipated or actual harm.

Technical Specifications (Design and Manufacturing):

  • Manufacturer: SAVOX Communications Ltd
  • Address: Vitikka 4, FIN-02630 Espoo, Finland
  • Contact: savox@savox.com
  • Website: www.savox.com
  • Trademark: SAVOX® is a trademark of SAVOX Communications Ltd.
  • Document Number: D22361.
  • Note: SAVOX reserves the right to make changes.
  • Intended Use: This Product is for commercial use.

Savox HC-1 Specifications

General IconGeneral
BrandSavox
ModelHC-1
CategoryConference System
LanguageEnglish