EasyManua.ls Logo

Schlagel EDI CONTROL 7 - User Manual

Schlagel EDI CONTROL 7
4 pages
Print Icon
To Next Page IconTo Next Page
Loading...
SCHLAGEL, INC.
EDI Distributor Control 7
Page 1 of 1
New Features
Smaller size 10x8x5
Water and dust tight
Menu system for customizing
Automated configuration
Integrated Terminal/Control
Spout Directory eliminates charts
Easly to add a second control point
Automated Sensor diagnostics
Front panel Reset button
This manual describes the functions of the Keypad and Menu System. An explanation of the
Error Codes including the cause and possible remedy is also included.
See the C7 Quick Install Manual for wiring and initial setup of the distributor.
EDI CONTROL 7
OPERATORS MANUAL
Question and Answer IconNeed help?

Do you have a question about the Schlagel EDI CONTROL 7 and is the answer not in the manual?

Overview

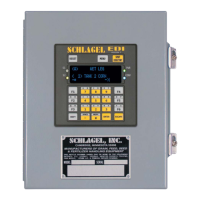
The Schlagel EDI Distributor Control 7 is a sophisticated control system designed for managing grain, feed, seed, and fertilizer handling equipment. This device serves as the central interface for operating and customizing a distributor, providing both manual and automated control capabilities.

Function Description:

The primary function of the EDI Distributor Control 7 is to precisely position a spout over various ducts in a material handling system. It continuously monitors the distributor's behavior, detects abnormal conditions, and notifies the operator of any errors. The system is designed for both manual operation via a keypad and automated control, including network integration for larger systems.

Important Technical Specifications:

  • Physical Dimensions: The control unit has a compact size of 10x8x5 inches, making it suitable for various installation environments.
  • Environmental Protection: It is designed to be water and dust tight, ensuring durability and reliable operation in challenging industrial settings.
  • Control Points: The system can easily accommodate a second control point, enhancing its versatility for complex setups.
  • Access Numbers: Supports access numbers from 1 to 255, allowing for a wide range of duct configurations.
  • Patents: Covered under multiple U.S. patents (3339691, 3952864, 4058199, 5593019, 7243782) and Canadian patent (803312), with other U.S. and foreign patents pending, indicating advanced and proprietary technology.

Usage Features:

  • Keypad Layout: The front panel features a comprehensive keypad for intuitive operation.

    • RESET Key (1): Performs a reboot of the C7 control, useful for troubleshooting or restarting the system.
    • MENU Key (2): Allows access to a menu of special functions for customizing the display or performing specific operations. Repeated presses scroll through the menu system.
    • SPOUT DIRECTORY Key (3): Displays a list of all named positions of the distributor, including their access numbers and assigned F-Keys. This eliminates the need for a crossover chart. Repeated presses scroll through the directory, showing 4 positions at a time.
    • PWR LED (4): Indicates that the device is powered on.
    • CONF LED (5): A steady blue LED confirms the spout is in position without errors. A rapid blink indicates certain errors.
    • Speed Dial Keys (F1-F6) (6): Six programmable keys that can be set to access any position with a single key press, speeding up frequent operations.
    • ESCAPE Key (7): Used to erase mistyped numbers when attempting to move to a position or to abandon a Menu operation.
    • SHIFT Key (8): Enables typing of alphabetical characters in the Menu system for naming positions. A single press accesses the upper left character on a key, while a double press accesses the upper right character.
    • Sensor Status LEDs (9): Displays the current status of the sensors on the distributor, providing immediate visual feedback.
  • Menu System: The device features a robust menu system for customization and setup, accessible via the MENU key.

    • Customize Display:
      • Edit Access Numbers (1): Allows changing the number used to access a position (1-255). This is useful for assigning numbers with special meanings, overriding the default sequential numbering.
      • Edit Position Names (2): Enables renaming each spout position (e.g., "POSITION 5" to "WET CORN BIN"). These names are displayed in the SPOUT DIRECTORY. Alphabetic characters require the use of the SHIFT key.
      • Edit Function Keys (3): Assigns frequently used positions to the F1-F6 Speed Dial keys.
      • Edit Caption (4): Changes the name of the distributor displayed on the top line of the screen.
    • Misc Settings:
      • Network Functions (1): Used for network automation, including starting/stopping operations and assigning names.
      • AutoRun Testing (2): A diagnostic tool for technicians to prove operational functionality.
      • AutoTune Routine (3): Used by technicians to reset spout-centering values, ensuring precise positioning.
    • Install/Setup: (Only available at boot)
      • Run Motor Manually (1): Allows technicians to check motor and spout movement for diagnostic purposes.
      • Check Sensors (2): Used by technicians to verify wiring and the condition of the sensors.
      • Auto Install Distributor (3): Configures the C7 control unit to the specific distributor setup.
  • Spout Directory: Eliminates the need for physical charts, simplifying position identification and selection.

  • Automated Configuration: Streamlines the setup process, making installation quicker and more efficient.

  • Integrated Terminal/Control: Combines control and terminal functions into a single unit.

Maintenance Features:

  • Automated Sensor Diagnostics: The system automatically diagnoses sensor issues, aiding in quick identification and resolution of problems.
  • Error Messages: The C7 control continuously monitors for abnormal behavior and displays error messages on Line 2 of the display. Optional audible or visual alarms are available, and connected PLCs or other automation equipment are also notified.
    • DRIVE ERROR:
      • Reason: The control attempted to move the spout but received no feedback for 10 seconds, indicating it's not moving. The motor is turned off.
      • Cause & Remedy: Spout is jammed, clutch is slipping, or sensor circuit is not functioning. This is a fatal error, usually a mechanical obstruction. Press Enter to reset.
    • POSITIONING ERR:
      • Reason: The control could not set the spout to the exact predetermined position over a duct.
      • Cause & Remedy: Electrical or mechanical disturbance to the spout position. Alarms are set. Try accessing the position again. Repeated errors suggest a need to repair the problem, checking for loose clutch or drive chains.
    • SPOUT MOVED:
      • Reason: The spout moved out of position after a successful stop. The C7 continuously monitors spout position and raises this alarm if movement occurs.
      • Cause & Remedy: Electrical or mechanical disturbance to the spout position. This is a fatal error. Press Enter to return to the reset screen. Check for a loose clutch or loose bolts on the drive wheel or drive arm assemblies.
    • SENSOR ERROR:
      • Reason: While moving the spout, the control anticipates the next code but encounters a mismatch. It attempts to re-read up to 3 times; if it fails, this error is issued.
      • Cause & Remedy: An improperly positioned sensor block in the distributor. This is a fatal error. Press Enter to return to the reset screen. Position and shim the sensor block properly, then run the "Check Sensors" routine.
  • Menu System for Customizing: Allows technicians to fine-tune settings and diagnose issues, including resetting spout-centering values via the AutoTune Routine.
  • Front Panel Reset Button: Provides a convenient way to reboot the control, which can resolve temporary glitches.

The manual also emphasizes that "shaded routines affect the operation of the distributor and should only be used by those familiar with the results of its use," highlighting the importance of qualified personnel for certain maintenance and setup tasks. The "C7 Quick Install Manual" is referenced for initial wiring and setup, indicating a modular approach to documentation.

Schlagel EDI CONTROL 7 Specifications

General IconGeneral
BrandSchlagel
ModelEDI CONTROL 7
CategoryControl Panel
LanguageEnglish