GB-2
1234 561
7
8
9
10
11
12
13
14
15171819
20
21
22
23
24
25
16
TABLE OF CONTENTS
PRECAUTIONS 1
TABLE OF CONTENTS 2
BOX CONTENTS 2
LOCATION OF CONTROLS 2
POWER SUPPLY 3
BASIC OPERATION 3
RADIO OPERATION 4
PLAYING AN iPod AND CHARGING THE INTERNAL iPod
BATTERY 5
AUX IN FUNCTION 6
AUX OUT FUNCTION 6
MAINTENANCE 6
TROUBLESHOOTING GUIDE 7
TECHNICAL SPECIFICATIONS 7
BOX CONTENTS
1. Unit
2. Adapters for different iPod models (7x)
3. Instruction manual
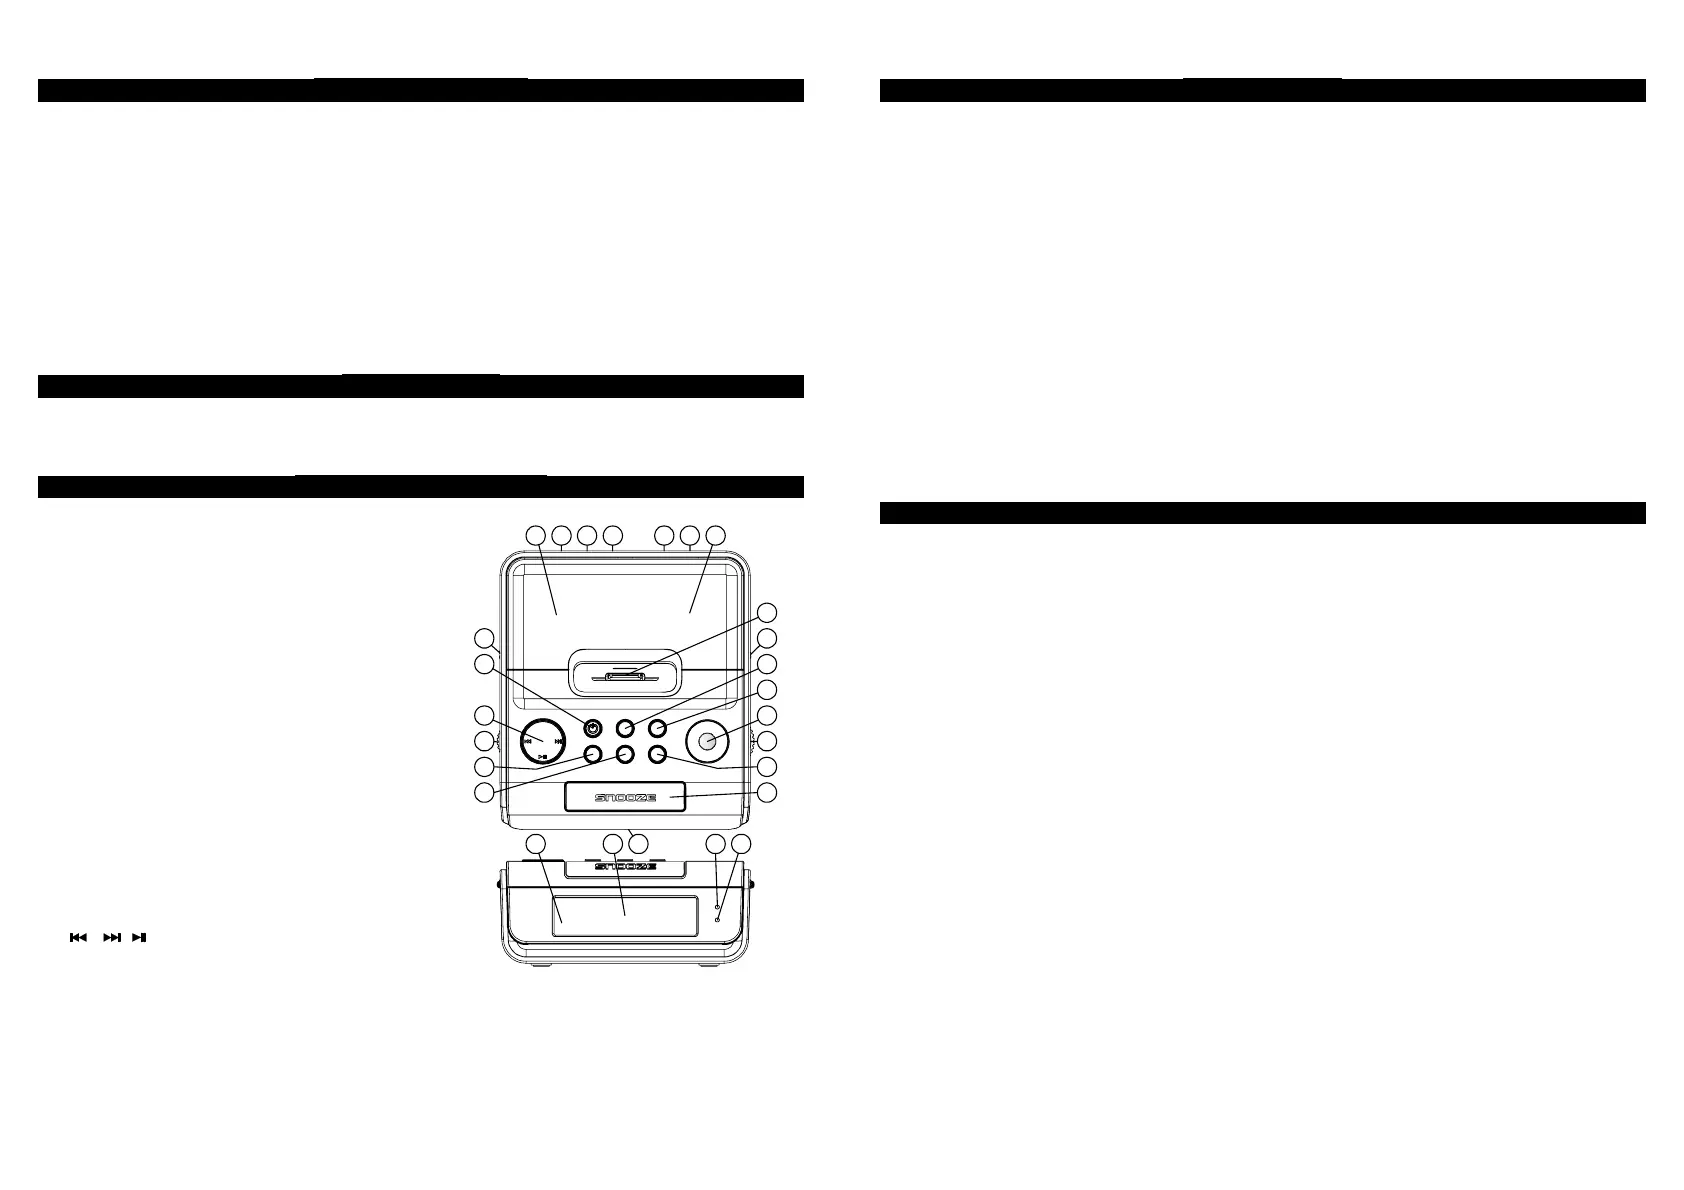
LOCATION OF CONTROLS
1. Speakers (2x)
2. AC power cord
3. AUX IN jack
4. AUX OUT jack
5. DIMMER HI-LO switch
6. FM antenna wire
7. iPod docking station and connector
8. AM/FM/iPod/AUX switch
9. ALARM SET/OFF button
10. CLK SET button
11. Tuning scale
12. TUNING dial
13. MIN (Minute set) button
14. SNOOZE button
15. FM STEREO LED indicator
16. ON LED indicator
17. Clock back up battery door
18. Clock display
19. Alarm indicator
20. HR (Hour set) button
21. SLEEP button
22. VOLUME dial
23.
/ , SKIP/SEARCH, PLAY/PAUSE buttons
24. ON button
25. AUTO OFF/MUSIC/BUZZER switch
GB-3
POWER SUPPLY
AC power supply
Insert the AC power cord into the AC mains outlet with a 230V AC ~ 50Hz power source.
Installing the clock back up battery
If the AC cord is disconnected or there is a power failure, this electronic clock is designed to continue
operating internally (without showing the time on the display) with a 9 volt battery (type 6F22, not
included). To install the battery, open the clock back up battery door on the bottom of the unit.
Connect the battery to the terminals of the battery snap inside the compartment (use of an alkaline
battery is recommended) and close the battery door.
After a power failure, the clock time should continue operating. If a flashing time appears on the
display, it indicates the battery is dead or not connected properly. The 9 volt battery will keep the
clock time accurately for approximately 30 minutes. If the power is restored after 30 minutes, the time
may need to be reset.
Precautions when using batteries
1. Replace only with an identical battery or an equivalent type.
2. An exhausted battery must be removed to prevent any battery leakage.
3. Dispose of the battery properly according to environmental regulations.
BASIC OPERATION
ON/ Standby mode
After connecting the power supply (refer to POWER SUPPLY), the unit goes to standby mode and
the clock time is displayed. Press the ON button to turn on the unit and the ON LED indicator lights
up. Press it again to go to standby mode.
Clock time setting
Set the clock
1. Hold down the CLK SET button and press the HR button to set the hours.
2. Hold down the CLK SET button and press the MIN button to set the minutes.
Set the alarm time
1. Hold down the AL SET/OFF button and press the HR button to set the hours.
2. Hold down the AL SET/OFF button and press the MIN button to set the minutes.
Alarm operation
The unit allows you to wake up to a buzzer or to music (AM/FM/iPod).
1. Press and hold down the AL SET/OFF button to display the alarm time.
2. To adjust the alarm time, follow the steps in “Set the alarm time”.
3. To enable the alarm function, slide the AUTO OFF/MUSIC/BUZZER switch to MUSIC if you want
to wake up to music or BUZZER if you want to wake up to the sound of the buzzer. The ALARM
indicator at bottom left corner of the display lights up.
When you choose to wake up to music, the alarm clock radio will start to play the last track it
played before the unit was switched off. This means you can choose which song you will to wake
up to.
4. If MUSIC mode is selected, slide the AM/FM/iPod/AUX switch to select the desired alarm source.
5. When the preset alarm time is reached, the buzzer or music will start up.
6. To stop the alarm, press the AL SET/OFF button. The alarm will sound again at the same time the
next day.
7. To disable the alarm function, slide the AUTO OFF/MUSIC/BUZZER switch to AUTO OFF.
 Loading...