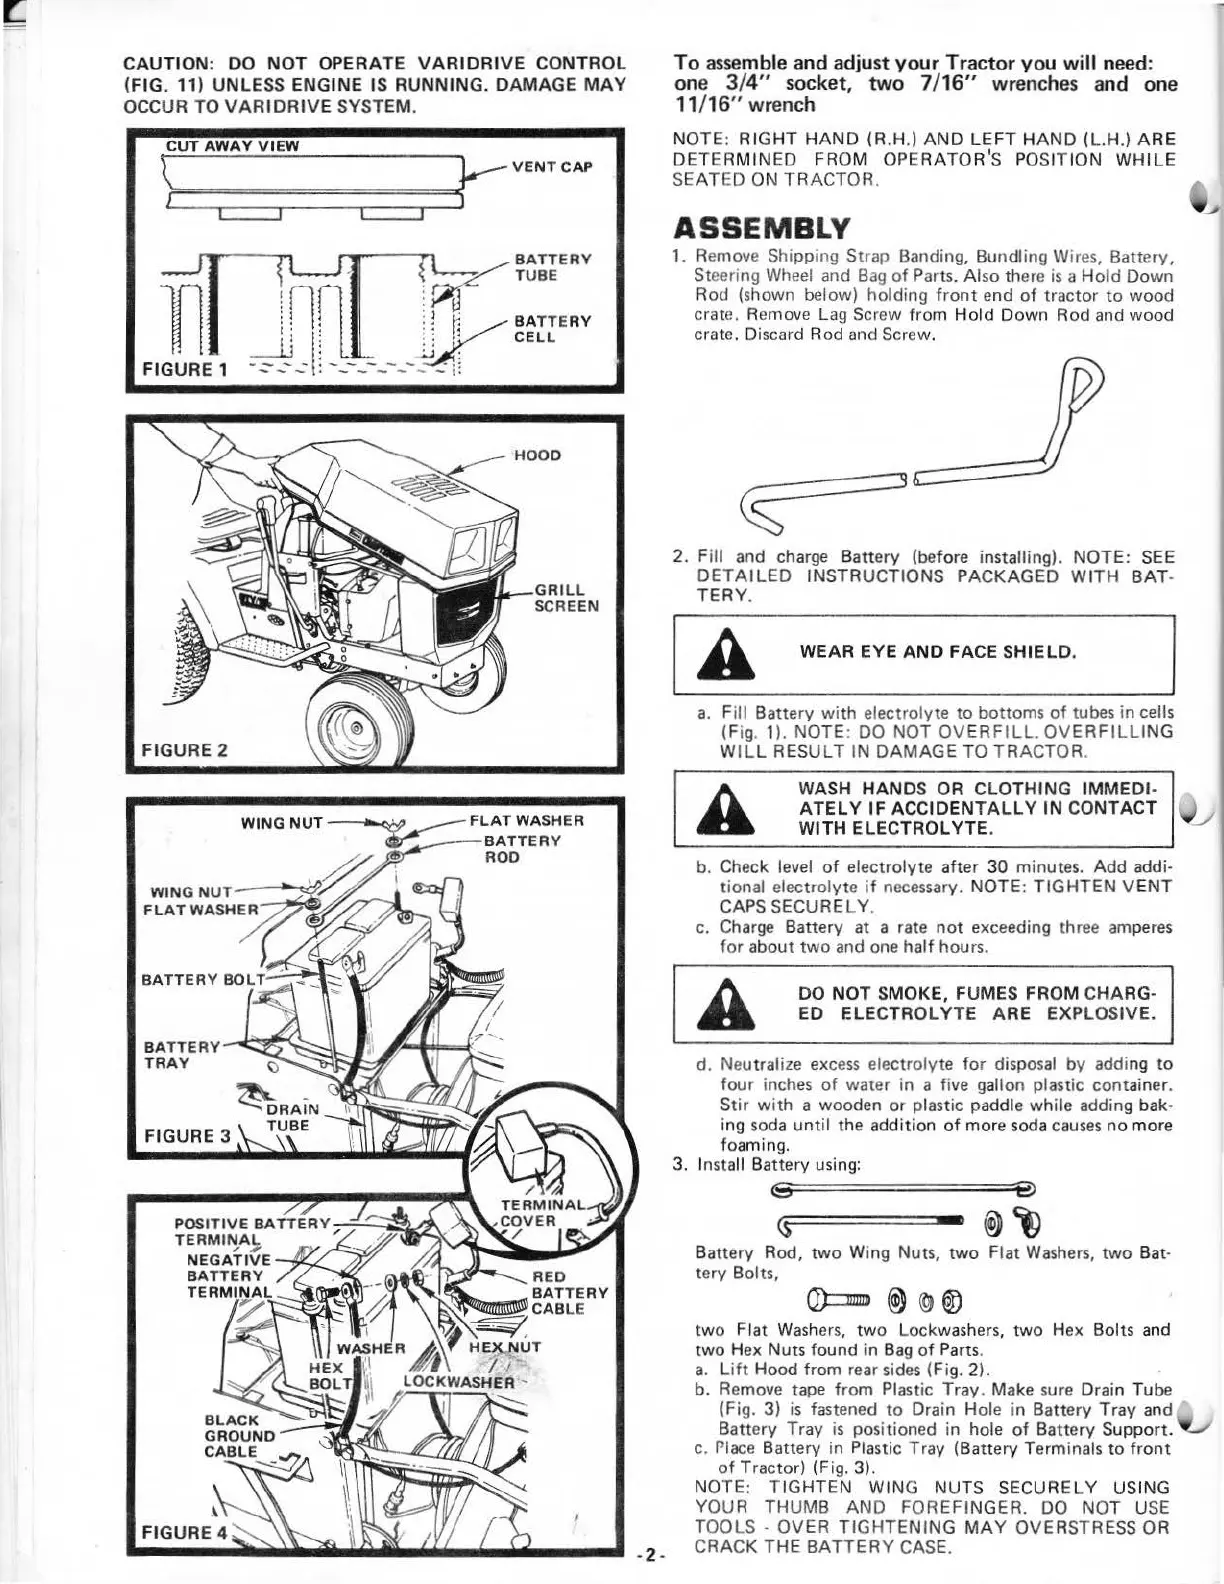
CAUTION
: DO
NOT
OPERATE
VA
RIDRI
VE
CO
NTROL
(FIG
. 11) UNLESS ENGINE IS RUNNING.
DAMAGE
MAY
OCCUR TO
VAR
I
DRIVE
SYSTEM.
\?
U=
T
==A=
W
=
A
=
Y
=
V
=
I
=
E
=
W
============
==<~VENTCAP
FIGURE 1
FIGURE 2
BA
TTERY
TRA
Y
~ S
~BATTERY
1
~
TUBE
ln
lr
:
r1
i I : J
~
l : :
~
::
r;
BATT
E
RY
1
!
~:
: : •'
CELL
__.Lj
:
'-
..:.J
:
--
-- . -- - -- .
·:
- - - • - - - - - -
l•
GR
I
LL
SCREEN
· 2 ·
To
assemble and adjust
your
Tractor you
will
need:
one 3/4" socket,
two
7/ 16" wrenches and
one
11
/16" wrench
NOTE: RIGHT
HAND
(R.H.)
AND
LE
FT
HA
ND
(L.H.) ARE
DET
ER
MINED FROM OPERATOR
'S
POSITION
WH
ILE
SE
AT
ED ON TRACTOR.
ASSEMBLY
1. Remove Shipping
St
rap Banding, Bundling Wires, Battery,
St
eering
Wheel
and
Bag
of
Parts. Al
so
there
is
a
Ho
ld
Down
Rod (shown below) holding f
ront
end
of
tractor
to
wood
crate. R
em
ove
Lag
Sc
rew from
Hold
Down Rod and
wood
crate. Discard Rod and Screw.
2. Fill and charge Battery (before installing). NOTE:
SEE
DETAILED
INSTRUCTIONS PACKAGED WI
TH
BAT
·
TERY
.
WEAR EYE
AND
FACE
SHIELD
.
a.
Fill Batte
ry
with
electrolyte
to
bottoms
of
tubes in cells
(Fig. 1). NOTE: DO NOT
OV
ER
FILL.
OVERFILLI
NG
W
IL
L RESULT IN DAMAGE TO TRACTOR.
WASH
HAND
S
OR
C
LOTHING
IMMED
I·
ATEL
Y
IF
ACCIDENTALL
Y
IN
CONTACT \j_J
WITH ELEC
TROLYTE
.
b. Check
level
of
electrolyte after 30 minutes. Add addi·
tional electrolyte if necessary. NOTE:
TIGHTEN
VENT
CAPS SECURE LY.
c.
Charge
Battery
at
a rate
not
exceeding three
am
peres
for about
two
and
one
half hours.
DO NOT SMOKE,
FUM
ES FROM
CHA
RG
·
ED ELEC
TROLYTE
A
RE
EXPLOSIVE.
d.
Neu
tral
ize
exce
ss
electrolyte
for
disposal
by
addi
ng
to
four
inches
of
water in a five gallon plastic container.
Stir
with
a wooden or plastic paddle while adding bak·
i
ng
soda
unt
il the addition
of
mo
re
soda
causes
no more
foamin
g.
3. Install Battery using:
e~
;======
==e
<S
®~
Battery Rod,
two
Wi
ng
Nuts,
two
Flat
Washers,
two
Bat·
tery Bolts,
Q)::::B
@)
(g
®
two
Fiat
Wash
ers
,
tw
o Lockwash
ers
,
two
Hex Bolts
and
two
H
ex
Nuts found in
Bag
of
Pa
rts.
a.
Li
ft
Hood from
re
ar
sides
(Fig. 2).
b. Remove tape from Plastic Tray. Make
su
re
Drain
Tu
be
(Fig. 3) is fastened
to
Drain Hole in
Ba
tt
ery Tray and
Battery Tray
is
posi
ti
oned in hole
of
Ba
ttery Support.
c.
Place
Battery in Plastic Tray (Battery Terminals
to
front
of
T
rac
tor) (Fig. 3).
NOTE:
TIGHTEN
WING NUTS SECURELY USING
YOUR
THUMB AND FOREFINGER. DO NOT U
SE
TOOLS-
OVER
TIGHTENING
MAY
OVERSTRESS OR
CRACK
THE
BATTERY
CASE.
another free manual from www.searstractormanuals.com