EasyManua.ls Logo

Sears X-Cargo 18 cu. ft. User Manual

Sears X-Cargo 18 cu. ft.
7 pages
To Next Page IconTo Next Page
Page #1 background imageLoading...
Page #1 background image
X-Cargo 18 cu. ft.
300.7271
MFG: 90030
1
INSTRUCTION SHEET • FICHE D’INSTRUCTIONS HOJA DE INSTRUCCIONES
A
K L
CB D E F G H I J
MFG. BY SPORTRACK • 3737 N. ACORN AVE. • FRANKLIN PARK IL 60131 • 1-800-561-0716 • PART NO. 05563 • 2006
ASSEMBLY COMPONENTS • COMPOSANTS D’ASSEMBLAGE COMPONENTES DE LA UNIDAD
M N O
TOOLS REQUIRED • OUTILS REQUIS HERRAMIENTAS REQUERIDAS
00841 01315 03668 01010 04103 03948 00070 00017 00764 00115
2x 1x 4x 4x 6x 4x 8x 2x 4x 10x
03396 • 2x 03347 • 2x 03810 • 2x 03807 • 2x 03808 • 2x
Question and Answer IconNeed help?

Do you have a question about the Sears X-Cargo 18 cu. ft. and is the answer not in the manual?

Sears X-Cargo 18 cu. ft. Specifications

General IconGeneral
Capacity18 cu. ft.
Product TypeCargo Carrier
CategoryAutomobile Accessories
BrandSears
ModelX-Cargo

Summary

Pre-Assembly Safety and Important Notes

Safety Warnings Before Operation

Warnings regarding locking devices, speed limits, and empty carrier usage for safe operation.

Read Instructions Before Assembly

Covers manufacturer responsibility, load capacity, and part sourcing for correct installation.

Top Assembly and Initial Attachment

Attach Foam Weather Stripping

Install foam weather stripping to the inside of the carrier top for sealing.

Assembling Top to Bottom

Align Hinges and Attach Base Components

Connect carrier top to bottom using hinges, medium screws, washers, and plastic nuts.

Attach Support Assemblies to Top

Secure support assemblies to the carrier top using large screws and washers.

Install Snap Latches on Base

Attach front and rear snap latches to the carrier bottom with small screws and washers.

Lock Mechanism Installation and Operation

Install Lock Assemblies and Locators

Install lock assemblies and lock locators in the locked position on the carrier top.

Attach Lock Brackets to Base

Fasten lock brackets to the carrier bottom on the passenger side.

Verify and Adjust Lock Alignment

Check and adjust lock assembly alignment with lock brackets for proper engagement.

Prepare for Carrier Closure

Ensure locks are open and pull the carrier top down to prepare for closing.

Final Locking Procedure and Safety

Secure the Carrier with Locks

Lock the carrier by inserting and turning the key, and engage snap latches.

Locking Device Safety Check

Ensure all locking devices are engaged before vehicle is in motion.

Installation Options

Vehicle Mounting Methods

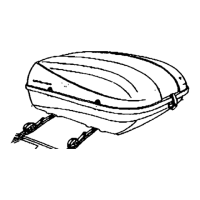
Information on attaching the carrier using mounting hooks or roof racks.

Cleaning, Storage, and Warranty

Cleaning and Storage Recommendations

Guidance on cleaning the carrier with mild soap and water, and proper storage.

Limited Warranty Information

Details the manufacturer's one-year warranty, exclusions, and liability limitations.

Related product manuals