English
English
4 5
For safes equipped with an electronic lock:
What should you do before using the safe for
the first time?
Please check that the safe works correctly
before installing it or securing items inside.
Access codes
The lock has two access codes and can be
programmed independently from each other.
Default both access codes are active and must
be changed before you use the safe.
Default factory codes
The electronic lock is supplied by the manufacturer
with the standard access code 1 2 3 4 5 6
(1st code) and 5 6 7 8 9 0 (2nd code). These codes
must be changed before you use the safe. Now do
the following:
1. Install the 4 batteries in the battery holder.
2. Plug the battery holder into socket of keypad
(located at the bottom of the keypad); the lock
will start up and the LCD display shows
“-SAFE-”, followed by “-GOOD-” and “- - - - - -”.
A beep will sound and a red light will turn on.
3. Enter the default factory code: 1 2 3 4 5 6 or
5 6 7 8 9 0. The door will unlock and the LCD
display shows “-OPEN-”. A beep will sound and
a green light will turn on.
4. Within 3 seconds turn dial knob clockwise until
stop position reached.
5. Open the door.
6. Remove the battery holder and remove the
batteries from the battery holder. Store the
battery holder safely away from the safe.
7. Open the lid of the battery compartment at the
back of the door.
8. Fit the batteries, ensuring that the positive and
negative terminals are aligned correctly. The
LCD display shows “-SAFE-”, followed by
“-GOOD-”; a beep will sound and a red light will
show.
9. Now change the 1st and 2nd access code; this
is done as follows:
Changing the 1st access code
Note: this can only been done when the door is
open.
1. Press “START” button on the keypad. The
LCD display shows “- - - - - -”.
2. Enter now your personal 6-digit code.
3. Within 3 seconds press the “Memory” button,
located on the back of the door, to confirm your
new access code. The LCD display shows “IN”.
4. DO NOT CLOSE THE DOOR YET!; test the new
code before closing the safe. Go to “Testing the
electronic lock”.
Changing the 2nd access code
Note: this can only been done when the door is
open.
1. Press “Memory” button. The LCD display shows
“- - - - - -“.
2. Press the “START” button on the keypad.
3. Enter now your personal 6-digit code; the LCD
display shows “IN” and your new code. Your
new code is stored.
4. DO NOT CLOSE THE DOOR YET!; test the
new code before closing the safe. Go to
“Testing the electronic lock”.
Testing the electronic lock
The lock should only be tested with the door open!
1. Turn dial knob anti-clockwise until stop position
reached.
2. Press button “START” on the keypad. The
LCD display shows “- - - - - -”.
3. Enter now your personal 6-digit code. A beep
will sound, the green light will be on and the
LCD display shows “-OPEN-”.
4. Within 3 seconds turn dial knob clockwise until
stop position reached.
5. If steps 2, 3 and 4 are carried out successfully,
you can close the door and lock the safe.
Closing the safe
1. Close the door and keep it gently pressed shut
with one hand.
2. Now turn the dial knob anti-clockwise until stop
position reached the lock mechanism will be
activated and the bolts (these are the metal
pins in the side of the door) will be pushed out.
Opening the safe
1. Press button “START” on the keypad. Enter
your personal 6-digit code; if the code has
been entered correctly a beep will sound, the
green light on and the LCD display shows
“-OPEN-”.
2. Within 3 seconds turn dial knob clockwise until
stop position reached (the bolts will be
retracted).
3. The door can be opened further by pulling it
towards you.
• If an incorrect access code has been entered,
a beep will sound, the red light will turn on and
the LCD display shows “Error”.
• If an incorrect access code has been entered 5
times, lock will be blocked for 3 minutes. An
alarm will sound for 3 minutes and the red light
will light up.
Security feature
If required the LCD input can be made unreadable
when entering your code. This feature is also
called “anti-spy” function and can be enabled by
keeping the “START” button pressed whilst
entering your personal access code. The LCD
display shows “= = = = = =” and not your code!
Replacing the battery
If the LCD display shows “LOW-BAT” after
pressing the “START” button, it indicates the
batteries are weak and need to be replaced as
soon as possible.
If the batteries are completely empty, the safe can
be opened by plugging the battery holder (with
new batteries!) into the socket of keypad - located
at the bottom of the keypad.
We recommend that you use only alkaline model
LR6-AM3-AA-1.5V batteries.
To replace the batteries, follow these steps:
1. Open the door.
2. Open the lid of the battery compartment at the
back of the door.
3. Replace the batteries; ensuring that the
positive and negative terminals are aligned
correctly; the LCD display shows “-SAFE-”,
followed by “-GOOD-” and “- - - - - -”. A beep
will sound and a red light will turn on.
4. DO NOT CLOSE THE DOOR YET!; test the new
code before closing the safe. For this, see
the instructions on “Testing the electronic lock”.
5. If the lock works correctly, you can close the
safe.
Power on self testing
The electronic lock is equipped with a power on
self testing system which is carried out when new
batteries are installed.
After installing new batteries, a beep will sound
and the LCD display shows “-SAFE-”, followed by
“-GOOD-“ when the lock is correct.
When the lock is not correct an error message will
be shown in the LCD display:
Err F : “START” button error
Err b : “Memory” button error
Err E : EPROM error
Err 1-9 : Keypad error
First re-read the manual. If you cannot find a
solution, contact your supplier.
Attention
• Do not store your user manual in the safe, but
safely away from the safe.
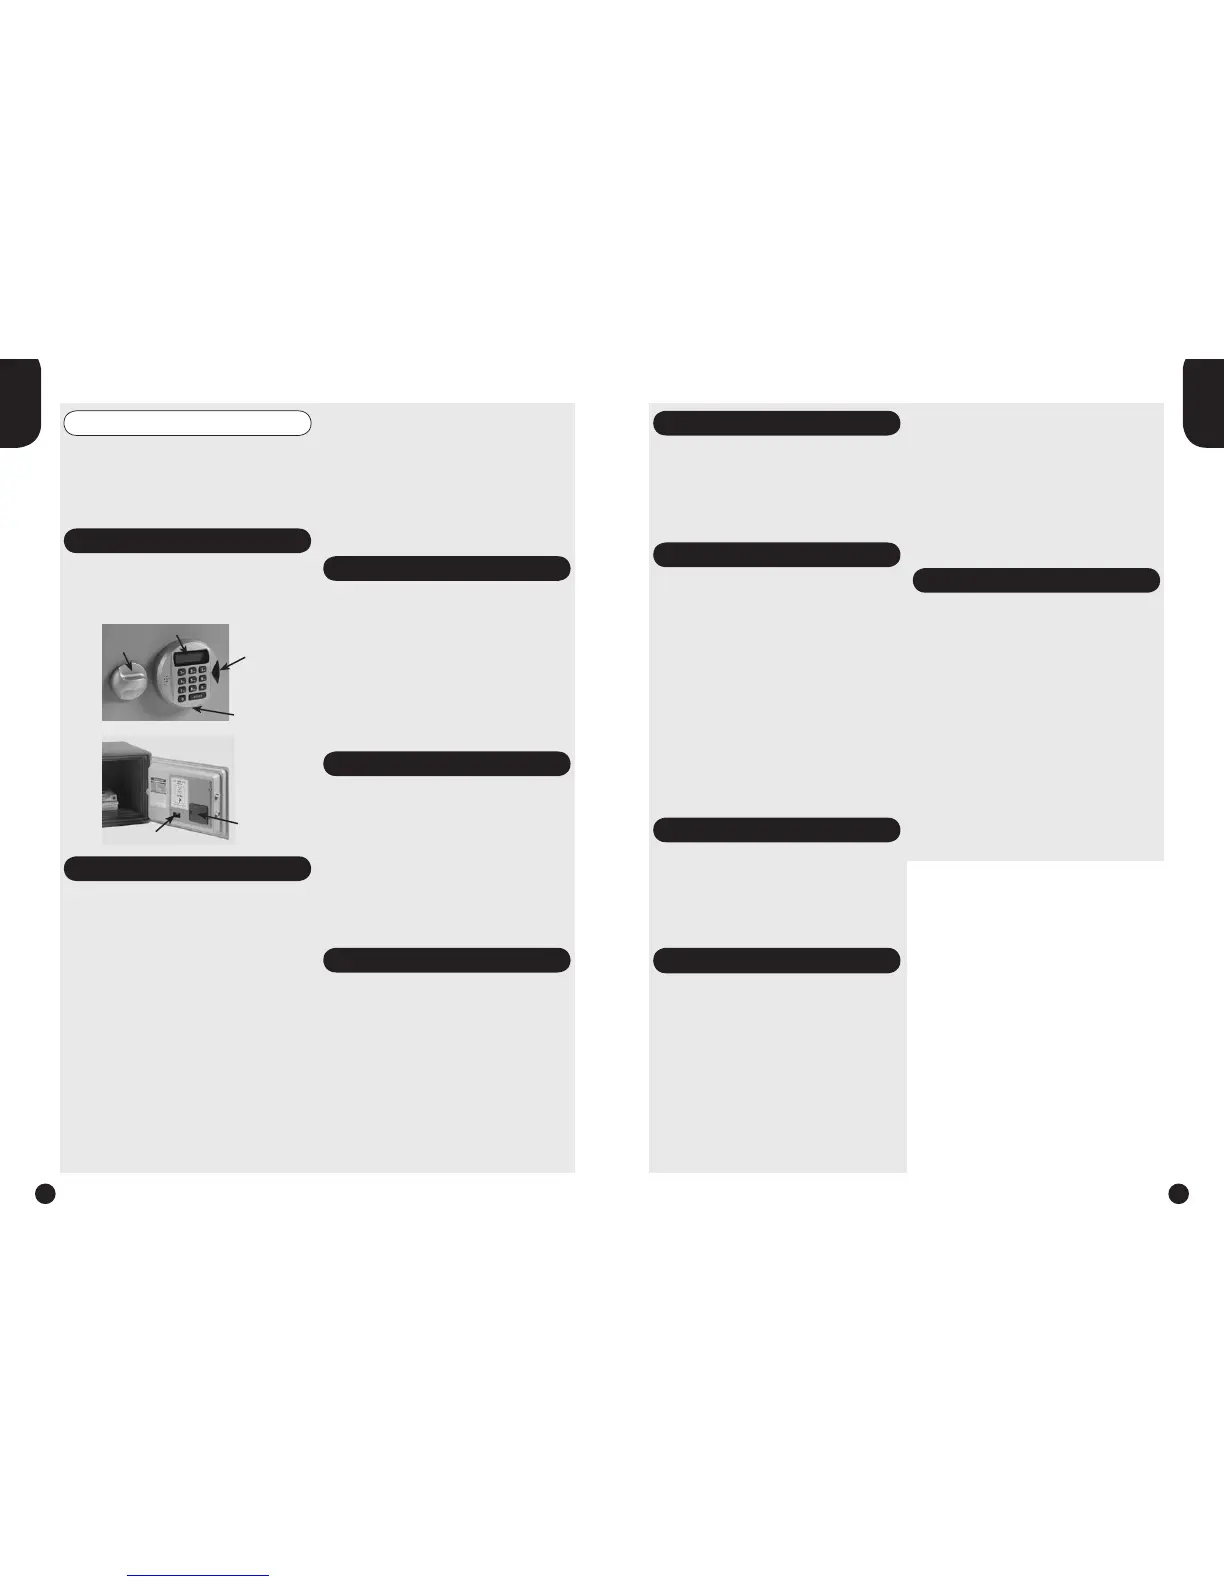
light
(green & red)
dial knob
LCD-display
battery socket
battery
compartment
Memory button
 Loading...