EasyManua.ls Logo

SEON CQ Series - User Manual

SEON CQ Series
2 pages
Print Icon
To Next Page IconTo Next Page
Loading...
Dome Camera CQ/CJ
Series
Quick Installation Guide
© April 2014 | Seon Design Inc. | All rights reserved.
www.seon.com Part Number: 700-0125 R010
Installation Kit Contents
The CQ camera with IR is ideal for interior facing locations. The CJ
camera without IR is ideal for forward windshield facing locations.
1 CQ or CJ Series camera, including dome, gasket, connector cable
1 Local Video Connector cable (1/8” plug to RCA jack)
2 #10 1.25” screws with washers
1 Security key
1 Quick Installation Guide
1 Mounting template
1. Choose Camera Location
Determine the location for mounting the camera.
choose a solid surface to minimize vibration
choose a location away from access panels, hatches, or doors
which may block the camera view
choose a location away from heat sources
Cameras are usually installed with the cabling running inside the wall
panels.
2. Connect the Camera
1. Connect the camera cable to the extension cable. See Figure 1.
2. Connect the extension cable’s 2×3 Micro-Fit connector into a
digital video recorder (DVR).
3. Open the Camera
1. Using the security key supplied with the camera, remove the
locking screw from the bezel. See Figure 2.
2. Turn the bezel and dome counter-clockwise to release it from the
base.
3. Pull the bezel and dome up and away from the base.
4. Install the Camera
Use the two #10×1.25" mounting screws and the two rubber washers
supplied with the camera to attach the camera to a wall or ceiling.
See Figure 3.
5. Connect Local Video Out
1. Connect the supplied 1/8” plug to RCA jack cable to the Local
Video Out socket, shown in Figure 3.
2. Connect the cable to a video monitor to see the camera’s line of
view while aiming the camera’s pan tilt and rotate positions.
(CQ only) The infrared LEDs have a five second lag when turning
on or off.
(CQ Camera shown,
CJ camera has no
IR lamps)
Figure 1
CAUTION: Camera Damage Risk
While installing the camera, do not impact the printed circuit
board inside the camera with screws or screwdriver bits.
Damage to the camera can occur.
Figure 2
(CQ Camera shown,
CJ camera has no
IR lamps)
Figure 3 (CQ Camera shown, CJ camera has no IR lamps)
Rubber Washers
Mounting gasket Base Local Video Out
#10x1.25” mounting screws
*700-0125*
Question and Answer IconNeed help?

Do you have a question about the SEON CQ Series and is the answer not in the manual?

Overview

The Seon Dome Camera CQ/CJ Series is a robust surveillance solution designed for various vehicle applications, offering both interior and forward-facing monitoring capabilities. This quick installation guide provides comprehensive instructions for setup, configuration, and maintenance.

Function Description

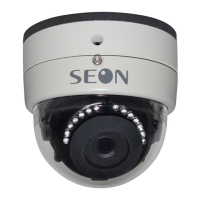
The CQ/CJ Series cameras are primarily used for video surveillance in mobile environments. The CQ camera, equipped with infrared (IR) lamps, is ideal for interior-facing locations, providing clear video even in low-light conditions. The CJ camera, without IR, is suited for forward windshield-facing applications. Both cameras capture high-quality video, which can be recorded by a Digital Video Recorder (DVR). The cameras feature adjustable pan, tilt, and rotate positions, allowing for flexible aiming to achieve the desired line of view. A local video out port enables real-time monitoring during installation and aiming.

Important Technical Specifications

  • Power Consumption: 1.3 W (IR off); 2.7 W (IR on, CQ only).
  • Operating Voltage Range: 11 to 17 VDC (powered by DVR).
  • Operating Temperature Range: -4 to 140°F (-20 to 60°C).
  • Horizontal Resolution: 600 TV Lines.
  • Infrared LED Lamps (CQ only): 14 high-efficiency LEDs.
  • Minimum Illumination (CQ only): 0.1 lux at F1.2 (B&W, D/N); 0 lux (IR on).
  • Enclosure Size: Diameter: 3.75" (95 mm), Height: 3.4" (86 mm).
  • Enclosure Material: Solid aluminum alloy.
  • Dome Material: Impact-resistant polycarbonate, anti-glare, scratch-resistant hard coating, UV protected.
  • Connector Cable Length: 9.5" (24 cm).
  • Local Video Out Cable: 1/8" (3.5mm) plug to RCA jack.
  • Weight: 0.9 lbs (0.4 kg).

Usage Features

The installation process begins with selecting an optimal camera location. It's crucial to choose a solid surface to minimize vibration, avoid areas that may block the camera's view (such as access panels, hatches, or doors), and keep it away from heat sources. Cabling is typically run inside wall panels for a clean installation.

Connecting the camera involves attaching the camera cable to an extension cable, which then plugs into a DVR via a 2x3 Micro-Fit connector. The camera is secured to a wall or ceiling using two #10x1.25" mounting screws and rubber washers. Care must be taken during installation to avoid impacting the internal printed circuit board with screws or screwdriver bits, as this can damage the camera.

Aiming the camera is a critical step. Users must first loosen the pan, tilt, and rotate adjustment screws. The local video out port, connected to a video monitor, allows for real-time viewing of the camera's line of view while adjusting its position. Once the desired view is achieved, all adjustment screws must be tightened. The infrared LEDs on CQ cameras have a five-second lag when turning on or off.

Configuration settings can be adjusted using internal switches. These include:

  • Audio Level Control: Clockwise decreases volume, counter-clockwise increases volume.
  • IR Levels (CQ Camera only): "High IR" (default) is for long-range viewing (e.g., aisle camera), while "Low IR" is for close-range viewing (e.g., doorway camera).
  • Mirror Image Setting: "Mirror OFF" (default) displays the image normally. "Mirror ON" displays the image as if seen through a mirror.
  • Backlight Compensation: "BLC OFF" (default) bases shutter speed on the entire image's light level. "BLC ON" bases shutter speed on the light levels near the image center, improving quality when backlight is strong.

Maintenance Features

Routine maintenance primarily involves cleaning the camera enclosure. Most liquid cleaners or graffiti gel can be used, but abrasive cleaners should be avoided as they can scratch the window and reduce visibility. If the camera window becomes damaged or scratched beyond use, a replacement bezel and dome assembly can be ordered from a camera distributor.

Replacing a damaged dome involves removing the locking screw with the supplied security key, turning the bezel and dome counter-clockwise to release it from the base, and then pulling it up and away. To replace, the new bezel and dome are fitted onto the base, turned clockwise until it snaps into place, and the rubber IR boot around the camera lens is firmly pressed against the inside of the dome before tightening the locking screw.

Seon Design Inc. provides a warranty for its cameras and components, covering defects in workmanship and materials. Cameras are warranted for three years from the date of purchase for both parts and labor. For service, customers are advised to contact Seon Design to obtain a Return Authorization (RA) number, which helps track the product during service. Products sent without an RA number may be refused. Customer service contact information, including toll-free and local telephone numbers, and an email address, is provided for support.

SEON CQ Series Specifications

General IconGeneral
BrandSEON
ModelCQ Series
CategorySecurity Camera
LanguageEnglish

Related product manuals