13
142 x 208 mm
Pre-heating cups
For optimum taste enjoyment we recommend to pre-heat
the cups. Rinse the cups with hot water or place them on
the cup-warming top.
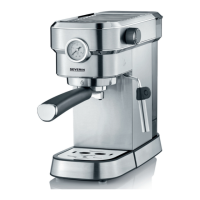
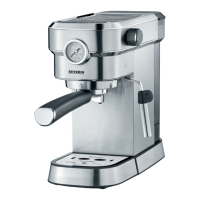
Making espresso
∙ Remove the water container, open the lid and ll with
fresh water, observing the min/max marking.
∙ Ensure that the rotary control is set to .
Using espresso powder:
∙ Fit the lter insert for one or two cups into the lter
holder.
∙ Load the lter insert with the desired amount of espresso
coffee. We recommend 7.5 g per cup.
∙ Use the tamper to push down the espresso coffee
evenly and rmly with a pressure of around 15 kg.
∙ Hint: After tampering, the compressed surface should
be about 2 mm down from the rim inside the lter
holder.
∙ Remove any excess coffee from the rim of the lter
holder.
Using ESE pods:
∙ Fit the lter insert for ESE pods into the lter holder.
∙ Insert a pod.
∙ Fit the lter holder with the handle facing left to
the boiler outlet. Secure the lter holder by turning the
handle to the right, locking it underneath the symbol.
∙ Place one or two cup(s) onto the drip tray underneath
the outlet opening.
∙ Press to turn the unit on. The cup symbols start
ashing slowly while the unit is pre-heating.
∙ Once the cup symbols are permanently lit, the brewing
process can be started by pressing or button.
∙ Once brewing is complete, remove the cup(s) and
switch the unit off.
∙ Allow the lter holder to cool down, then remove and
clean it as described in Cleaning and care.
∙ To avoid spilling, always empty the drip tray in good
time, observing the red oat indicator.
∙ Hint:
If the appliance has been used for frothing or hot
water, it must be allowed to cool down before making
espresso. The
and
buttons are ashing
rapidly to show that the unit is too hot.
To accelerate cooling, you can release water from
the panarello. Place a suitable container underneath
the panarello and set the rotary control to for
around 2 seconds. The unit is ready for use when the
and buttons are permanently lit.
Making cappuccino
∙ First prepare the espresso as described in Making
espresso.
∙ Fill a suitable heat-resistant jug with about 100 ml of
fresh, cold milk from the fridge.
∙ To prevent the milk from spilling over during the frothing
process, the jug should be only half full.
∙ Press
. The button ashes while the unit is pre-
heating.
∙ Once the button shows a steady light, place the milk
jug underneath the panarello so that the lower of the
panarello is just submerged in the milk.
∙ Turn the rotary control to the position. The
panarello is now open.
∙ Turn the jug with a circular motion for around 40-45
seconds.
∙ Once the milk is sufciently frothy, turn the rotary control
back to and remove the milk jug.
∙ The steam tube must be cleaned after each milk froth
preparation.To do this, hold a suitable container under
the panarello and turn the rotary control to for a
few seconds.
∙ After the preparation is nished, switch the appliance off
or press the button to return to the ‘Espresso’ menu.
∙ Use a spoon to spread the milk froth over the espresso.
The proper ratio should be 1/3 espresso, 1/3 hot milk
and 1/3 milk froth.
Dispensing hot water
∙ Remove the water container, open the lid and ll with
fresh water, observing the min/max marking.
∙ Press to turn the unit on.
∙ Once the and buttons shows a steady light,
place a suitable container underneath the panarello.
∙ Set the rotary control to .
∙ Once hot water has been drawn, set the rotary control
back to .
Change factory settings
∙ The unit has various functions which may be modied as
follows:
∙ Turn the unit on and wait until the cup symbols are
permanently lit.
∙ Press the button for 10 seconds to enter the Change
factory settings mode. All three buttons ash alternately.
∙ Modify the default factory settings as described further
below.
∙ If no input is registered for about 15 seconds, the unit
returns to ‘Ready’ mode.
∙ To return the various functions (water hardness,
automatic switch-off, temperature, amount) back
to their factory settings, press the buttons and
simultaneously, keeping them pressed for three
seconds. The , and buttons start ashing
and two beep signals are heard. The appliance switches
off.