EasyManua.ls Logo

Sew Amazing Sewing Station TY6142 - User Manual

Sew Amazing Sewing Station TY6142
12 pages
Print Icon
To Next Page IconTo Next Page
Loading...

Question and Answer IconNeed help?

Do you have a question about the Sew Amazing Sewing Station TY6142 and is the answer not in the manual?

Summary

Introduction and Parts Overview

Parts and Accessories

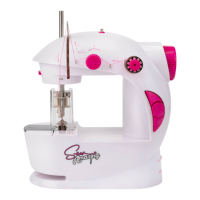
Lists and illustrates the various parts and accessories included with the sewing machine.

Getting Started

Powering the Sewing Machine

Instructions for powering the machine using batteries or the AC adapter.

Using the Function Buttons

Explains the function and operation of the machine's control buttons.

Foot Pedal Operation

Guidance on connecting and using the foot pedal for sewing control.

Core Sewing Operations

Threading the Sewing Machine

Step-by-step guide on how to thread the sewing machine using the bobbin holder.

Bottom Bobbin Placement

Detailed instructions for correctly placing the bottom bobbin in the sewing machine.

Adjusting Thread Tension

How to adjust the thread tension for optimal stitch quality.

Winding the Bobbin

Procedure for winding thread onto a bobbin using the sewing machine.

Changing the Needle

Step-by-step guide on how to safely and correctly change the sewing machine needle.

Safety Information

General Safety Precautions

Important safety warnings and precautions for using the sewing machine.

Troubleshooting

Common Sewing Machine Issues

Common problems and their solutions for the sewing machine.

Overview

The device described in this manual is a "Sew Amazing Sewing Station," a compact sewing machine designed for beginners and children (ages 6+). It offers basic sewing functionalities and comes with a comprehensive set of accessories.

Function Description:

The Sew Amazing Sewing Station is designed to perform basic stitching tasks. It can be operated either by batteries or via an AC adaptor, offering flexibility in its use. The machine features an "Auto Sew Mode" for continuous stitching without the foot pedal, and a "Manual Mode" that requires the foot pedal for controlled stitching, which is recommended for beginners. It also includes a speed switch to adjust the stitching speed between normal and slow. The machine is equipped with a light for better visibility during sewing.

Important Technical Specifications:

  • Power Source:
    • 4 x AA batteries (high power alkaline or rechargeable batteries recommended).
    • AC/DC Jack DC 6V (P) for connection to mains power via an AC adaptor.
  • Needle Type: The manual indicates that needles come in various sizes, with smaller numbers corresponding to thinner needles for delicate fabrics and larger numbers for heavier fabrics.
  • Foot Pedal: Included for manual control of stitching.
  • Battery Compartment: Located on the underside of the machine.
  • AC Adaptor: DC 6V 800mA (specific adaptor recommended by the manufacturer).

Usage Features:

  • Powering On/Off: The machine can be powered by inserting 4 AA batteries into the battery compartment (B) or by plugging the AC adaptor cable into the AC/DC Jack (P) and then into a wall mains. It is recommended to remove batteries before connecting to mains. The Auto Sew button (Y) should be in the off (up) position before inserting batteries or connecting to mains.
  • Light Control: A Light On/Off Switch (Z) allows users to turn the sewing light on or off.
  • Sewing Modes:
    • Auto Sew Mode: Activated by pressing down the Auto Sew Mode button (Y). In this mode, the machine stitches continuously without the need for the foot pedal.
    • Manual Mode: The default mode when the Auto Sew Mode button (Y) is in the up (de-pressed) position. Requires the foot pedal (M) to initiate and control stitching. Recommended for beginners.
  • Speed Control: A Speed Switch (X) allows users to toggle between slow and normal stitching speeds. Pressing down the button sets it to slow speed, and de-pressing it returns to normal speed.
  • Foot Pedal Operation: The foot pedal (M) plugs into the foot pedal jack (M) on the right-hand side of the machine. Gentle pressure on the pedal starts stitching, and easing off stops it.
  • Threading: The manual provides detailed instructions for threading the sewing machine using the bobbin holder and for bottom bobbin placement. This includes steps for positioning the thread spool, guiding the thread through tension screws, thread guides, take-up lever, and finally through the needle (R).
  • Bobbin Winding: The machine allows users to wind their own bobbins using thread from separate spools. This involves placing an empty bobbin on the bobbin winder spindle (T), guiding the thread, and using either the foot pedal or auto sew mode to wind the thread.
  • Thread Tension Adjustment: A Tension Screw (Q) allows users to adjust thread tension. Turning it left loosens tension (useful for threading and heavier fabrics), and turning it right tightens tension (for lighter fabrics). Correct tension is crucial for smooth, flat seams and to prevent jamming.
  • Finger Guard (W): A safety feature that needs to be removed for certain operations like threading and needle changes, and then replaced.

Maintenance Features:

  • Needle Replacement: Detailed instructions are provided for changing the needle (R). This involves removing the finger guard, raising the needle to its highest position, loosening the needle clamp (O), removing the old needle, inserting a new needle with the flat side facing the clamp, tightening the clamp screw, and replacing the finger guard.
  • Troubleshooting Guide: The manual includes a troubleshooting section for common issues such as power cuts, thread snapping/jamming, and messy stitching. It provides potential causes and solutions, including checking for blockages, rethreading, adjusting tension, using appropriate fabric, and replacing blunt needles.
  • Cleaning: The troubleshooting guide suggests ensuring fabric is clean and free from fluff, and clearing any fluff or dust in the path of the thread to prevent issues.
  • Battery Care: Users are advised to remove batteries when the machine is not in use for long periods to save battery life and protect the machine.
  • Safety Information: The manual emphasizes safety, including warnings about sharp functional points, adult supervision for children, proper battery handling (non-rechargeable vs. rechargeable, polarity, removal of exhausted batteries), and responsible disposal of batteries and electrical waste. It also warns against opening the motor case, pulling on fabric, operating with wet hands, using damaged power cords, and leaving the machine unattended while plugged in. Regular examination of the transformer for damage is also recommended.

Sew Amazing Sewing Station TY6142 Specifications

General IconGeneral
BrandSew Amazing
ModelSewing Station TY6142
CategorySewing Machine
LanguageEnglish