EasyManua.ls Logo

SFF time P-ATX V3 - User Manual

SFF time P-ATX V3
31 pages
Print Icon
To Next Page IconTo Next Page
Loading...
SFF time P-ATX V3 manual
1
Dear customer,
Thank you for purchasing SFF time P-ATX V3 case. Please read the full compatibility list before assembling your PC. You can find the list on
our website at sfftime.com.
If you have any doubts about choosing your components, or steps in this manual, please contact us via email on info@sfftime.com, and we will
be glad to assist you.
Important notes:
- always use the correct screwdriver tip for corresponding bolts (PH1 or PH2)
- always use the correct bolt type
- do not overtight the bolts
- do not force the components in, each component should be installed without using excessive force
Question and Answer IconNeed help?

Do you have a question about the SFF time P-ATX V3 and is the answer not in the manual?

Overview

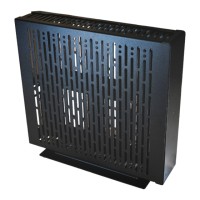
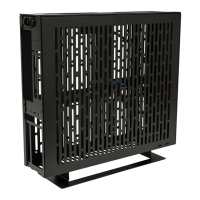
The SFF time P-ATX V3 is a console/"pizza box" style PC case designed for small form factor builds, offering a compact yet versatile solution for housing various PC components. Its primary function is to provide a sturdy and efficient enclosure for a custom-built computer, with a focus on optimizing space and airflow within a narrow footprint.

Important Technical Specifications:

  • Volume and Dimensions: The case has a volume of 10.4 liters with outer dimensions of 377.5 x 340 x 81 mm.
  • Weight: It weighs 1.7 kg, indicating a lightweight aluminum construction.
  • Motherboard Support: The P-ATX V3 supports a wide range of motherboard sizes, including mini-ITX, mini-DTX, micro-ATX, and ATX, providing flexibility for different build configurations.
  • Power Supply Support: It accommodates SFX/SFX-L power supplies up to 130mm in length.
  • GPU Support: The case features vertically mounted GPU support with multiple riser cable options. It can house a full-length dual-slot graphic card, or a triple-slot card if an ITX-sized motherboard is used.
  • CPU Cooler Height: CPU coolers up to 59 mm in height are supported.
  • AIO Support: The case supports 120mm AIO (All-In-One) liquid coolers.
  • Drive Bays: It offers support for one 3.5" drive and up to six 2.5" drives, allowing for ample storage options despite its compact size.
  • Front I/O: A front USB-C gen3.2 port is included for modern connectivity.
  • Construction: The case is built with sturdy powder-coated aluminum, ensuring durability and a premium feel.
  • Footprint: It has a narrow footprint of 110 mm wide with the included stand.
  • Layout Option: An inverted layout option is available, allowing for customization of the internal component orientation.

Usage Features:

The SFF time P-ATX V3 is designed for DIY PC builders, requiring assembly of chassis panels before component installation. The manual emphasizes careful assembly, including:

  • Modular Assembly: The case comes with separated chassis panels that need to be assembled. The process starts by attaching the rear panel to the top panel, followed by the MBO tray, bottom panel, and front panel.
  • Tooling: The assembly primarily uses M3 countersunk bolts of 5mm and 4mm lengths, along with M3 pan head bolts of 3mm and 4mm lengths. A PH1 screwdriver is recommended for most bolts, while a PH2 screwdriver is specified for #6-32 bolts. A 5.5mm socket hex tool is provided for M3 flanged nuts.
  • Motherboard Installation: Standoffs need to be prepared and installed according to the specific motherboard size (ATX, mITX, mDTX, µATX). The manual provides diagrams for correct standoff placement to prevent damage.
  • Power Switch Installation: The power switch is installed before the motherboard, using a combination of short 3mm pan head bolts, 5mm M3 standoffs, and 5mm countersunk bolts.
  • GPU Riser Cable and Bracket: The GPU riser bracket is assembled in two parts, with adjustable positions (1-3 slot options) to accommodate different GPU thicknesses. The riser cable is then installed, connecting the GPU to the motherboard.
  • GPU Installation: The GPU bracket is attached to the GPU, and then the GPU is installed into the riser, ensuring it is fully seated and the riser clip is locked.
  • PSU Installation: The SFX power supply is screwed to its bracket, with attention to orientation (notch facing the left panel). The internal AC cable is secured to the rear of the case, and the PSU bracket is then screwed to the case from both front and back.
  • Stand Installation: The stand can be mounted in either classic (bottom panel) or inverted (top panel) orientation. It aligns with slots on the case and is fixed once the side panels are installed.
  • Side Panel Installation: Side panels are installed with their notched side oriented towards the stand, fitting into the stand's slots, and secured with four countersunk bolts per side.
  • Drive Installation:
    • 3.5" Drive: A 3.5" drive is screwed to the case using four #6-32 silver bolts.
    • 2.5" Drives: Multiple options are available for 2.5" drives:
      • One drive mounted in the same plane as the motherboard, using two pan head bolts.
      • One drive mounted flush with the front panel, allowing for a 3.5" drive and long GPU, using two pan head bolts.
      • Up to five drives mounted to the front panel, or up to six 2.5" drives in total (or four 2.5" drives with a 3.5" drive), using two 5mm countersunk bolts.
  • Water-Cooling Radiator Installation: Optionally, a 120mm water-cooling radiator with its fan can be installed in the position otherwise occupied by hard drives, using four provided bolts (M3 pan head or #6-32).
  • Cable Management: After main components are installed, other cables like PSU cables can be attached.

Maintenance Features:

The manual implicitly suggests several maintenance practices through its assembly instructions:

  • Correct Fastener Usage: Emphasizes using the correct screwdriver tip (PH1 or PH2) and bolt type, and warns against overtightening bolts, especially when screwing into aluminum, to prevent stripping threads or damaging components.
  • Gentle Component Handling: Advises against forcing components, stating that "each component should be installed without using excessive force," which is a key principle for preventing damage during assembly and subsequent maintenance.
  • Accessibility: The design allows for the back of the motherboard to be accessible for cooler installation, simplifying potential upgrades or maintenance of the CPU cooling system.
  • Modularity: The modular design of the case, with separate panels, suggests that individual panels or components can be accessed or replaced more easily if needed for maintenance or upgrades.
  • Compatibility List: The initial instruction to "read the full compatibility list before assembling your PC" serves as a preventative measure, ensuring that chosen components will fit and function correctly, thereby reducing the likelihood of issues requiring maintenance due to incompatibility.
  • Support: Providing an email for support (info@sfftime.com) indicates a commitment to assisting users with any doubts or issues, which can be crucial for troubleshooting and maintenance.

SFF time P-ATX V3 Specifications

General IconGeneral
BrandSFF time
ModelP-ATX V3
CategoryEnclosure
LanguageEnglish

Related product manuals