1. Languages
Select your preferred on screen display language. This will change the language in
which the menus and associated information is displayed in. When set up has been
completed, this can be changed by selecting Menu > Settings > Language
3. Network setup You can connect the TV to your broadband router or wire-
less network in order to take advantage of the Smart functions. If you connect the
TV to your router using an Ethernet cable (recommended) this step will be skipped.
Follow the on screen prompts to connect to your wireless network. You can set up
the Network connection later in the network menu.
5. TV Installation – Audio.
Depending on how you use / install your TV, select the appropriate setting. The sound
settings on the TV will adjust to suit the type of installation.
6. Default Source
Select the source which you use the most. If Digital TV (Freeview) is chosen, then at
the next step, the set will tune in and default to Digital TV (Freeview). If one of the
other sources is selected, then the set will not tune in at this stage and default to
that input. If it is required to tune the set in later, this can be achieved by selecting
Menu > Channels
4
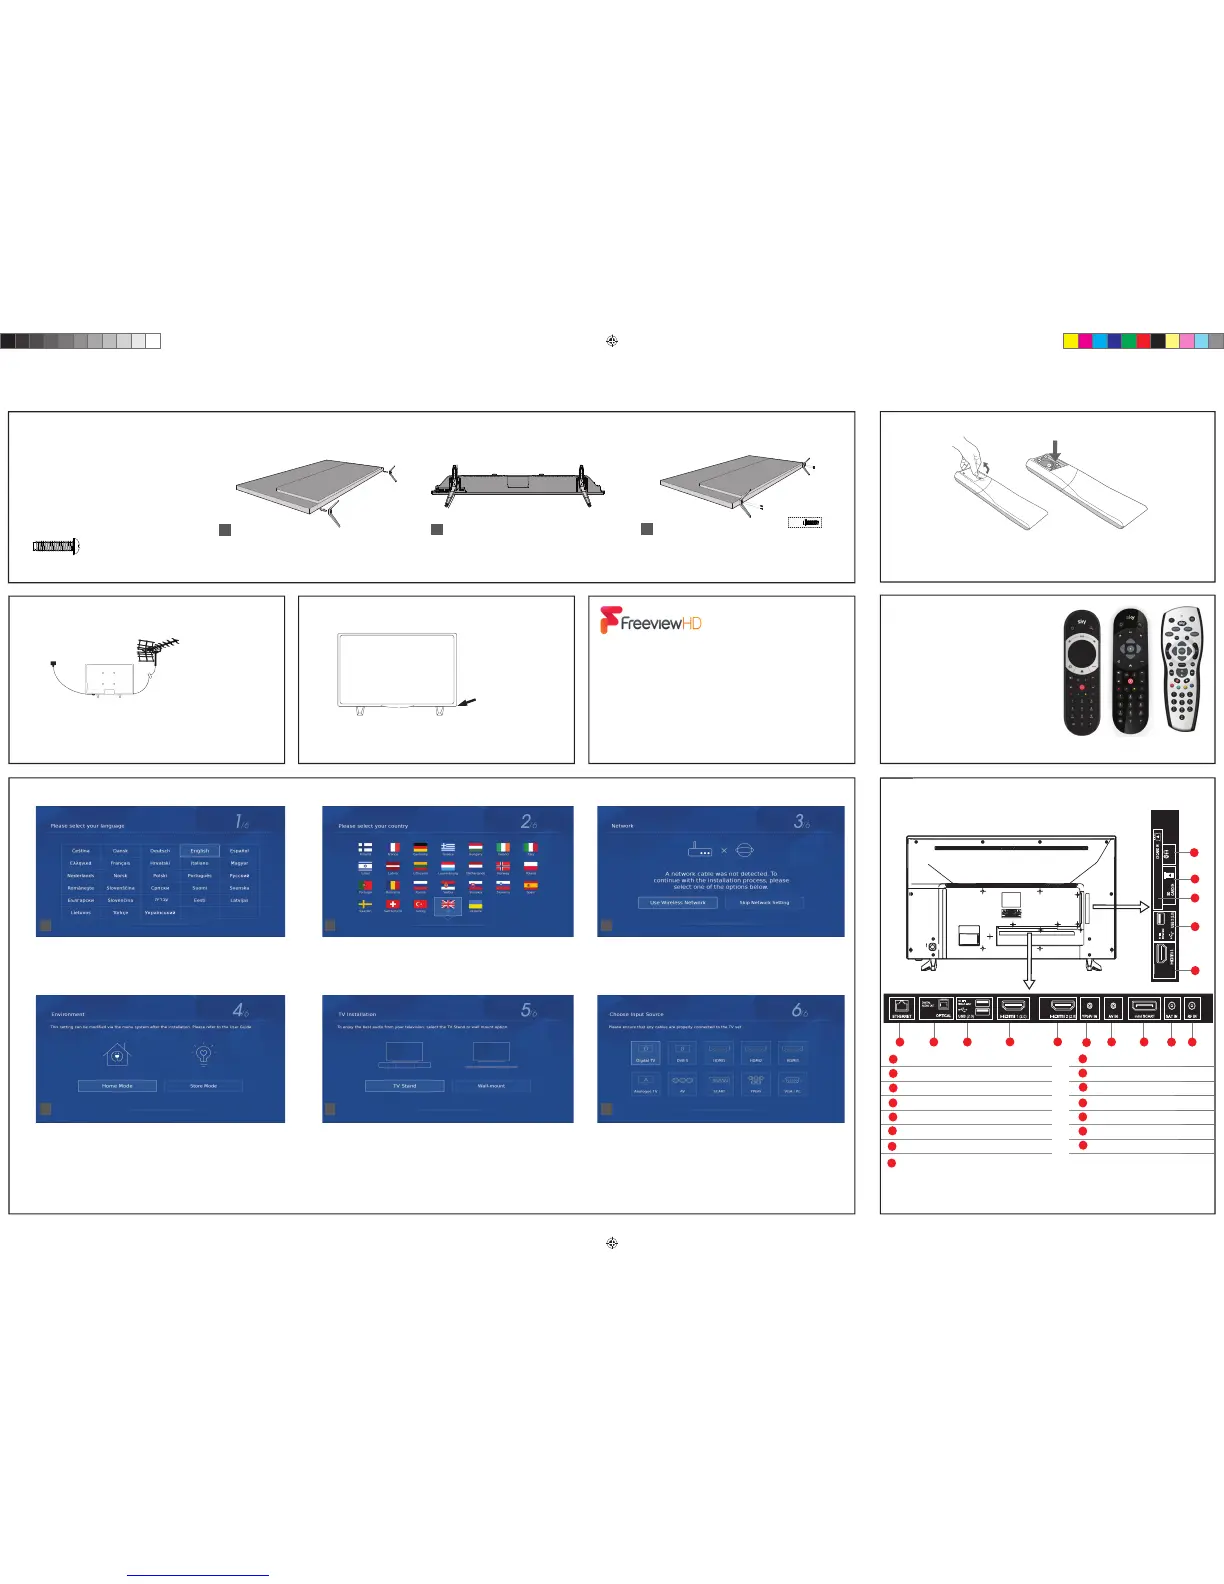
Fitting the stand
Installing batteries
Connecting your set
First time installation
4. Environment of Use
Home Mode: For normal use, by default it is set to a power saving mode which re-
duces the energy used by up to 25% (by reducing the power to the LED/LCD panel).
This can be changed in the picture mode settings.
NOTE: In Home Mode, the TV will switch itself to the standby mode after 4 hours in
the event that the buttons on the remote control or TV set are not used.
Store Mode: For store display use. The picture is adjusted to optimum settings. The
store demonstration will appear on the screen automatically after two minutes.
1 2 3
4 5 6
2. Country Selection
Select the correct fl ag for the country in which the set will be used in. This will enable
the set to correctly install the functions applicable in the country of use.
TV Control Stick
Switch on the television by pressing the TV control
stick located on the TV set.
For the stand installation, there is one type of screw
provided as shown below.
To complete the stand installation you will require a
cross head screw driver.
Place the TV set on a fl at and clean surface with the
panel facing downwards to avoid damage.
Setting up the TV set for the rst time
Connectivity
1) Connect the TV to your power socket.
2) If you wish to use the TV to receive Freeview/Saorview channels,
connect the RF input from the TV to your outdoor Digital TV aerial.
If you do not wish to receive Freeview/Saorview, skip this step.
1
2
3
To receive Freeview channels, in particular Freeview HD
channels, you will need a Digital TV aerial and be in a good
Freeview coverage area. You can check coverage for your
postcode at www.freeview.co.uk.
Please note that any Freeview HD channels found during
tuning will be placed in channel positions above 100.
For example, 101 (BBC1 HD) 102 (BBC2 HD) etc.
1
Sky remote code
If you wish to use your Sky+/HD+ remote to
operate the TV’s basic functions, you will
need a Sky remote control (Revision 9 or
later) and you will need to program it with
the code 2134.
Used for attaching the stand
to the TV set ( g.2)
4 x
TV panel must be facing downwards.
* The Ethernet/LAN port is used for Freeview HD services and smart functions.
TV control stick
Place the TV set on a fl at and clean surface with
the panel facing downwards to avoid damage.
When the stand feet are installed correctly the
stand feet will be longest at the front of the TV
and shortest at the back with the feet pointing
away from each other.
When the stand/feet are in the correct position, secure
the feet to the underside of the TV set using 4 screws
provided.
Insert the batteries supplied into the remote control and press the standby button
to power on the TV.
Ethernet/LAN* Network connection
Digital Audio Digital Optical Audio Output
USB 2.0 2 x USB port 2.0
HDMI 1 HDMI input
HDMI 2 HDMI input (ARC)
YPbPr HD input (YPbPr)
AV IN Audio/Video input
Mini SCART Mini SCART input
SAT IN Satellite input
RF in RF / TV aerial input
HDMI 3** HDMI input
USB 3.0 USB port 3.0
CI card in Common interface module
SD SD card input
Earphones Earphone input
A
I
M
L
B
J
N
C
D
E
F
G
K
O
If you wish to use your Sky Q remote to
operate the TV’s basic functions, you will
need to program it with the code 4170.
H
 Loading...