Do you have a question about the Siamp 50 6189 00 and is the answer not in the manual?
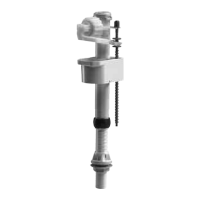
Place inlet valve through inlet hole with inlet rubber washer inside the cistern.
Secure the inlet valve with the backnut.
Connect the water supply to the inlet valve.
Adjust water level using the grey adjusting screw.
Adjust telescopic tube height so inlet top does not exceed tank top.
Place inlet valve through inlet hole with inlet rubber washer inside cistern.
Secure the inlet valve with the backnut.
Connect the water supply to the inlet valve.
Adjust water level using the grey adjusting screw.
Adjust telescopic tube height so inlet top does not exceed tank top.
Place inlet valve through inlet hole with inlet rubber washer inside cistern.
Secure the inlet valve with the backnut.
Connect the water supply to the inlet valve.
Adjust water level using the grey adjusting screw.
Place inlet valve through inlet hole.
Secure the inlet valve with the backnut.
Connect the water supply to the inlet valve.
Adjust water level using the grey adjusting screw.
Measure cistern height (H) and hole diameter (D) for mechanism fitting.
Adjust stirrup position based on cistern dimensions using provided table.
Follow steps to unclip, remove, cut, squeeze, relax, clip, block, and unscrew parts.
Place the mechanism in the cistern and secure it with the nut.
Fix screws at the bottom of the cistern according to part order.
Place the foam seal on the nut for cistern assembly.
Position the cistern on the toilet bowl and attach it with wing nuts.
Connect float valve and adjust water level using the float valve.
Ensure maximum water level is 20 mm below the overflow tube.
Position the button on the lid and screw down until it locks.
Steps to replace the seal in the cistern mechanism.
Measure cistern height (H) and hole diameter (D) for mechanism fitting.
Position stirrup, clip rod and pulls, and unscrew nut as per table.
Position mechanism in cistern and secure it in place with the nut.
Fix screws at the bottom of the cistern according to part order.
Place the foam seal on the nut for cistern assembly.
Position the cistern on the bowl and secure it with wing nuts.
Adjust the full flush level using the ballcock.
Slide cursor to adjust the short flush water level.
Adjust sliding valve to increase residual water for better cleaning.
Position the button on the lid and screw down until it locks.
Steps to change the valve gasket in the cistern mechanism.
Measure cistern height (H) and hole diameter (D) for mechanism fitting.
Adjust stirrup position using notch table and secure lift rod and nut.
Position the mechanism in the cistern and secure it in place with the nut.
Fix screws at the bottom of the cistern according to part order.
Position the latex foam gasket on the nut.
Position the cistern on the bowl and secure it with wing nuts.
Connect ballcock, open tap, and set long flush level.
Slide cursor to adjust the short flush water level.
Increase residual water by moving sliding valve left for better cleaning.
Position the button on the lid and screw until tight.
Steps to change the valve gasket by separating and refitting the mechanism.
Choose the right level for overflow tube shortening based on cistern dimensions.
Unscrew the strainer nut as part of mechanism preparation.
Position the mechanism in the cistern and secure it in place with the nut.
Fix screws at the bottom of the cistern according to part order.
Position the latex foam gasket on the nut.
Position the cistern on the bowl and secure it with wing nuts.
Connect ballcock, open tap, and set long flush level.
Slide cursor to adjust the short flush water level.
Increase residual water by moving sliding valve left for better cleaning.
Position the button on the lid and screw until tight.
Steps to change the valve gasket by separating and refitting the mechanism.
Position the mechanism in the cistern and attach it with the nut.
Attach screws to the bottom of the cistern.
Position the foam seal on the nut.
Position the cistern on the toilet bowl and attach it with wing nuts.
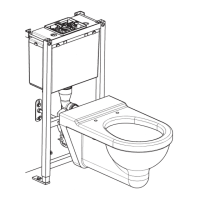
First step in installing the control system mechanism.
Second step in installing the control system mechanism.
Third step in installing the control system mechanism.