45
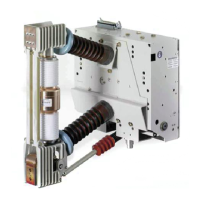
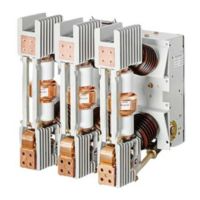
Figure 24: Illustration showing required technique for fastening terminal-clamp hardware
Position of torque wrench to avoid undue stressing of moving contact (36.1)
Item Description
A Moving contact (36.1)
B Spacer (shoulder) (29.3)
C Torque wrench
D Direction of force (P)
E Terminal clamp (29.2)
F Holding wrench
G Vacuum interrupter
G
F
E
D
C
B
A
D
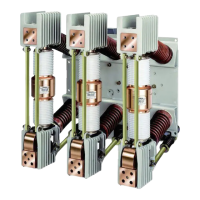
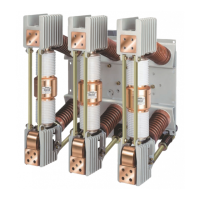
2.5 Attach struts (28.0) to the upper pole-
support (20.0), replace hardware
(M10), but do not tighten at this time.
2.6 Couple levers (48.6) and drive link
(48.9) to the eye bolt (36.3), using the
pin supplied. Apply retaining clips.
Appropriate pin is modestly chamfered,
not to be confused with pin for the
insulating coupler.
2.7 Raise the terminal clamp (29.2) against
the step or the spacer (if applicable) of
the moving contact (36.1) of the
vacuum interrupter (30.0) so that the
radius of the movable contact faces the
connecting surface of the flexible
connector (29.1). Employ technique
illustrated to fasten terminal clamp
(refer to Figure 25). Note opposing
wrenches. Tighten the bolt(s) of the
terminal clamp to a torque of 40 Nm
(30 ft-lb), taking care to see that the
terminal of the vacuum interrupter is
not subjected to excessive bending
movement.
Note: Excessive bending movement exerted
while fastening the terminal clamp will
damage the vacuum interrupter.
 Loading...