Maintenance and fault tracing7SV512
V1
109C53000---G1176---C91
7.3.1 Replacing the mini-fuse
--- Select a replacement fuse 5 ¢ 20 mm. Ensure
that the rated value, time lag (medium slow) and
code letters are correct. (Figure 7.2).
--- Prepare area ofwork: provide conductive surface
for the basic module.
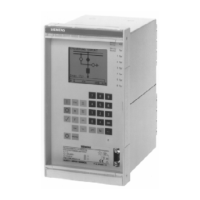
--- Open housing cover.
Hazardous voltages can be present in
the device even after disconnection of
the supply voltage orafter removal ofthe
modules from the housing (storage ca-
pacitors)!
!
Warning
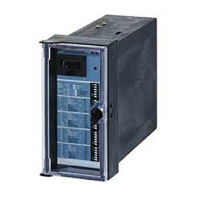
--- Loosen the module using the pulling aids pro-
vided at the top and bottom. (Figure 7.3).
Electrostatic discharges via the compo-
nent connections, the PCB tracks or the
connecting pins of the modules must be
avoided under all circumstances by pre-
viously touching an earthed metal sur-
!
Caution!
--- Pulloutthemodule and place ontotheconductive
surface.
--- Remove blown fuse from the holder (Figure 7.2).
--- Fit new fuse into the holder (Figure 7.2).
--- Insert basic module into the housing; ensure that
the releasing lever is pushed fully to the right be-
fore the module is pressed in (Figure 7.3).
--- Firmly push in the module using the releasing le-
ver. (Figure 7.3).
--- Close housing cover.
Switch on the device again. If a power supply failure
is still signalled, a fault or short-circuit is present in
the internal power supply. The device should be re-
turned to the factory (see Chapter 8).
24/48 2 A/E
60/110/125 1,6 A/E
220/250 1 A/G
Rear view on the removed
basic module
Mini-fuse of the power supply;
medium slow (M)
rated
value
at U
HN
/V---
Figure 7.2 Mini-fuse of the power supply
 Loading...