English
A5E02316203-01 5
Five connection types have been provided for connecting two-wire, three-wire or four-
wire systems with balanced or unbalanced load.
The input circuit of the device must correspond to one of the connection types listed.
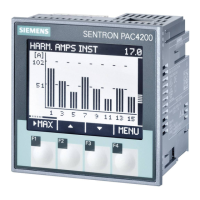
Select the suitable connection type for the purpose. Fig. 13 shows a typical sample
connection with connection type 3P4W. Other sample connections can be found in
the SENTRON PAC4200 Manual.
Key to Fig. 13:
* Fuses must be provided by the customer.
** Connection of supply voltage.
Terminal versions: The wiring of the device varies according to the terminal version:
• Wiring of screw terminals, Fig. 14 and 20.
• Wiring of ring lug terminals, Fig. 15 and 21.
Applying the supply voltage: All necessary information can be found in the techni-
cal data.
Once you have installed the device and connected it, you can carry out the parame-
terization.
To start up the device, the following operating parameters must be specified in the
device settings according to the connection type and sample connection:
Setting the language: At initial startup after resetting to factory defaults and after
updating the firmware, all available langugages are shown on the display. English is
the default, Fig. 16.
1) Select the desired language Key <F2> or key <F3>.
2) Accept the desired language: Key <F4>
Setting the connection type: 1) Exit the measured value display and open the
"MAIN MENU": Key <F4>. 2) In the main menu select "SETTINGS": Key <F2> or
<F3>. 3) Call the "SETTINGS" menu entry: Key <F4>. 4) In the "SETTINGS" menu
select the "BASIC PARAMETERS" menu entry: Key <F2> or <F3>. 5) Call the "BASIC
PARAMETERS" menu entry: Key <F4>. 6) In the "BASIC PARAMETERS" menu call
the "VOLTAGE INPUTS" entry: Key <F4>. The display shows the currently valid set-
tings, Fig. 17. 7) Open edit mode of the "CONNECTION TYPE" device setting: Key
<F4>. 8) Cycle through the available options: Key <F2>. 9) Select the desired con-
nection type: Key <F4>. The connection type is saved permanently and is immedi-
ately effective. The display returns to display mode. 10) Return to the selection
menus or the measured values display: Key <F1>.
Setting the voltage input: The factory setting for the measuring reference voltage
(phase-to-phase voltage) is 400 V. At initial startup, the following steps must be car-
ried out if the available phase-to-phase voltage deviates from this.
1) In the "SETTINGS" menu, call the "BASIC PARAMETERS" entry. 2) In the "BASIC
PARAMETERS" menu open the "VOLTAGE INPUTS" entry: Key <F4>. The display
shows the current settings. 3) Select the "VOLTAGE INPUT" device setting: Key <F2>
or <F3>, Fig. 18. 4) Open edit mode of the "VOLTAGE INPUT" device setting: Key
<F4>. 5) Set the desired value: Key <F2> and key <F3>. 6) Accept the value with:
Key <F4>. The voltage input value is saved permanently and is immediately effective.
The display returns to display mode. 7) Return to the selection menus or the mea-
sured values display: Key <F1>.
Setting the measuring current: Set the conversion ratio of the current transducer on
the device, Fig. 19:
1) In the "SETTINGS" menu, call the "BASIC PARAMETERS" entry. 2) In the "BASIC
PARAMETERS" menu open the "CURRENT INPUTS" entry: Key <F4>. 3) Select the
"CT PRIMARY" device setting: Key <F3>. 4) Open edit mode for the "CT PRIMARY"
device setting: Key <F4>. 5) Set the desired value: Key <F2> and key <F3>.
6) Accept the value with: Key <F4>. The primary current value is saved permanently
and is immediately effective. The display returns to display mode. 7) Select the "CT
SECONDARY" device setting: Key <F3>. 8) Open edit mode for the "CT SECOND-
ARY" device setting: Key <F4>. 9) Specify the secondary current. Key <F2>. 10)
Accept the value with: Key <F4>. The secondary current value is saved permanently
and is immediately effective. The display returns to display mode. 11) Return to the
selection menus or the measured values display: Key <F1>.
1)
The measuring range is the range within which the accuracy data applies.
Connection
Type of connection Brief description
3 phases, 4 conductors, unbalanced load 3P4W
3 phases, 3 conductors, unbalanced load 3P3W
3 phases, 4 conductors, balanced load 3P4WB
3 phases, 3 conductors, balanced load 3P3WB
Single-phase AC 1P2W
Parameterizing
Technical data
Measurement
Only for connection to AC voltage systems
Method for measuring voltage and
current
True root-mean-square measurement (TRMS)
Measured value acquisition
Power, current, voltage Contiguous (zero blind measuring)
Waveform Sinusoidal or distorted
Frequency of the relative funda-
mental
50 / 60 Hz
Measuring inputs for voltage
Voltage ph-n 3~ 400 V AC (+20 %), max. 347 V for UL
Voltage ph-ph 3~ 690 V AC (+20 %), max. 600 V for UL
Min. measurable voltage
Voltage ph-n AC 3~ 57 V – 80 %
Voltage ph-ph AC 3~ 100 V – 80 %
Impulse withstand voltage <= 9.5 kV (1.2/50 µs)
Measuring category (in accordance with IEC/UL 61010 Part 1)
Input voltage V
I
CAT III
Input resistance (ph-n) 1.05 MΩ
Power consumption per phase max. 220 mW
Measuring inputs for current
Only for connection to AC power systems via external current transformers
Input current I
I
Rated current 1 AC 3~ x / 1 A
Rated current 2 AC 3~ x / 5 A
Measuring range
1)
for current 10 % to 120 % of rated current
Measuring range
1)
for power 1 % to 120 % of rated current
Surge withstand capability 100 A for 1 s
Max. permissible continuous current 10 A
Power consumption per phase 4 mVA at 1 A
115 mVA at 5 A
Zero point suppression 0 to 10 % of rated current
Supply voltage
Design Wide-range power supply AC / DC
Rated range 95 … 240 V AC (50/60 Hz) or 110 … 340 V
DC
Operating range ± 10 % of AC / DC rated range
Power consumption
Without expansion module Typically 11 VA AC, 5.5 W DC
With 2 expansion modules max. 32 VA AC, 11 W DC
Overvoltage category CAT III
Battery
Types BR2032, CR2032 (not rechargeable)
Approved in accordance with UL 1642
The battery must be designed for tempera-
tures of >=70 °C.
Digital inputs
Number 2 inputs
Input voltage
Operating voltage 24 V DC, max. 30 V DC
(SELV or PELV supply)
"0" signal detection 10 < V DC
"1" signal detection 19 > V DC
Input current
For signal "1" typ. 4 mA (24 V)
Digital outputs
Number 2 outputs
Design/function Switching output or pulse output
Operating voltage 12 to 24 V DC, max. 30 V DC
(SELV or PELV supply)
Output current
For signal "1" Depends on the load and the external power
supply
Continuous load max. 100 mA (thermal overload protection)
Transient overload max. 300 mA for a duration of 100 ms
Resistive load 100 mA
For signal "0" max. 0.2 mA
Internal resistance 55 Ω
Short-circuit protection Yes
Overvoltage category CAT I
Pulse output function
 Loading...