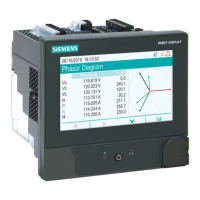
Configuring basic Ethernet settings using the meter webpages
You can use the meter webpages to configure the IPv4, IPv6 and TCP/IP settings for the meter.
When configuring communications parameters, ensure you maintain at least one communication
path that allows full access to your device; otherwise, you may permanently lose the ability to
change your device’s configuration and access to additional data.
NOTICE
LOSSOFACCESS
Failure to follow these instructions can result in loss of access to the device.
Ensure you maintain sufficient access to communicate with and configure your device.
Contact your network system administrator for your IP addresses and other Ethernet network
configuration values.
To configure basic Ethernet setting using the meter webpages:
1. Connect to your meter’s webpages.
Until you configure other Ethernet connection settings, you can connect to the meter using
its default IPv4 address or its IPv6 link local address, or by using self-discovery over
Ethernet by double-clicking the meter’s network icon.
2. Navigate to Setup > Ethernet.
3. Enter the appropriate value for the settings.
4. Click Advanced Settings to configure additional Advanced Ethernet settings, such as
timeouts and enabling/disabling certain protocols over Ethernet, if needed.
5. Click Apply.
NOTE: If you are changing the address you used to access the webpages, you will need to
reconnect to the webpages after you click Apply.
Parameter Value Description
MAC address Read-only
The media access control (MAC) address is
factory set and is for reference only.
Ethernet device name configurable
The Ethernet device name is used by DPWS
for self-discovery over Ethernet and as the
hostname to uniquely identify your meter for
DHCP and DNS.
By default, this is set to the meter model plus
the last six-digits of the MAC address.
Ethernet settings available using the webpages
9810 series - User manual Communications
7EN05-0390-08 80
 Loading...