GB
│
IE
│
9 ■
SMZE 500 C2
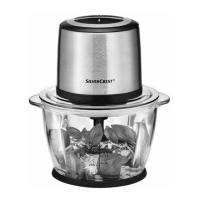
5) Place the lid 5 onto the bowl 9 so that the sealing ring 6 rests on the
edge of the bowl 9 and the blade holder 7 protrudes through the opening
of the lid 5.One of the two catches e that are located on the inner ring of
the lid 5 should point forwards, towards you.
6) Place the motor unit 3 onto the lid 5 so that the logo is facing it. The two
catches e on the inner ring of the lid 5 now engage into the two recesses on
the bottom of the motor unit 3. If the catches e do not slide immediately into
the recesses on the bottom of the motor unit 3, turn the motor unit 3
a little until it rests flush on the lid 5 and the catches e have slid into the
recesses.
7) Insert the plug into a mains power socket.
NOTE
► Hold the bowl 9 firmly with one hand and the motor unit 3 with the other
hand while processing food.
8) Press the required speed button 1/2. The blade rotates 8 as long as
you keep the speed button 1/2 pressed. The motor stops as soon as it is
released.
CAUTION – PROPERTY DAMAGE!
► If the blade 8 stops and starts or does not turn at all, release of the speed
button 1/2 immediately and pull out the mains plug. Check whether
the blade 8 is jammed as a result of too hard/tough food and free this.
Otherwise, the motor unit could overheat.
NOTE
► If food remains stuck on the inside of the bowl 9 and the blade 8 cannot
reach it any more, open the lid 5 and push the food back down with a
spatula or similar.
9) Once the food is fully chopped, release of the speed button 1/2.
10) Remove the power plug from the socket.
WARNING – RISK OF INJURY!
► Never attempt to remove food from the bowl 9 while the blade 8 is still
turning. There is a risk of injury and food can also spray out and make a
mess.
11) Wait until the blade 8 has come to a complete standstill.
12) Lift the motor unit 3 off the lid 5.
 Loading...