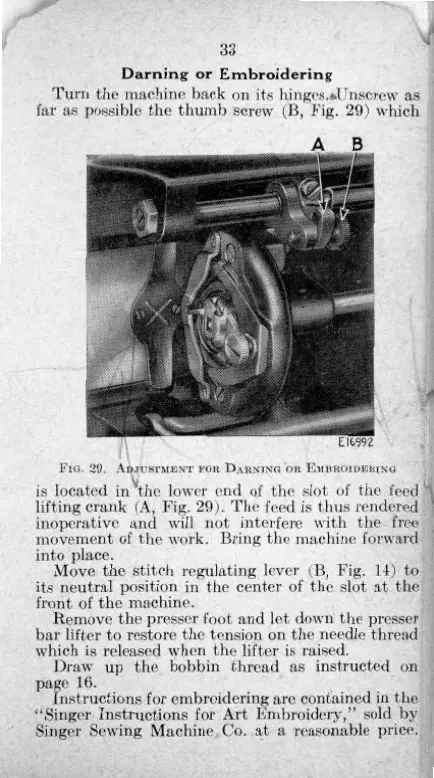
A B
E16992
33
Darning or Embroidering
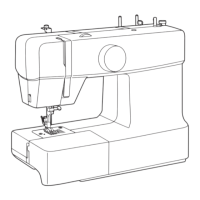
Turn the machine back on its hinges.d.Unscrew as
far as possible the thumb screw (B, Fig. 29) which
Flo. 29.
A TUSTMENT FOR DARNING 'OR EMBROIDERING
is located in the lower end of the slot of the feed
lifting crank (A, Fig. 29). The feed is thus rendered
inoperative and will not interfere with the free
movement of the work. Bring the machine forward
into place.
Move the stitch regulating lever (B, Fig. 14) to
its neutral position in the center of the slot at the
front of the machine.
Remove the presser foot and let down the presser
bar lifter to restore the tension on the needle thread
which is released when the lifter is raised.
Draw up the bobbin thread as instructed on
page 16.
Instructions for embroidering are contained in the
"Singer Instructions for Art Embroidery," sold by
Singer Sewing Machine Co. at a reasonable price.
33
Darning
or
Embroidering
Turn
the machine back on its
hinges.«»Unscrew
as
far
as possible the thumb screw (B, Fig. 29) which
E16992
FIG.
29.
ADJUSTMENT
FOR
DARNING
OR
EMBROIDERING
V
is
located in the lower end of the slot of the
feed
lifting
crank (A, Fig. 29). The
feed
is thus rendered
inoperative and
will
not interfere
with
the free
movement of the work.
Bring
the machine forward
into place.
Move
the stitch regulating lever (B, Fig. 14) to
its
neutral position in the center of the slot at the
front of the machine.
Remove the presser
foot
and let down the presser
bar lifter to restore the tension on the
needle
thread
which
is released when the lifter is raised.
Draw
up the
bobbin
thread as instructed on
page
16.
Instructions
for embroidering are contained in the
''Singer
Instructions for Art Embroidery," sold by
Singer
Sewing Machine Co. at a reasonable price.