Do you have a question about the Singer 222K and is the answer not in the manual?
Details SINGER's commitment to expert service and the availability of representatives for maintenance.
Instructions for connecting the foot controller and electric cord to the machine and power source.
Cautionary advice to disconnect the power plug after finishing sewing.
Key rules to prevent damage, such as not running without fabric or with incorrect threading.
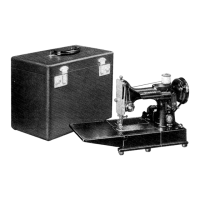
Explains how the tubular bed is ideal for stitching curved or cylindrical items.
Procedure for removing the standard plate to attach the tubular bed assembly.
Instructions on initiating sewing with the foot controller and guiding fabric.
Step-by-step guide to remove the bobbin case, including latch operation.
How to use the stop motion screw to wind bobbins separately from the main sewing action.
Detailed threading path for the bobbin winder, from spool to bobbin.
Steps for placing the bobbin, holding the thread, and starting the winding process.
Instructions for placing the bobbin correctly into the bobbin case.
Steps for routing the thread through the case's slot and tension spring.
Procedure for placing and latching the threaded bobbin case onto the machine's stud.
Instructions for inserting the needle into the needle clamp properly.
Detailed steps for threading the machine from the spool to the needle.
Guidance for the thread's path through the final guides and into the needle eye.
Emphasizes using appropriate thread and needle sizes for satisfactory machine performance.
Steps to pull up the bobbin thread to meet the needle thread.
Procedure for commencing sewing, including fabric placement and presser foot operation.
Steps for safely removing sewn fabric and pivoting work for corners.
Guidance on adjusting presser foot pressure for different fabric weights.
How to adjust stitch length using the indicator and regulator lever.
Detailed steps for setting stitch length via the indicator plate and thumb nut.
Explanation of achieving a balanced stitch by correctly setting needle and bobbin thread tensions.
Method for testing needle thread tension with the presser foot down.
Instructions for increasing or decreasing needle tension using the dial and thumb nut.
Procedure for adjusting bobbin thread tension via the screw on the bobbin case.
Steps to take apart the needle thread tension assembly for maintenance.
Detailed steps for putting the needle thread tension unit back together.
Procedure for testing the minimum thread tension and adjusting the dial as needed.
Steps to diagnose and fix problems when correct stitching cannot be achieved, focusing on thread tensions.
Instructions on where and when to apply oil to ensure smooth machine operation.
Guidance on oiling the hook bearing for optimal performance.
Steps to access and lubricate parts within the machine base, including gears.
Emphasis on using SINGER lubricant for the motor and refilling grease tubes.
Lists common reasons for needle breakage, including bent needles and incorrect tension.
Identifies causes for needle and bobbin thread breakage, such as knots or improper threading.
Explains reasons for skipped stitches, including needle setting and quality.
Note advising to raise needle, remove presser foot, and check alignment after attachment installation.
Instructions for threading and sewing bias binding using the binder attachment.
Recommendations for thread and needle, and steps to lower the feed mechanism.
| Built-in Light | Yes |
|---|---|
| Free Arm | Yes |
| Power Source | Electric |
| Stitch Options | Straight Stitch |
| Built-in Stitches | 1 |
| Bobbin Type | Class 66 |
| Stitch Type | Straight |
| Motor | External |
| Operation | Mechanical |