Do you have a question about the Singer 2502 and is the answer not in the manual?
Key safety instructions including DANGER and WARNING notices.
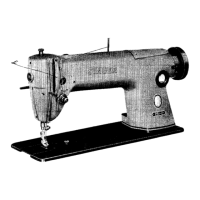
Identifies and labels the main components of the sewing machine.
Instructions on connecting and running the sewing machine.
Guidance on selecting and properly inserting sewing machine needles.
Detailed steps for winding thread onto the bobbin.
Procedure for correctly placing the wound bobbin into the bobbin case.
Step-by-step guide for threading the sewing machine with upper thread.
How to adjust the stitch width for straight stitching.
How to adjust the needle position for straight stitching.
How to adjust the stitch length for straight stitching.
How to use the reverse stitch button for reinforcement.
Properly positioning fabric under the presser foot before sewing.
Using guidelines for sewing straight seams.
How to backstitch to reinforce the end of a seam.
How to adjust thread tension for balanced straight stitches.
How to adjust thread tension for zig-zag stitching.
Adjusting needle position for zig-zag stitches.
Adjusting stitch width for zig-zag stitches.
Adjusting stitch length for zig-zag stitches.
Using zig-zag stitch for seams, applique, monogramming, and decorative sewing.
First step in making a four-step buttonhole.
Second step in completing the first side of the buttonhole.
Third step for stitching the second side of the buttonhole.
Final step to complete the four-step buttonhole.
Adjusting stitch density for balanced buttonholes.
Sewing buttons easily using the free-arm feature.
Applying bar tacks to reinforce strain areas using free-arm.
Procedure for removing and reinstalling the bobbin case.
Instructions for cleaning the sewing machine's exterior and parts.
Guidance on how and when to lubricate the sewing machine's moving parts.
First step in manually creating a buttonhole.
Second step for manually creating a buttonhole.
Third step for manually creating a buttonhole.
Fourth step for manually creating a buttonhole.
Final step for manually creating a buttonhole.
| Type | Mechanical |
|---|---|
| Built-in Stitches | 10 |
| Needle Threading | Manual |
| Maximum Stitch Length | 4 mm |
| Maximum Stitch Width | 5 mm |
| Built-in Needle Threader | No |
| Presser Feet | All-Purpose Foot, Buttonhole Foot, Zipper Foot |