Do you have a question about the Singer 6212 and is the answer not in the manual?
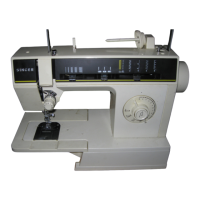
Highlights key features like zig-zag, 4-step buttonholer, blindstitching, and easy-to-use accessories.
Instruction to record the sewing machine's serial number for future reference.
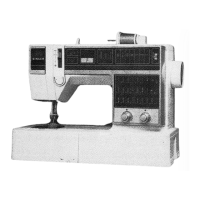
Lists and identifies the main mechanical and operational components of the sewing machine.
Used for decorative and zig-zag sewing.
Standard parts for straight and zig-zag stitching.
Used for making four-step buttonholes.
Used for inserting zippers and stitching corded seams.
Holds spools and allows smooth thread unwinding.
Assortment of needles for various fabric types.
Prevents fabric movement during darning/embroidery.
Positions fabric for blindstitch hemming.
Stitches two parallel decorative rows.
Essential safety precautions to follow before operating or cleaning the machine.
Step-by-step guide on how to connect the sewing machine to a power source.
Instructions on starting, stopping, and controlling the sewing machine's speed.
Guidance on selecting the correct needle for fabric and how to safely change it.
Instructions for easily attaching and removing snap-on presser feet.
Procedure for replacing presser feet that attach with screws.
Steps to replace the general purpose or straight stitch needle plates.
Procedure for attaching the feed cover for darning or free-motion embroidery.
Adjusts the width of the stitch, essential for straight and zig-zag stitches.
Determines the needle's position (left, center, right) for precise stitching.
Controls the length of the stitch for different fabric types.
Button used to sew backward for reinforcing stitches.
How to position fabric correctly under the presser foot.
Methods for pin basting and hand basting to create temporary seams.
Using needle plate guides for precise straight seam lines.
Procedure for placing fabric and aligning edges to begin a seam.
Techniques for guiding various fabric types, including knits and elastic fabrics.
How to use the reverse stitch button to backstitch and reinforce seams.
Instructions and settings for repairing worn or torn fabric.
Introduction to stitching multiple fabric layers for decorative effects.
Recommended settings for using the zipper foot to stitch evenly near the zipper.
Selects different stitch patterns for zig-zag sewing.
Adjusts needle position, typically center for zig-zag.
Controls stitch width, from narrow to wide zig-zag.
Setting the stitch length for open zig-zag or satin stitches.
Regulating needle thread tension for balanced stitches.
Using zig-zag stitch to prevent fabric edges from fraying.
Creating smooth, dense stitches for monograms and embroidery.
Technique for stitching block letters for monograms.
Recommended settings and procedures for sewing buttons with zig-zag stitch.
Instructions for creating durable, invisible hems using blindstitch.
Recommended settings for creating functional and decorative ladder seams.
Using multi-stitch zig-zag to repair fabric tears and reinforce.
Creating strong bar tacks for reinforcing stress areas like belt loops.
Instructions for inserting elastic using the 'M' stitch.
Technique for inserting lace using the 'M' stitch.
Instructions for the first step of making a four-step buttonhole.
Instructions for the second step of making a four-step buttonhole.
Instructions for the third step of making a four-step buttonhole.
Instructions for the fourth step, including finishing and cutting.
Adjusting stitch density for balanced buttonholes on different fabrics.
Simplifies topstitching, sleeves, and waistband finishing.
Easier sewing of buttons on cuffs or neckbands.
Avoids fabric bulk for applying bar tacks to pockets and waistlines.
Recommended settings for sewing with two parallel lines of stitches.
Step-by-step instructions for removing and reinstalling the bobbin case.
Instructions for safely replacing the machine's light bulb.
General advice on cleaning machine surfaces and parts.
For precise straight stitching on lightweight fabrics.
Securely holds buttons for stitching.
For decorative and zig-zag sewing.
For inserting zippers and corded seams.
For free-motion work, embroidery, and monograms.
For cleaning hard-to-reach areas.
For machine lubrication.
For making four-step buttonholes.
Checks for power, connections, and handwheel engagement.
Checks for needle condition, threading, and bobbin insertion.
Checks for needle quality, insertion, and settings.
Checks for proper thread winding and spool engagement.
Checks for machine threading, spool cap, and tension.
Checks for bobbin winding, insertion, and thread path.
Checks for threading, fabric hold, needle, and settings.
Checks presser foot attachment, lowering, and stitch length.
| Brand | Singer |
|---|---|
| Model | 6212 |
| Category | Sewing Machine |
| Language | English |