Do you have a question about the Sinope RM3250ZB and is the answer not in the manual?
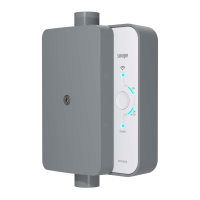
Details the 'Indicator/Button', 'ON Indicator', 'Power Indicator', and 'Main Button' on the controller.
Describes two wiring options for controller placement, indicating connections to 'Load' and 'Line'.
Guides through turning off the circuit, preparing wires, mounting, connecting terminals, and powering up the controller.
Instructions for downloading the Neviweb app, creating an account, and adding the device via the app.
Details initiating the Zigbee hub session, pairing the controller, and connecting other devices.
Explains how to disconnect the load controller by pressing the controller's buttons simultaneously for 10 seconds.
Provides details on wire gauge, operating voltage, consumption, temperature limits, and Zigbee profile.
Outlines the 3-year limited warranty for product defects, conditions, and exclusions.
| Brand | Sinope |
|---|---|
| Model | RM3250ZB |
| Category | Controller |
| Language | English |