Do you have a question about the SKY-WATCHER STAR ADVENTURER GTi and is the answer not in the manual?
Key safety warnings including eye protection, flammable gas, child safety, and avoiding disassembly.
Notices regarding Sky-Watcher's right to change specifications and liability for misuse.
Ensures all necessary parts for setup are identified before assembly.
Steps for opening the tripod, setting height, and attaching the spreader base for stability.
Attaching the mount head to the tripod and roughly setting the altitude using the control knob.
Attaching the counterweight collar to the shaft and then the shaft to the mount for balance.
Orienting the mount towards True North/South and placing the counterweight on the shaft.
Attaching the telescope/camera via the dovetail clamp and roughly balancing the system.
Balancing the optical system in Right Ascension by adjusting its position on the saddle.
Ensuring the optical system is balanced in Declination when oriented parallel to the ground.
Guidance on adjusting counterweight position based on system pitch for optimal balance.
Explains compensating for apparent star movement using polar alignment for long exposures.
Using the polar scope to find Polaris and aligning it using the SynScan Pro app or manual adjustments.
Using the polar scope to find the 'Octans' asterism and aligning it with the reticle for Southern Hemisphere.
Ensuring the mount is level and oriented correctly before polar alignment.
Setting the mount's altitude to match the user's geographical latitude.
Utilizing the SynScan Pro app and mount controls for precise polar alignment adjustments.
Instructions for installing and using eight AA batteries for powering the mount.
Using an external 12V DC source, specifying requirements for power adapters and battery packs.
Warnings against using 24/48V sources or gas generators due to potential damage.
Connecting the mount to a smartphone or tablet via Wi-Fi using the SynScan Pro app.
Connecting the mount to a computer via Wi-Fi using the SynScan Pro app.
Connecting the mount to a computer via USB cable for control with the SynScan Pro app.
Connecting the mount using a SynScan hand controller via RJ45 cable.
Installing ASCOM, SynScan Pro app, and necessary drivers for autoguiding.
Steps to connect the guide camera, mount via USB/ST-4, and launch the SynScan Pro app.
Setting up the guiding software to connect to the mount via ASCOM driver.
Guidelines for cleaning the mount using dry or damp lint-free cloths.
Recommendations for battery removal during storage and proper installation to prevent damage.
Best practices for manual movement, avoiding overload, and protecting the polar scope borehole.
Identifying parts and assembling the column extension to raise the mount head height.
Advice on disassembling the mount and column extension for safe transportation.
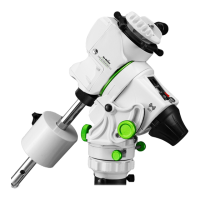
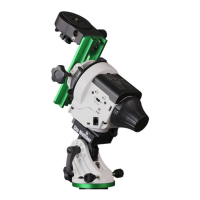
The Star Adventurer GTi is a portable, lightweight, and practical tracking mount designed for astrophotography and observing celestial objects. Its primary function is to track the apparent movement of stars, allowing for long-exposure photography without star trails. It also incorporates the SynScan GoTo system, enabling it to automatically find and track various astronomical objects.
The mount is equipped with a V-style mounting saddle, capable of supporting a payload of up to 11 pounds. It can be powered by eight AA batteries or an external 12V DC power supply. For enhanced connectivity and ease of use, the Star Adventurer GTi features Wi-Fi connectivity, allowing for wireless operation and reducing potential trip hazards associated with cables. It also supports full computer connectivity and autoguiding via an ST-4 connection, which is crucial for precise tracking during long exposures.
A key feature of the Star Adventurer GTi is its integrated polar scope, located along the polar axis of the mount. This polar scope is essential for accurate polar alignment, a critical step for successful astrophotography. It includes an illuminated reticle for improved visibility in low-light conditions, which can be activated via the SynScan Pro App.
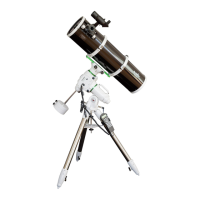
Setting up the Star Adventurer GTi involves several steps to ensure stability and accurate alignment. First, the mount needs to be securely attached to a tripod, ensuring it is level with the ground and does not wiggle or rock. The tripod legs should be extended to their fullest length for maximum stability. The mount head is then fastened to the tripod via a central bolt.
Once the mount is secured, the altitude needs to be roughly set based on your geographical location. This is done by turning a knob below the counterweight borehole to raise or lower the mount head. The counterweight shaft is then attached to the mount, and the counterweight collar is slid onto the shaft. The counterweight safety screw must be attached to the end of the shaft. The mount is capable of handling both low and high latitudes, with specific counterweight borehole positions for each. For lower altitudes, a counterweight shaft cap on the front of the mount needs to be removed.
Before attaching any optical system, the mount should be oriented to face "True North/South" using a reference app. The clutches on the mount head should be disengaged, and the saddle oriented left to right with the dovetail locking screw facing away. The telescope or camera is then attached to the mount via the dovetail clamp and roughly balanced to prevent it from falling left or right. The hand knob is tightened to secure the optical system. It is crucial never to attach the telescope/camera before adding the counterweight, and the total payload should not exceed the mount's capacity to prevent damage.
Balancing the optical system is a two-step process involving both Right Ascension (RA) and Declination (DEC) axes. First, the counterweight is set to the bottom of the shaft, and the optical system is slid left or right within the saddle until it is balanced, meaning it remains stationary when the dovetail locking screw is loosened. The RA clutch is then disengaged, and the optical system is oriented parallel to the ground. If the system pitches forward or backward, the DEC axis needs adjustment. Once DEC is balanced, the counterweight is slid along the shaft. The mount is then flipped over to check the balance of both RA and DEC axes. During balancing, all accessories must be attached, and for refractors, the focuser should be extended to about 3/4 its length, or for camera lenses, to 2/3 of the focal length. Always maintain a hold on the system to prevent accidental swings.
Polar alignment is critical for long-exposure photography. For the Northern Hemisphere, Polaris is located in the polar scope by adjusting the equatorial wedge. The SynScan Pro App can provide the precise orientation of Polaris based on date, time, longitude, and latitude. Polaris is then moved to the corresponding position in the polar scope using the fine-tuning movements of the equatorial wedge. For the Southern Hemisphere, the four dim stars forming the "Octans" pattern are located in the polar scope and aligned with the "Octans" drawing, moving them to the small circles using the horizontal adjustment knob or by moving the tripod's tilt-head.
The polar alignment process begins by ensuring the mount is level and oriented towards True North/South. The altitude is adjusted using the altitude control knob based on the latitude of the observing location. The "hour angle" of the mount is set so "0" points straight up by rotating the mount on the RA axis, with the DEC axis in the left-to-right position. The SynScan Pro app's "polar scope" utility calculates the required position of Polaris (or Octans) in the reticle, which is then achieved by adjusting the altitude and azimuth screws. The illuminated reticle in the polar scope, activated via the SynScan App, aids in this process.
The Star Adventurer GTi offers multiple connectivity options: Wi-Fi via a smart device or computer, USB via computer, and a SynScan hand controller. For Wi-Fi connectivity, users need to download the SynScan Pro app, connect to the mount's Wi-Fi signal (SynScan_****), and then select "Connect" within the app. For USB connection, the mount is plugged into a computer via a USB Type B cable, and the SynScan Pro app is used to connect. For the SynScan hand controller, an RJ45 cable connects the controller to the mount.
The mount also features a SNAP port for camera remote control, allowing it to trigger most cameras with a remote trigger port. A shuttle release cable (sold separately) connects the camera to the SNAP port. The SynScan Pro app provides camera control options.
The Star Adventurer GTi requires minimal maintenance to ensure its longevity. Regular cleaning involves wiping the mount down with a dry, lint-free cloth. For more stubborn dirt, a damp cloth can be used. It is important not to insert any cleaning devices or jam anything into the electronic ports to avoid damage to the pins or connectors.
Battery care is crucial. Batteries should never be left in the compartment for extended periods to prevent corrosion from leakage. When storing the mount, batteries should be removed and the unit stored in its original box or protective packing to prevent dust, dirt, and moisture damage. When installing batteries, ensure correct polarity to prevent damage and ensure the mount powers up correctly.
During general operation, always disengage the RA and DEC clutches before manually moving the mount to prevent stress on the motors. The rated payload capacity should never be exceeded, as this can cause significant damage. The polar scope borehole should always be covered with the provided polar cover when not in use to prevent small objects from falling inside. The Star Adventurer GTi contains no user-serviceable parts, and any issues should be directed to technical support. An optional column extension is available to raise the mount head for longer telescopes, and it is recommended to disassemble the column extension for transportation to prevent damage.
| Payload Capacity | 5 kg (11 lbs) |
|---|---|
| Tracking Modes | Sidereal, Solar, Lunar |
| App Support | SynScan Pro App |
| Motor Type | Stepper Motor |
| Mount Type | Equatorial |
| Power Requirement | DC 12V |
| Connectivity | Wi-Fi |
| Alignment Method | 2-Star Alignment |
| Interfaces | USB |
| Tripod Compatibility | 3/8" |
| Database | 42, 000+ celestial objects |