4 5
6
5. Operation instruction
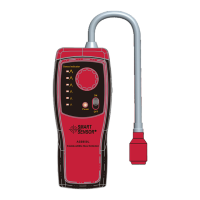
5.1 Turn the unit off and the sensitivity knob fully
counter clockwise.
5.2 Turn the unit on in a non-contaminated atmosphere
by slide the switch to ON, the power indicator
will be lit. Power indicator keep on light show
the battery power is sufficient, it ensure the
unit precise detection.
5.3 After turn on, the unit will auto warm-up within
20 sec, a ticking sound will be heard.
5.4 Adjust the sensitivity control until the first
leak indicator light up, the ticking speed up.
5.5 Approached the sensor to a known leak source,
the leak size indicate lights will increase with
the rapid ticking. Above steps to ensure the unit
working correctly, now the unit are ready to use.
If the battery power in sufficient state but the
sensor approach a known leaks without any
responds, do not use the instrument, please
return for repair.
5.6 In conjunction with the increased tick rate,
the leak size indicator will light from down to
top as a larger combustible concentrations.
5.7 Search the general area of the leak. When
a detectable compound enters the sensor, the
ticking speed up.
5.8 If you are searching for a heavy leak source,
please lower the sensitivity in a clear air by
turning the adjustable knob (until the leak size
indicator turn off).
6. To change batteries
6.1 During operation, if the power indicator is
blinking, it is necessary to change batteries.
6.2 Change the batteries properly, cover battery
door.
Note:
A. Battery must only be replaced in an area known
to be no-hazardous.
B. Turn off the unit when replace the battery.
C. Do not short circuit the metal pieces of the battery.
D. Do not clean the sensor probe to avoid the water,
oil stain, dust entering into probe. (important)
Detect Item
Sensitivity
Response time
Warm-up time
Continuous
operation time
Low battery
indication
Power supply
Working Condition
Storage Condition
7. Specifications
Combustible gas
Variable, minimum 50 PPM
(methane)
Instantaneous
<20 seconds
9 hours (slightly vary with
working condition)
Replace batteries while
power indicator blinks
3*1.5V AA batteries
0 to 50°C; ≤80% RH(Non gel)
10 to 60°C; 0% to 90% RH
8. Cautions
8.1 Do not use the instrument in an area of extremely
high level of combustible gas.
8.2 The gas/vapor of organic solvent might interfere
the function of the unit. During detection, please
eliminate the influence of the organic solvent.
8.3 In order to ensure correct operation and indication,
the unit should be switched on and warm-up in
non-contaminated atmosphere.
4 5
6
5. Operation instruction
5.1 Turn the unit off and the sensitivity knob fully
counter clockwise.
5.2 Turn the unit on in a non-contaminated atmosphere
by slide the switch to ON, the power indicator
will be lit. Power indicator keep on light show
the battery power is sufficient, it ensure the
unit precise detection.
5.3 After turn on, the unit will auto warm-up within
20 sec, a ticking sound will be heard.
5.4 Adjust the sensitivity control until the first
leak indicator light up, the ticking speed up.
5.5 Approached the sensor to a known leak source,
the leak size indicate lights will increase with
the rapid ticking. Above steps to ensure the unit
working correctly, now the unit are ready to use.
If the battery power in sufficient state but the
sensor approach a known leaks without any
responds, do not use the instrument, please
return for repair.
5.6 In conjunction with the increased tick rate,
the leak size indicator will light from down to
top as a larger combustible concentrations.
5.7 Search the general area of the leak. When
a detectable compound enters the sensor, the
ticking speed up.
5.8 If you are searching for a heavy leak source,
please lower the sensitivity in a clear air by
turning the adjustable knob (until the leak size
indicator turn off).
6. To change batteries
6.1 During operation, if the power indicator is
blinking, it is necessary to change batteries.
6.2 Change the batteries properly, cover battery
door.
Note:
A. Battery must only be replaced in an area known
to be no-hazardous.
B. Turn off the unit when replace the battery.
C. Do not short circuit the metal pieces of the battery.
D. Do not clean the sensor probe to avoid the water,
oil stain, dust entering into probe. (important)
Detect Item
Sensitivity
Response time
Warm-up time
Continuous
operation time
Low battery
indication
Power supply
Working Condition
Storage Condition
7. Specifications
Combustible gas
Variable, minimum 50 PPM
(methane)
Instantaneous
<20 seconds
9 hours (slightly vary with
working condition)
Replace batteries while
power indicator blinks
3*1.5V AA batteries
0 to 50°C; ≤80% RH(Non gel)
10 to 60°C; 0% to 90% RH
8. Cautions
8.1 Do not use the instrument in an area of extremely
high level of combustible gas.
8.2 The gas/vapor of organic solvent might interfere
the function of the unit. During detection, please
eliminate the influence of the organic solvent.
8.3 In order to ensure correct operation and indication,
the unit should be switched on and warm-up in
non-contaminated atmosphere.
 Loading...