This product is a detachable stove that was developed exclusively for
outdoor use. Please make sure NOT to use it inside buildings,
vehicles or tents, as there is a danger of death by carbon monoxide
poisoning or oxygen deficiency. Even when using it outdoors in narrow
spaces, make sure that there is sufficient ventilation And always keep
out of reach of children.
Instruction Manual
Main Valve
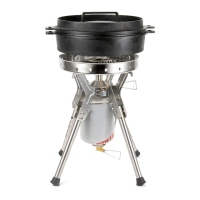
Gigapower LI Camping Stove
Operation
Warnings and Safety Precautions
Thank you very much for purchasing Snow Peak product.
Please be sure to read this instruction Manual for safe and long
Term use of the product, and, after reading it, put it in a safe place
for future reference. If you find anything in the instruction manual
that is difficult to understand, please make sure to contact Snow
Peak before you use product. All cumbustion appliances
created by Snow Peak are required to pass throughgoing burning
tests beforeshipment. Therefore, please understand that there
may be a slight tarnish on the pot support and burner head.
Warning: Mistaken use of the product could result in serious
injury or death to the user.
Caution: Mistaken use of the product could result in the danger
of injury to the user or give rise to damage of equipment.
This product is designed to achieve high performance output with
longer time. Therefore its output is extremely high compare with
other camping stove and consumes more oxygen and fuel. For
your safety, please readthis manual instruction carefully and
understand well before using.
Be careful not to change the shape
Warning:
of the generator pipe under any circumustance.
Names of Parts
Burner Head
Wind Screen
Pot Support
Button
Lock
Storage
Condition
Leg Length
Height
Adjustment
Position for
normal use
Main Valve
Spindle
Lever for
securing the fuel
canister
Button Lock
A leg set
B leg set
Flame Control Valve
Specifications
Product Name
Model
Canister Stove (Detachable Type)
External
Dimensions
Stowed
During Use
Maximum Pot Size:
12” Diameter, or
10L Capacity Volume
Weight
Gas Consumption
Heat Output
Compatible Fuel Canisters
Gas consumption and heat output is measured and calculated
in accordance with In-house testing methods.
Set Up
Press the button lock on the folded A Leg Set, rotate the leg and
set them in place through it sounds locking sounds on the way.
Rotate Leg B in the same way.
A leg set
B leg set
Button Lock
Button Lock
Revolve the legs about 100
degrees to set them in place.
Revolve the legs
about 120 degrees
to set them in place.
Press the button locks to adjust the length of
legs to the required length (under normal
condition, extend the legs to their full length).
On uneven ground, adjust the length of the
legs in order to set the pot supports level on
the holizontal place.
Pot supports revolve, making to fit them to the
size of pot.
Revolving the pot supports
to correspomd to the size
of pod to be used.
2.
1.
3.
4.
5.
Viewing from the front of the valve at
the end of the hose, revolve the valve
clockwise until it stops and check to
ensure that it is completely shut off.
Revolve clock-
wise to turn off.
Fuel
Canister
WARNING: When mounting the fuel
canister, check to make sure that the collar
assembly threads are in line with those of
the canister and that the O-ring is not
damaged or out of place. If anything is out
of place, do not mount the gas canister.
CAUTION: A small amount of gas may leak
out while mounting and/or dismounting
the gas canister. Make sure to mount and
dismount the gas canister in a well
ventilated area and with plenty of distance
from any flame source .
Fuel
Canister
Collar
Assembly
Main
Body
Fuel Canister
Attchment
Groove
Fuel Canister
Setting Lever
1.
Handles or other areas on cookware may be damaged under
long cooking times with a high output flame. Do not let the
flame width exceed that of the cookware.
1.
Viewing the flame control valve on the main
body from the front, revolve the valve clockwise until it stops and
check to ensure that it is completely shut off.
2.
Facing the valve of the fuel canister upward, fit
the threading of the fuel canister to the threading
of the main valve of the hose. Viewing the canister
from its base, revolve it clockwise until it stops.
Ensure that the canister is securely sealed the
main valve, but do not over tighten. Confirm that
no gas is leaking by listening for any signs of
escaping gas and smelling for any gaseous odors.
3.
When the fuel canister is connected completely to
the end of the hose, revolve the setting lever to the right.Flip the
canister upside down and insert the protruding parts of the canister
grooves (2 grooves) into the main body of the stove and release the
setting lever spring. The tension of the setting lever spring will
naturally return the lever in place. Tighten until the canister does
not wobble. Check to ensure that everything is firmly and properly
connected.
Lighting the Stove:
Viewing the flame control valve from the front, revolve it in the
counter-clockwise direction (to the left). Turn about 90 degrees.
Insert the ignition device into the ignition hole at the bottom of
the wind screen. Revolve the flame control valve slowly in the
counter-clockwise direction until the burner head is lit. A few
seconds after ignition, the generator will warm up and the gas
flame will stabalize.
Wind
Screen
Ignition
Hole
Ignition
Hole
Ignition
Device
Flame Burner Head
4.
Warning: When lighting the stove, keep your face, hands
and body well away from the area directly above the burner head
to avoid risk of burns as the flame leaps up when lit.
Warning: Always light the burner through the ignition aperture.
Warning: The larger the volume of gas being emmited from the
stove, the greater the intensity of the flame, and greater consequent
risk of fire related dangers, during ignition.
Check to make sure that the
ignition device has reached the
side of the burner head.
Caution: When lighting the stove, check to make sure that
there are no easily flammable items nearby.
1.
Warning: When lighting the stove, use an ignition device
(matches or lighter) to light the stove at the flame opening.
Warning: There are times when it is not possible to carry out
ignition smoothly, particularly when in hot weather which causes
the pressure inside the fuel canister to rise in cold weather which
prevents the gas from converting into mist. In such cases, stop
the ignition process and start over again, this time use some
ignition device that produces flames.
Caution: When lighting the stove, check to make sure that
there are no flammable items in the nearby area.
Adjusting the flame:
Revolve the flame control valve slowly in a counter clockwise
direction (left revolution) for a larger flame and clockwise for a
smaller flame. Revolve the flame control valve slowly.
2.
Extinguishing the flame:
Revolve the main valve slowly clockwise (right revolution) until it
stops. Check to make sure that the flame is completely
extinguished. Then, revolve the flame control valve of the stove
slowly clockwise (right revolution) until it stops.
3.
Check to make sure that the main valve and the fuel
control valve control are completely shut off.
1.
2.
Detaching Fuel Canister
Storage
Revolve the A leg set and the B leg set in the opposite direction
from when assembling the stove, and fold them securely into
place.
Precautions for Use
Inspection and Care
Troubleshooting Chart
After Services and Repair
Never use the stove for any purpose other than cooking.
Remove any dirt, dust or debris on the stove before use as they
make clog the apparatus. Always keep the fuel adjustment
control clean, and be careful never to put it on the ground or
Revolve the fuel canister setting lever to the right and
detach the fuel canister. Then, holding the canister upright,
detach the main valve and the fuel canister from each other.
After detaching the fuel canister, make sure to put its cap back
on before storing it.
1.
Caution: Never use a stove that leaks gas, or that has
received a shock, or that does not function properly.
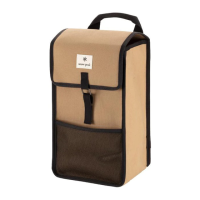
Be careful to unwind all twists and kinks in the hose, particularly
near its ends. Then store it in the case.
1.
2.
3.
Damage resulting from natural deterioration of materials over
time.
Malfunction resulting from misuse or rough handling of the
product.
1.
2.
Malfunction resulting from handling of the product in a manner
that is prohibited in the instruction manual.
3.
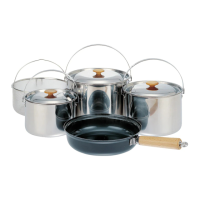
Choose cookware of up to 12” in diameter and 10 liters in
volume for use on the stove. If the cookware is too large, there
is a danger of instability on the stove.
4.
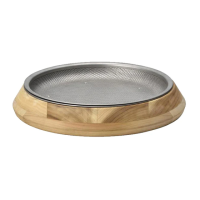
During the cooking process, heat emitted from the cookware
will cause the bottom to become very hot, so use a heat
reflector, such as a burner sheet, under the cookware.
5.
The temperature of the air and/or fuel canister will cause
changes in gas pressure, resulting in changes of combustion
conditions (conditions of the flame intensity, power, etc.).
6.
A strong wind may cause the flame to go out. Always keep a
close watch on the stove when in use.
7.
If any abnormal combustion occurs, immediately extinguish the
flame and stop using the stove.
8.
Metal parts near or in direct contact with the flame will scorch
and change color with use.
9.
If you smell gas, do not light the flame under any circumstanc-
es. Extinguish all flames and fires, and detach the fuel canister.
10.
Carry out regular periodic inspection and care.
Check to make sure that the stove is operating properly before
use.
1.
2.
If the burner head gets dirty, wipe clean with damp cloth.
3.
Never use the stove if it is damaged or there is any sign of
dysfunction.
4.
Never attempt to make repairs on your own. Make sure to
return the stove to your dealer or to Snow Peak to handle
repairs.
5.
Use of non-approved
fuel canister
Fuel Canister does not
mount on the burner
Flame extinguishes during
operation
Damaged fuel canister
thread
Damaged collar
assembly
Improper mounting of
fuel canister
Use of a designated Snow
Peak fuel canister
Replace the fuel canister
with a new one
Request inspection and
repair
Make sure that the fuel
canister is mounted correctly
Request inspection and
repair
Replace the fuel canister
with a new one
Wipe carefully with a piece
of cloth to avoid breakage
Request inspection and
repair
Defective spindle
Defective fuel canister
Clogged burner head
Clogged Nozzle
Gas leakage
Stove will not ignite
Low heat output
Uneven flame
Flame does not extinguish
Symptoms
Causes
Please check through the above symptoms and causes, and if
malfunctions persist or the cause is not clear, contact the retailer
where you purchased the product or the home offices of Snow
Peak.
Snow Peak makes every effort to ensure that all products operate
properly, so if a product is found to be defective, contact the
retailer where you purchased the product. If it is determined that
the cause was a production defect, the product will be repaired or
replaced free of charge. Otherwise, it will be repaired at a
reasonable charge. Please note that it may not be possible to
repair a product under the following circumstances.
MADE IN KOREA
For question or concern s
c ontact t h e Snow Peak
Customer Service Department.
Snow Peak USA Branch
+1503-697-3330
(9:00~17:00)
Email: info@snowpeak.com
Outdoor Use Only
D 13.8 H 16.5 in
D 9.5 H 8.1 in
4.0 lbs(1800g)
34000 BTUs
25oz (708g) / h
Snow Peak designated fuel canisters only.