SNMP Card II - Ref.: QSGSNMP2XX02-XX 00
3
简体中文
使用Upgrade实用程序查找IP地址
1 将网络电缆连接到SNMP卡上的网络连
接器,确定10 Mbps或100 Mbps LED
在必要时闪烁。
2 使用连接到和SNMP卡所处的同个子网
络的Windows PC启动Upgrade Utility.
exe实用程序。
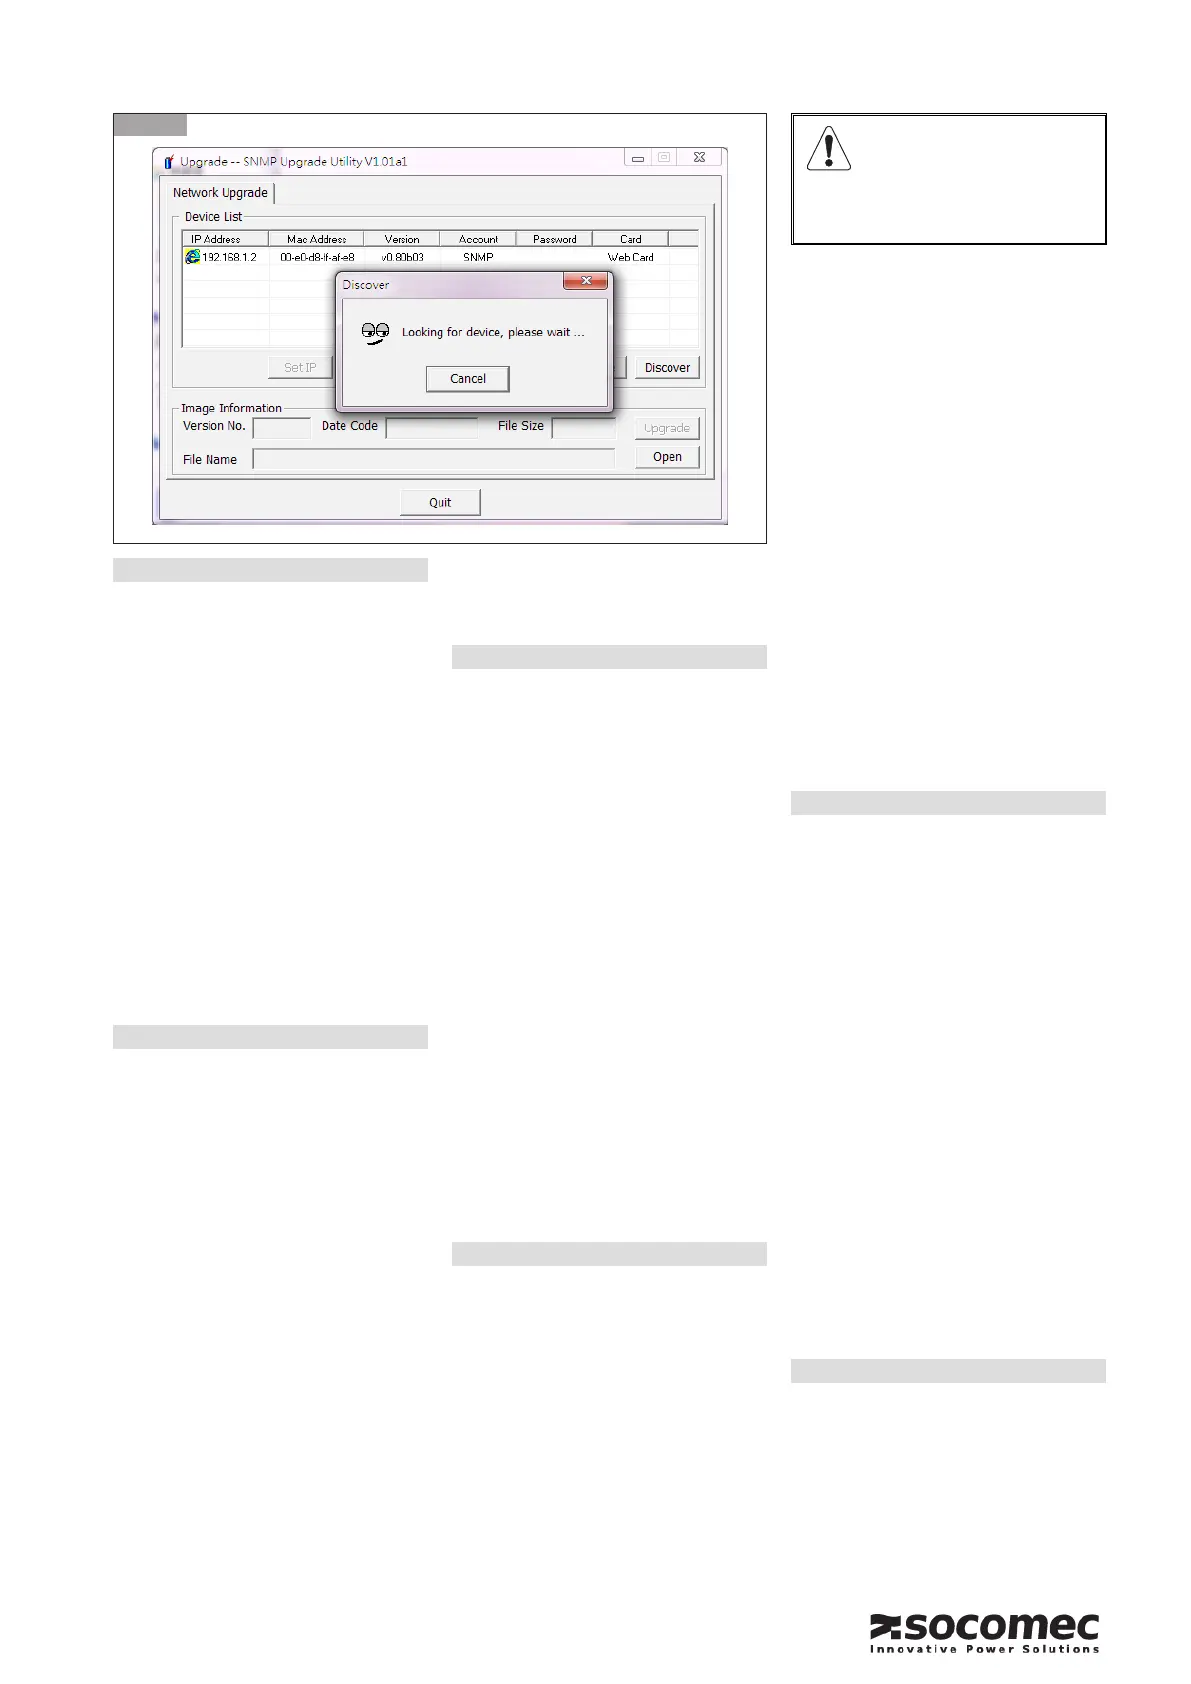
3 单击 “Discover” [搜索]按钮。几秒后,将
显示连接到该子网络的所有SNMP Card
II接口的列表(每个接口具有其本身的
MAC地址)。从列表中选择SNMP Card
II然后单击
«Browse»
(请参阅图3)。
4 当浏览器提示时,输入登录名和密码
详细信息。
5 使用您的浏览器配置SNMP卡。有关
配置的详细信息,请参阅用户手册。
6 如有必要,可更改IP地址、子网掩码和
DHCP配置
单击”SET IP”
。
DEUTSCH
Herausfinden der IP Adresse mit der
1 Schließen Sie das Netzkabel an die
SNMP Karte an und stellen Sie sicher,
dass die 10 Mbps oder 100 Mbps LEDs
wie angefordert blinken.
2 Benutzen Sie einen Windows PC, der
an das gleiche Subnetz angeschlossen
ist wie die SNMP Card II Karte, um die
Upgrade Utility.exe zu starten.
3 Klicken Sie die Taste “Discover” an. Nach
einigen Sekunde wird die Liste aller SNMP
-
nen MAC Adresse) angezeigt, die an das
Subnetz angeschlossen sind. Wählen
Sie die SNMP Card II aus der Liste aus
und klicken Sie die
«Browse»
an (siehe
Abbildung 3).
4 Geben Sie Ihr Login sowie das Passwort
ein, sobald Sie vom Browser dazu
aufgefordert werden..
5
Benutzen Sie Ihren Browser zur
Konfiguration der SNMP Karte. Weitere
Konfigurationsdetails finden Sie im Handbuch.
6 Bei Bedarf ändern Sie die IP Adresse, die
Subnetz-Maske und die DHCP Konfiguration
Klicken Sie die Taste ”SET IP” an
.
ESPAÑOL
Averiguar la dirección IP con la utilidad
Upgrade
1 Enchufe el cable de red al conector de
que parpadean los LEDs de 10 Mbps o
2 Utilice un PC con Windows conectado
Card IIpara iniciar la Upgrade Utility.exe.
3 Haga clic en el botón “Discover”. Después
de unos segundos, aparecerá la lista de
todas las interfaces de SNMP Card II
(cada una con su propia dirección MAC)
conectados a la subred. Seleccione la
SNMP Card II de la lista y haga clic en el
botón
«Browse»
(véase la figura 3).
4
Cuando el navegador lo solicite, introduzca
el nombre de usuario y la contraseña.
5
Utilice su navegador para configurar la
la
configuración en el manual del usuario.
6 Si es necesario, cambie la dirección IP, la
máscara de subred y la configuración DHCP
Haga clic en el botón ”SET IP”
.
FRANÇAIS
Trouver l’adresse IP à l’aide de l’utilitaire
Upgrade
1 Branchez le câble réseau sur le connec-
teur réseau de la carte SNMP et
2
Utilisez un PC sous Windows raccordé au
même sous-réseau que la carte SNMP
Card II pour lancer Upgrade Utility.exe.
3
Cliquez sur le bouton
“Discover”
. Après
quelques secondes, la liste de toutes les
interfaces SNMP Card II (chacune avec sa
propre adresse MAC) connectées au sous-
réseau s’affiche. Sélectionnez le SNMP
Card II dans la liste et cliquez sur «Browse»
(voir Figure 3).
4 Lorsque votre navigateur vous y invite,
saisissez l’identifiant et le mot de passe.
5 Utilisez votre navigateur pour configurer
la carte SNMP. Veuillez vous reporter au
manuel d’utilisation pour les détails de la
configuration.
6 Au besoin, modifiez l’adresse IP, le
masque de sous-réseau et la configura-
tion DHCP,
cliquez sur le bouton
”SET IP”
.
ENGLISH
Finding out the IP address using the
1 Connect the network cable to the
network connector on the SNMP card
and make sure the10 Mbps or 100
Mbps LEDs are flashing as required.
2 Use a Windows PC connected to the
same sub-network as the SNMP Card
II card to launch the Upgrade Utility.exe.
3 Click the
“Discover”
button. After a
few seconds, the list of all SNMP Card
II interfaces (each with its own MAC
address) connected to the sub-network
will appear. Select the SNMP Card
II from the list and click the
«Browse»
button (see figure 3).
4 When prompted by your browser, enter
the login and password details.
5 Use your browser to configure the
SNMP card. Refer to the user manual
for configuration details.
6 If necessary, change the IP address,
subnet mask and DHCP configuration
click the button
”SET IP”
.
ITALIANO
S
Upgrade
1. Collegare il cavo di rete al connettore
network della scheda SNMP e verificare
il corretto lampeggio dei led 10Mbps o
100Mbps
2. Da un PC windows collegato nella
stessa sottorete della scheda SNMP
Card II lancaire l’utility Upgrade Utility.
exe
DEFAULT SNMP CARD II
CONFIGURATION
USERNAMESNMP
PASSWORDadmin
 Loading...